This is an old revision of the document!
Table of Contents
CALENDAR
Click on CALENDAR icon to get your flights, maintenance or reservations displayed as calendar duties. By using left-hand side filter you can define the view by modyfing options in 3 tabs: Schedule, Aircraft & More.
Description


Each flight appears as a belt: flight confirmed (green) or an option (striped)  with the informtaion such as:
- Schedule times
- ADEP/ADES airports codes
- FERRY/PAX number
- OPS/Sales checklist status
- Crew
If you hover the mouse over STD, STA, ADEP or ADES - Leon also shows a tooltip with Flight number & Trip number (apart from other details such as changes history or airport details). You can check an aircraft phone number by hovering the mouse over aircraft registration (phone number needs to be inserted in aircraft profile page, section Fleet).
In this section you can add a flight in 2 ways:
- By using
 button located at the bottom of the page
 - By right-clicking the mouse on the square which will bring
 button.
If you hover the mouse over CREW, assigned crew will show up information such as:
- Crew name/surname and the aircraft position.
- Contact details (if inserted into crew profile).
- Warnings about expired currency, endorsements, airport discontinuity or FTL violations - click 'Crew & Endorsements' to expand the list of details.
If crew have been changed, Leon shows a blue belt on top of the rectangle - when you hover the mouse you will get an information about who changed who (see below).


Each rectangle has a background which indicates a stage of realisation of a particular flight or operation. Colour codes are described below:
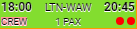 - Flight is confirmed
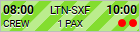 - Flight is not confirmed (option)
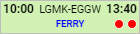 - Ferry flight confirmed
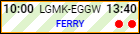 - Ferry option
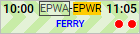 - Opportunity (more information here)
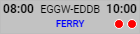 - Flight is completed (Journey Log has been added)
 - Cancelled flight
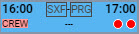 - Non-Commercial flights such as Crew Private, Technical flight, Training flight and Flight for owner
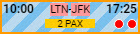 - Non-Commercial flight is not confirmed (option)
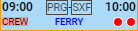 - Non-Commercial ferry flight
 - Any type of aircraft reservation
 - Reservation option
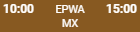 - Maintenance
 - Maintenance option
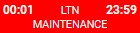 - AOG maintenance


It is possible to print or send documents from documents pop-up window. As you can see in the attached screenshot Leon gives you an option to send (envelope icon) or print (printer icon) marked documents either per Leg or per Trip by clicking on the icon by the main section (OPS, SALES). In this case at least one document has to be ticked in order to make the icon by main section active. If you hover the mouse over any available document Leon will also display both icons next to the document. This will allow you to send or print a document individually.
If you are sending OPS documents Leon will automatically populate e-mail addresses of the Crew assigned to this flight. E-mails are taken from Work email in User Profile section. From email address is imported from work email of the person sending the documents.
For SALES documents, From e-mail addresses, Subject and E-mail body are imported from 'Quotation Email Templates' Settings. There, you can also upload additional files that can be sent along with standard sales documents. If you are sending all SALES documents in one email, Leon will only suggest From and To e-mails and also the Sales documents will be attached.
After sending SALES documents, Leon will display the “Last sent” date in the document menu (see the screenshot below) underneath sent document. This will only show when you hover the mouse over the document. You can click on the date and Leon will display sent document.

It is also possible to mark number of legs of the same trip. It will allow you to print flight documents, and use additional options such as Show crew and Schedule as well as Notify Crew, for these particular selected legs.
In order to select multiple legs you have to hold the Ctrl button and click on the flights of your choice. As you can see in the screenshot all the selected legs will display with the dotted line.
If you try to print documents for the flights assigned to 2 different aircraft, Leon will display error message: More than 1 aircraft selected.
Reservation

To add a new reservation from Calendar section click New Reservation button (at the bottom of the screen), or right-click the mouse and select 'ADD RESERVATION' link and insert details in the right-hand filter, such as: name, aircraft, airport, status, date & time, client, notes). Notes inserted into the Reservation will appear in a pop-up window when you hover the mouse over it.
There are 7 default types of reservations:
- Reservation
- No crew
- No charter
- Owner's approval
- Crew on request
- 36 hrs crewrest
When one of the above types is selected it appears in the Calendar/Timeline. However, it is possible to input any name of the reservation manually and it will overwrite selected type.
Once it's added it will appear in sections CALENDAR and TIMELINE, as well as in Sales > Calendar. You can always click any reservation and change its details.


To add a reservation from a section Sales > Calendar click ![]() on a selected day, right next to the date. The new window will come-up and mandatory fields like: aircraft type, registration, airport, date & time - all these fields need to be filled in. You can also add the name of the reservation, client, type of reservation and notes.
on a selected day, right next to the date. The new window will come-up and mandatory fields like: aircraft type, registration, airport, date & time - all these fields need to be filled in. You can also add the name of the reservation, client, type of reservation and notes.

![]()

Filter
The filter in the Calendar panel is very similar to the one in the panel Table with the difference explained below.
Tab SCHEDULE
- Show on schedule - select which type of activities should get displayed: flights, maintenance, reservations.
- Sort aircraft by - there are 5 ways you can group flights in the table view: MTOW Ascending, MTOW Descending (defined in Fleet section), Registration, Pax capacity, ICAO home base (also defined in Fleet).
- Layout - an option to view aircraft either vertically or horizontally.
- Flight type - select which type of flights should be displayed.
- Commercial type - option to see either 'Commercial' or 'Non-commercial' flights, or both.
- Flight status - shows confirmed and/or not confirmed flight (options).
- Show - you can narrow your view by excluding ferry, cancelled or terminated flights.
- Preferred airport code - select ICAO or IATA codes.
- Preferred time zone - select between UTC, LT and Base Time.
Aircraft

Aircraft panel allows to define for which tails Leon should show flights in a section OPS. On the options-bar click  (where circled-blue is the number of active tails) and Leon will show a new poop-up window, where you can mark/unmark particular tails.
Use 'Filter' or 'Sort by' options to chnage the order of tails in the Calendar panel. You can also chnage the order by drag & dropping the tail in the pop-up window.

Tab MORE
Options are the same as in section TABLE.
VIEW SETTINGS filter

Each Leon user can define his own view of the schedule list. It is possible to add or remove columns, decide if ACFT or Flight number should appear with a colour, if Leon should show any warnings, cautions or notices and to define preferred airport code as well as timezone.
If any of the warnings, cautions or notices have applied, Leon will highlight aircraft registration in red, yellow or white respectively.
To access the panel click ![]() icon in top-right corner of the screen.
icon in top-right corner of the screen.
Columns
Leon allows to add more columns to the overall schedule view (apart from the default ones, such as: FW & JL, Flight No., Day, Date, STD, ADEP, ADES, STA, ACFT, PAX, Tags) - click 'Columns' and mark appropriate checkbox, then click 'APPLY'.
Colours
Here you can define if Leon should colour Flight No. column and/or ACFT column, as well if Leon should dim ferry legs. By marking a checkbox Entire leg row Leon will colour an entire row, either with the flight type colour (if 'Aircraft colours' checkbox is left unmarked), or with an aircraft colour (if 'Aircraft colours' checkbox is marked). If both checkboxes (Flight type & Aircraft colours) are marked - Leon will show an aircraft colours as this colour has priority over flight type one.
Warnings
All warnings in Leon are displayed in red. Here, you can mark particular (or all) checkboxes and if i.e.:PAX passport is expired, crew FTL violated or crew endorsement is expired - Leon will show PAX number value in red  just like crew codes. User can hover the mouse over the alerted item to see details.
Cautions
Here you can mark checkboxes for particular cautions, i.e.: PAX passport missing, Airport cat B or HIL restriction, which Leon shows in the Table page in yellow  Hover the mouse over the alerted item to see details.
Notices
Notices are dislpayed in the Table page in white  and can be turned on for items like i.e.: Airport note, Flight diverted or Aircraft documents expired.
Hover the mouse over the alerted item to see details.
and can be turned on for items like i.e.: Airport note, Flight diverted or Aircraft documents expired.
Hover the mouse over the alerted item to see details.
Preferred airport code
Switch between ICAO & IATA airport codes to be displayed in the OPS section (Table, Calendar or Timeline).
Timezone
Here you can choose if Leon should show STD & STA times in UTC, LT (at ADEP/ADES airports) or Base Time (defined in an user's profile).
Day Note in Calendar view
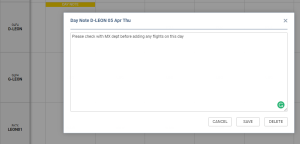
It is now possible to add a Day Note per aircraft in the Calendar section.
To add a Day Note follow these steps:
- Choose a specific day and aircraft in the Calendar view you would like to add a Day Note for.
- Right-click the mouse within this tile to open the dropdown list.
- Choose 'Add Day Note' option to open the edit window.
- Insert the note and press 'SAVE'.
- Once saved, it will display as
 within the particular tile, it was added to.
Hovering the mouse over the ![]() will display the text of the note in the tooltip.
will display the text of the note in the tooltip.
You can also edit and delete the flight note. The process is similar to the one when adding a note. You simply right-click the mouse and choose 'Edit Day Note' option. Edit window will contain both EDIT and DELETE button.
The 'Day Note' doesn't feature anywhere apart from the 'Calendar' view in the OPS.
See also: