This is an old revision of the document!
Table of Contents
Crew Panel
The new Crew Panel has been implemented for fast, legible and intuitive reading & editing of the roster. It displays all the data you need for the perfect planning of duties for the crew.
To access a new duties roster hover the mouse over a section CREW and click CREW PANEL.
Legend
The Legend, which explains what particular icons or indications mean, can be found by clicking the icon ![]()
- Flights
Flights added in a section OPS appear in Crew Panel as a blue belt. The line starts with the reporting time, then there is a belt (which lenght means flight's duration), then the line showing the lenght of the minimum rest.
If you click the blue belt at the bottom belt Leon will show flight's details, such as: schedule, airports codes & names, trip no, crew, quotation, who created the trip and when, tags.

If there is FTL violation Leon shows the line in red - click on the flight to get an information at the bottom with FDP & Duty details.

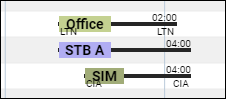
- Simulators
When the Crew is assigned to the Simulator flight in section OPS, this 'Simulator' will appear in 'Crew' part of the 'Crew Panel'.
The Simulator will display as a purple belt and will indicate the length of the duty as well as the line suggesting the EOBT.

Clicking on the purple belt will display the simulator details in the bottom section.
- Positionings
All positionings added in a section OPS show in a similar way to flights. The belt shows the positioning's duration, then the line shows the lenght of the minimum rest.

- FTL Duties
Duties pre-defined in a section Duties Setup as Included in FTL calculations show as colour belts, which lenght means the duration of a particular duty time.
- Non-FTL Duties
All duties pre-defined as Off show as belts throughout the entire day.

Filter


The filter in the 'Crew Panel' section is divided into 3 sections:
- Person - you can filter duties by using 2 available options:
- Crew member - insert crew code and click the 'Search' button - Leon will show only that person's duties. It is also possible to filter by multiple crew members. Simply choose the crew from the Crew Member search box and once you have the list of crew click 'SEARCH' button.
- User labels - click on the field and Leon will show all crew labels defined in a section Phonebook > Labels (then assigned in crew profiles).
- Aircraft - you can filter the page by the aircraft type or a tail registration.
 - located in the top-right corner of the 'Crew Panel' and devided into the folloting sections:
- Show - to display scheduled Maintenance and Options in the 'Flights' section
- Position type - mark/unmark checkboxes: Cockpit, Cabin, Maintenance, Ground & Positioning.
- Show active aircraft only - switching to 'YES' will display only active aircraft in the 'Flights' section
- Layout - to display 'Crew' section only, or on both: 'Flights & Crew'
- Dim ferry legs - making ferry legs dimmed
- Preferred airport code - selecting between ICAO/IATA airport codes
- Sort by - display the list of crew in order: Rating (CPT, FO, FA), Known as or Code (alphabetically)
On the options-bar, right between 'TO' date-range and 'NOW' button, you can find a drop-down box where you can select preferred timezone (UTC or Base time - the Base defined in General Settings).
Adding/Editing Crew

It is possible to add new Crewmembers or edit existing Crewmembers directly from the “Crew Panel”.
In order to do that you simply need to:
- Right-click of the mouse on the Crew code
- Choose the relevant option from the dropdown menu
- Adding/editing window will pop up and you will be able to perform the actions
- Press “SAVE” button to update changes
Assigning crew to flights

To assign crew to a flight you need to:
- Choose a flight and click a key 'A' on the keyboard, or right-click the mouse to open a selection menu. Here you can choose more than one flight by holding 'Ctrl' button on your keyboard and clicking on the flights to which you would like to assign the crew.
- Choose 'Assign Crew' option.'ASSIGN CREW' pop up window will opem. It is divided into 3 tabs: COCKPIT, CABIN and OTHER
- Click on the crew you would like to assign. The crew listed are the ones available in the base, the default base will reflect the airport of departure of that particular flight, if there are no crew based in that airport All bases will appear. The list of bases is sorted based on the number of crew placed in each base with the largest on top. Only crew with ratings for the chosen aircraft will appear. Each crew will also display the accumulated month/year block time. If a particular crew member has more than one rating and is assigned - the code is circled
 , the same crew code on another rating inactive - you will not be able to click on the code
 - Once you have assigned the set of crew, click save.
Before you assign Crew, Leon will indicate:
 - crew already assigned to this flight
 - crew assigned to OFF duty
If there is a large number of crew within one tab, Leon will display '…show more' option that allows uploading the remaining crewmembers.
Leon remembers the last tab that was opened upon following reopening it, even on a different flight. If the last tab opened was 'OTHER', Leon will revert to the previous tab, either 'COCKPIT' or 'CABIN', that was used before the tab 'OTHER'
When assigning crew to the flights, Leon recalculates the FTLS's.


Leon also will suggest FTL calculations by highlighting the crew tile with the following colours:
 - FTL within limits
 - rest before the flight violation, not enough rest to perform this flight or series of flights
 - FDP violation on the flight
Leon displays block times within the crew tile, the top figure being monthly block time and the bottom figure being the yearly block time.
Double-click on a flight will display Crew assigned to this particular sector along with the phone number & email address.
The colour-code in the flights-part of the Crew Panel are as follow:
 - flight fully assigned
 - flight ferry fully assigned
 - flight partially assigned
 - flight without crew assigned
It is also possible to assign Crew to Option flights. The colour-coding is a per below:
 - option fully assigned
 - ferry option fully assigned
 - option partially assigned
 - option without crew assigned
'Discontinuity' and 'Time collision' warnings
Leon will now display 2 types of warnings in the assign crew pop-up window:
- Discontinuity detected - if you try to assign a crew member to 2 flights with the airport discontinuity between the sectors. This is to suggest that the positioning needs to be added
- Time collision detected - if you try to assign a Crew member to 2 flights that are overlapping each other
You can also change the crew on a flight or a number of flights. To do so, you need to follow the steps from assigning crew section.
Copying crew between the flights

If you wish to assign the same crew to the next sector or series of sectors, it is possible to copy the crew by left clicking on the flight from which the crew should be copied. Then select Copy Crew or use shortcut C and select the next sector/sectors to which the crew should be copied and select Paste Crew or use shortcut V.
In order to copy crew to more than one sector it is necessary to hold Shift or Ctrl key while selecting the sectors to which the crew should be copied.
Once this is done the Assign flight crew pop-up window will appear with the entire crew already selected. At this point it is possible to deselect some of the crew members.
Deleting the crew from flights

It is possible to delete the crew from the flights section or the crew section of the Crew Panel.
To delete crew you need to:
- Choose a flight or number of flights and right-click the mouse to open a selection menu.
- Choose 'Delete Crew' option.
- You will be asked to confirm.
- Pressing 'YES' to delete or 'NO' to discard.
Useful options

'Move up' function
This functionality allows you to move a selected Crew member to the top of the Crew List. To use this function you need to click on the crew member and select 'MOVE UP' option, as per screenshot. It is possible to move up a number of crew members, one at a time. The Crew members will then display by the selection order in which they were moved.
Crew search
In the filter > field 'Crew member' type crew name/surname or code and select him from the list. You can add more name to the searching list. You can also use quick search option by clicking on a key 'F' on your keyboard, type in the Crew member in the 'Crew member search' pop-up window and press enter. Leon will only display this particular Crew member.

To bring back view for all the crew you need to either remove the Crew from the 'Crewm Member search' in the filter or simply 'Reset' the filter.
Duty info
It is possible to view duty information in 2 ways:
- One click on the duty - this will display the duty information at the bottom of the Crew Panel Page.
- Right-click - this will open a pop-up window with the full duty information including the duty type and who created the duty and when (date & time).
Using keys
For quick using of some options in Crew Panel you can use particular keys on the keyboard. Select the flight and use keys as follow:
- A - shows crew available for flight assignement.
- S - shows already assigned crew on top of the crew list.
- D - shows assigned crew details (position, code, name/surname, phone number & email address) along with the basic trip information.
- F - shows 'Crew member search' pop-up window where you can type crew name or a code and view only his/her duties.
FTL Details

To check FTL Details on a particular flight either double-click on the flight (in the Crew part of the screen), or right-click with the mouse and select FTL Details - Leon will show a pop-up window which is divided into 2 parts:
- Duty & FDP Sectors - showing reporting on, STD, ADEP, ADES, STA and reporting off plus rest before & after duty.
- FTL Calculation Summary - showing the same FTL details which you can find in a section OPS, tab CREW > FTL Calculations. Hover the mouse over Rest, FDP or Duty values to find explanations why these values have applied.
Click on 'View FTL Sheet' to get FTL Sheet report.
Adding duties
To add a duty mark a day, right-click with the mouse and select either ADD DUTY or QUICK ADD DUTY.

Add Duty

An option 'ADD DUTY' shows a drop-down box with all duties (pre-defined in a section Settings > Duties Setup), select a needed one and fill a new pop-up window in with details. If the duties are set up Per Acft Type in Settings > Duties Setup the added duty will apply for all tails of that type.
You can also add multiple crew members to the same duty by selecting relevant names in the drop down list in the editing window.
Choice of date frame available in 'ADD DUTY' function:
- if you want to add a series of repetitive duties you need to choose 'From' and 'To' dates as well as the timeframe and click on 'ADD' button
- if you want to add a single duty, do not change the date frame and set the duty times in the timeframe. Click 'ADD' button to save the duty
- if you want to add a single duty passing over midnight, do not change the date frame and in the timeframe insert the 'From' time before midnight and 'To' time after midnight. For example, if you want to set a duty to start on 7th Jun at 18:00 and finish on 8th Jun at 06:00 you simply set both dates to 7th Jun and set the 'From' time to 18:00 and 'To' time to 06:00
![]() You can now add duties which cross midnight. Be aware that in the old crew roster Leon will show such duties on the day of the duty start.
You can now add duties which cross midnight. Be aware that in the old crew roster Leon will show such duties on the day of the duty start.
Leon shows times in BT - Base Time - base/bases are defined in a section Settings > General Settings. Every crew can be assign to a certain base and that base's timezone shows on top of the page (between date 'TO' and an icon 'NOW').
Quick add duty

An option 'QUICK ADD DUTY' is a quicker way of adding duties. Hover the mouse over it and Leon will show all pre-defined duties along with their colours. It is more suitable for 'OFF' types of duties, as Leon does not show a pop-up window where you can add details - Leon adds duties with default times (previously defined in a section Duties Setup).
Click NOW on top of the page to get displayed a green line with the current Base time (base defined in Settings).
Crew Duty Requests
If the duty is requested by a Crewmember it will be presented as a duty with the red duty label:

To accept or reject the request Crew Planner has to either add this requested duty or override the duty.
Crewmembers can only request the duties via their mobile applications subject to the privileges provided.
Editing duties

Leon allows you to edit existing duties. It is possible to edit the airport, time, and date of the duty. It is also possible to add/delete crew members to the duty. In order to edit a duty you need to:
- Right-click the mouse on a particular duty. A pop-up menu will open
- In a pop-up menu click on 'Edit duty' option
- 'Edit duty' pop-up window will open, where you can change the duty details
- SAVE changes to overwrite the duty details
It is not possible to change the duty type while editing. You need to delete existing duty first and then add a new one.
Deleting duties

Leon allows to delete multiple duties across different dates and different crew members. Just hold Ctrl key select duties to be deleted and right click the mouse and select Delete Duties. You can also use Shift key to delete multiple duties for one crew member.
The process of deleting duties is very similar to editing duties:
- Right-click the mouse on a particular duty. A pop-up menu will open
- In a pop-up menu click on 'Delete duty' option. The confirmation question will display
- Pressing 'YES' will remove the chosen duty, 'NO' will switch off the validation.
Publishing drafts

Once you have added crew to flights, added all duties, made all changes - Leon will mark it all (duties) with pink background indicating it is not visible to the crew and it needs to be published.
To be able to publish added duties you need to set up a drop-down 'Crew Panel' to Manual Publish, in General Settings section of Leon. Setting it up to Auto publish will make all added duties will be published to crew automatically.

When you are ready to publish changes, click ![]() and Leon will show a pop-up window where you can select a time range and crew members.
and Leon will show a pop-up window where you can select a time range and crew members.
After clicking 'Publish' you will see the progress bar and after a few seconds publication will be completed.
Deleting draft for one user
It is possible to clear draft for one Crewmember.
In order to do it:
- right-click with your mouse on Crew code
- select 'CLEAR DRAFT CHANGES FOR …' from the list
 option will display
- click 'YES' or 'NO' button for relevant action
IMPORTANT! Selecting 'YES' will remove all the planned duties.
Duty notifications

It is also possible to notify the Crew when the roster or the changes to the roster are published.
In order to do that you need to check the SEND NOTIFICATIONS button that is located at the top of the Crew Panel View.

Once it is checked and the duty is added or published if such option is switched on, Leon will send the notification to the Crew 6 minutes after the task is completed.
The email notification will look as presented in the screenshot and will have the 'Work Schedule' pdf attached.
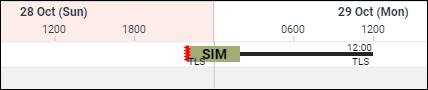
Airport/Crew Discontinuity
Leon will now mark the flight block with a red zigzag line if the last airport of landing does not correspond with the next airport of take off. This will indicate that aircraft repositioning needs to be added. Analogical situation will happen with the crew section if the airports between last and next duty do not correspond. This will indicate that crew positioning needs to be planned between the two duties.

Add Positioning
To add positioning in the Crew Panel - either before the planned sector or as a stand-alone positioning - you need to follow below steps:

- Right-click on a flight in the Crew part of Crew Panel to open 'New Positioning' window
- In the 'New Positioning' window, Leon will suggest the date of positioning, the departure of positioning (this is ADES from the sector you clicked on) and the Crew from the sector you clicked on. The Crewmember which the positioning is added to will be framed -
 . It is possible to change the default date, the departure airport of positioning as well as add extra crew by choosing them from the dropdown list.
 - Click 'ADD' button to save positioning. Once the positioning is saved it will display in the Crew part of Crew Panel as
 . Positioning will also display in the TABLE section of the OPS view.
Once the positioning is added it is also possible to add further positionings, edit existing positioning and deleted the positioning. You simply need to click on the existing positioning and choose the relevant option.