Table of Contents
TIMELINE
Introduction
Click on TIMELINE in order to access live flight information. This section is particularly useful for flight-watching, when you want to see the realization of the planned schedule.
FBO's and Users having access to more than one operator can see alll the fleet for all Operators by choosing “All *” in Leon Menu.
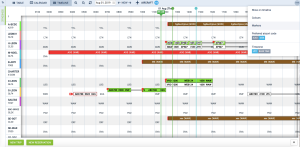
As you can see in the screen on the right, there are number of time-filtering options, such as (from the left):
- Calendar - here you can choose the date, set to current date by default
- TODAY - you can move with the view a day forward (right arrow) or backward (left arrow). Clicking on TODAY will bring you back to current date.
- Zoom in/Zoom out - here you can zoom in the Timeline view up to 6h and zoom out to 31 days maximum.
You can also see Reservations added from Planned Flights screen (Purple colour) or Maintenances added from Scheduled Maintenance section (Brown colour or Red if it is AOG Maintenance).
If there is airport discontinuity between airport A and B - a red line will highlight ADEP without continuity with ADES of the last flight.
If any crew member has any FTL violation, a tag ![]() will appear next to that flight. Similar situation with
will appear next to that flight. Similar situation with ![]() tag - it will show if a crew member designated to the flight will have any expired or inactive endorsement.
tag - it will show if a crew member designated to the flight will have any expired or inactive endorsement.
Right click of the mouse on the flight or an option strip will open a window with access to flight documents as well as Show crew, Show schedule, and Notify Crew functions. This works in exactly the same way as in Calendar and Table sections. CTRL + right click of the mouse on chosen sectors will allow you to print document for these sectors.
Focusing on a selected flight
If you select a flight (by clicking on the belt) and then click on the icon ![]() placed in the right-hand filter (top-right corner) - Leon will focus on that flight and will show it in the center of the screen.
placed in the right-hand filter (top-right corner) - Leon will focus on that flight and will show it in the center of the screen.
Even if you change the view i.e. from 5 days to 12 hours - Leon remembers that the selected flight should still be in the center of the screen. The same applies when you scroll with the page (either to the left or to the right) - if you click on the eye-icon, Leon will bring that flight back to the center of the screen.
Flight Support Companies will have the the Operator Code displayed below the Aircraft registration. The colour of the background is set in Operator Colours section.
Flight times
On the left you can see the fleet sorted by aircraft registration. The first row represents scheduled flight times. This strip may also include flights added as options - they will be distinguished by striped line. The second row represents the realization of the flight (Flight Watch and later Journey Log data, if entered), which shows only when Flight Watch is filled in.
There are colour codes in terms of data inserted into the Flight Watch:
- Green - planned flight, no data in the FW.
- White - CTOT, EDT or BLOFF (without T/O) filled in given the aircraft is still on ground.
- Light Blue - airborne flight.
- Orange - terminated flight without Journey Log filled in.
Once these times are exported to Journey Log and full Journey Log is saved, this lower bar turns grey.
Clicking on any strip allows you to access flight details and edit the flight in the same way as in TABLE, or CALENDAR sections.
Markers in Timeline view
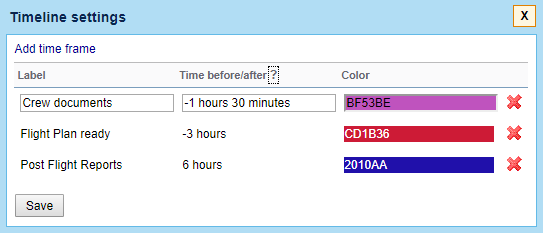
We have created a possibility of adding extra lines in the Timeline view which will allow you to mark the events (timeframes) that have to be done before or after the flight. The lines are set to follow the green 'NOW' line.
First step in this process is to create a line and name it. You need to go to 'General settings' and in 'General settings' section you will find a 'Timeline additional markers' option. Clicking on this option will open a window where you can choose the name of the line, where it should show vs 'NOW' (h-hours, m-minutes, d-days, etc), and the colour of the line. The line displaying before 'NOW' should be added with a minus sign, e.g. -1m for the line displaying 1 month prior to the green 'NOW' line.

Once you have the definitions created, Leon will add these options in the Timeline view under filter 'Markers' (available by clicking 3 dots in top-right corner of the screen). Depending on whether the section is ticked or not, the lines will get displayed in the timeline view.
Rotation
In a section SCHEDULE, tab FLIGHT, we have added a new field Rotation - minimum time on the ground needed for unloading & loading the aircraft as well as fueling and cleaning, etc…
The first step to enable this functionality is defining a Minimum Ground Time in a section Settings > Fleet. Right now that default time is set as 01:00 (which you can over-write to appropriate value).
Once it's defined, when you add a trip (i.e. 3 legs), in a section TIMELINE Leon will show legs where all legs - apart from the first one - have already added flight-times belts. They remain with scheduled times until Flight Watch details are filled in (see example below).
The logic behind this option is to monitor if the current leg is delayed and if time between landing and BLOFF of the next leg exceeds Rotation time. If so, Leon will delay next legs by that difference. Below you can find examples describing possible situations.
- BLOFF filled in
The screenshot below shows a case where BLOFF is 09:16 where scheduled STD of the 2nd leg is 12:10. That means that the rotation time defined as 01:00 would be less than this value. That is why Leon “pushed” 2nd leg's flight time bar to 12:16.
- EET & ETA filled in
By inserting a value EET (Estimated Endroute Time) Leon autimatically calculates ETA. The screenshot below shows a case where EET is 02:00 hence Leon “pushed” 2nd leg's flight time bar to 12:26 taking also into consideration Taxi In time at the GVA airport (which is defined as 00:10). As you can notice, Leon also pushed 3rd leg's flight time bar by 00:01 to 16:16 because the rotation time would not be 01:00.
CTOT
When adding CTOT value to the Flight Watch, in a section TIMELINE Leon shows an indication of the red 'S' (see the screenshot on the right).
On the flight-times belt you can see inserted CTOT - Leon moves the belt accordingly, depending on the CTOT value.
Once ETD or BLOFF is added, the red CTOT indication disappears.
Filter
In TIMELINE view you have 3 tabs with filtering options:
- Schedule - here you can mark/unmark flight type to narrow down the view. Also, confirmed flights, options or cancelled flights as well as sorting an aircraft by available options. You can also switch between ICAO or IATA airports codes and select preferred time zone.
- Aircraft - possibility to select a particular tail/tails or to hide not active fleet.
- Show - this tab is divided into 3 sections where you can set up the screen to see 'active fleet only' and to see 'rotation prognosis', as well as 'crew warnings' (FTL alert shows up). The other one allows to display 'aircraft colours' and to view 'ferry legs' as dimmed. Flight Support companies have also available an extra checkbox 'Operator colours' to display defined operator colours in a section Settings > Operator Colours. The 3rd one is named Markers - you can define in General Settings (link 'Timeline additional markers') how many days before/after the flight Leon should show a warning (a line in the defined colour attached to the marker).
See also:


