This is an old revision of the document!
Table of Contents
PAX
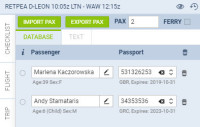
PAX panel is available in the right-hand filter. It shows list of passengers (names or TBA). You can edit PAX profiles by clicking the icon ![]() where you can define PAX details, passports or preferences.
where you can define PAX details, passports or preferences.
Passengers can be added to Leon in 2 ways: selecting names from Leon database or manually by inserting details. You can add pax number while adding a new trip, then in a tab PAX you just input their details.
If you have reduced PAX number by navigating with arrows (which result PAX names disappear from the filter) and you again increased PAX number - Leon will bring the same PAX names to the filter. PAX will not be brought back to the list if you reduced the number and saved changes.
The PAX panel is divided into 2 sections: Database and Text.
If you type a new PAX name/surname (which has not been added yet) into the field 'To be announced', Leon will show a button + ADD PAX - click it (or press Enter key) to have a window displayed where you can add all PAX details (apart from name/surname which will already show).
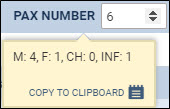
If you hover the mouse over the PAX number window, Leon shows a pop-up window with the information of how many males, females, children and infants are on the flight.
Database
In Leon all Pax data can be stored in Phonebook. When you add pax from database all you need to do is to insert passenger's first 3 letters of either his name or surname, then Leon will open a drop-down box with suggestions. If a passenger has more than 1 passport you can select the one which should be used in Select passport.
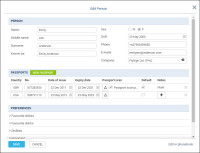
If you want to add a new passenger to database just click ![]() and a new pop-up window will show up where you should input details. Passenger's characteristic (his favourite dishes, drinks or dislikes) will appear on Trip Sheet document.
and a new pop-up window will show up where you should input details. Passenger's characteristic (his favourite dishes, drinks or dislikes) will appear on Trip Sheet document.
To add a new passport click a green icon and fill in fields with details. You can also add a scan of a passport and mark which one should be a Default passport.
If a new passenger should be assigned to a certain Company you can do it by typing a 1st letter of a company name.
If a passenger is under 2 years old he/she will appear in the tab PAX as (I). If between 2 and 12 years old - as (C). If you hover the mouse over PAX number in either Schedule or Calendar section that information also appears.
If you need to add some extra information to an existing passenger that is already assigned to a flight you can do it by clicking on 'Edit in phonebook' link. This will redirect you to the Phonebook where the data can be filled in.
To mark a Lead Passenger (who can be an aircraft owner or a company president) mark a checkbox right under the 
If you want to remove a passenger from the list just click X on the right.
Text
Click Text tab if you want to add pax details manually. Pax number in this section needs to be changed manually.
To generate pax data in the document Pax Manifest details need to be inserted in a certain format. There are currently 2 formats available:
- Number, Title, Surname Firstname, Date of birth, Passport number, Passport expiry date, Nationality
- Number, Title, Surname Firstname, Date of birth (dd-mm-yyyy)
Example:
- 1, Mr, Smith John, 06-03-1978, ABC123456, 13-12-2020, UK
- 2, Ms, Smith Jessica, 03-06-2001
As you can see from the screenshot, depending on the format inserted, PAX Manifest document will be filled in fully or partially.
Import PAX
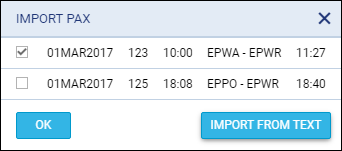
It is possible to import PAX from a leg assigned to the same trip or import PAX from text. If you wish to do that simply click icon 
If there are Passengers assigned to the flights within the same trip Leon will display available flight that the PAX can be imported from. In this case simply select a leg of the trip of which pax should get imported from and click 'OK'.
It is impossible to Import PAX if Text section of Passenger List is already filled in. In such case, when you click on  button Leon will display following information:
Pax import from the text is disabled because pax have been written as a note in Text tab. Please clear the note in Text tab to activate pax import from text.
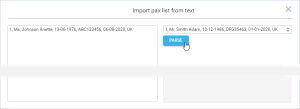
Import from text option will allow you to add Passenger details from a file.The Passenger details will be added to the flight and Phonebook at the same time. The Passenger details have to be inserted in certain format. There are currently 2 formats available. Both are presented in the Text section of this page.
The process of importing PAX list from text is very simple:
- Choose format - select the format you wish to use to insert your passengers from the dropdown in the 'Import pax list from text' window. Leon will accept both 2 and 3-letter country codes, e.g UK or GBR.
- Insert PAX list - in the left editable field you can either 'enter' or copy/paste PAX list in the chosen format.
- Parse - after inserting the list,
 button will activate. This button will check whether there is any inconsistency between the format and the data inserted. If there are mistakes, Leon will display the following message: Please check if items left in the text editor match the chosen format.. If the PAX data is inserted correctly, Leon will display: 1 pax will be added to the flight. Clicking 'OK' button will add Passenger list to the flight.
 - SAVE - this allows saving PAX list on the flight
Export PAX
When adding passengers from the Phonebook, Leon shows a link EXPORT PAX.
By clicking it you get an access to an Excel file where assigned PAX details are sent, such as:
- Name
- Surname
- Company
- Email address
- Mobile phone number
- Nationality
- DoB
- Passport or ID number
- Passport's expiry date
