This is an old revision of the document!
Table of Contents
Requests/Quotes
On the main page of the Requests/Quotes panel you can see the list of Quotes downloaded from Avinode as well as those created in Leon.
Quotes unread/unedited are displayed in bold to all users until it is read/edited by the particular user of the operator.

When a new quote is added, Leon shows a message  - click it and the new quote will appear on the screen.
The main page displays several columns:

- ID - quote request ID.
- Status - showing the status of the quote: New request, Quoted, Booked, Option, Brief sent, Contract sent, Rejected or Closed.
- Requester - requesting client's name or a company.
- Aircraft - requested aircraft registration & type.
- Itinerary - requested itinerary.
- Created - informs when the request has been created. Switched off by default, can be switched on in the '…' filter
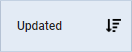
- Updated - day, month & exact time (LT) of updating the quote as well as the source (Avinode or Leon).
- Assignee - first person who is editing unread RFQ and designated to work with the quote. Underneath the person's name, Leon displays the Base to which the quote is assigned in the quote edit section
- Quote - list of possible aircraft quotes with prices - the lowest price is always on top.
- Messages - Leon displays all comments added in the quote's edition - unread
 and read
- Action - hover the mouse over and there are 3 icons available: Trash icon to delete the quote, Clone icon to copy the quote and Envelope icon to mark the quote as 'Read' or 'Unread'
In the top-right corner there is a  icon including filtering options:
- Columns - here you can choose which columns are to be displayed in the list of requests
- Preferred airport code - you can switch between ICAO and IATA codes for the whole 'Requests/Quotes' panel
Use 3 available fields on top of the page to filter the list of quotes:
- Type to search - you can type any part of the ID or Requester to find the quote.
- Status - Leon shows 'all' quotes by default - click to open the drop-down box and select the status to narrow down the list of quotes.
- Show - you can filter the Requests with unread comments by switching from 'All' to 'With unread comments'
- Show also archived - checkbox that allows displaying archived requests. The request is considered as 'Archived' if the status is set to either 'Rejected' or 'Done' or if the itinerary is scheduled before 'NOW'. 'Archived' requests are indicated on the list of requests by the grey bar on the left-hand side and 'Archived' label underneath the status in the 'Status' column. The Requests list is checked every 6 hours

It is also possible to sort the requests by:
 - sorting based on the date and time of the update of the request
 - sorting based on the date and time of departure of the first leg of the itinerary. This does not include the legs that already took off. Only includes the legs from 'now' minus 24h. It does not update the requests list and the green update button is not available
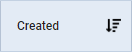 - sorting based on when the quote was created, from the most recent to the oldest or the other way round
There are additional options available directly from the Requests/Quotes view. In order to access the options menu, click with the right button of the mouse.
The available options are:
- REJECT REQUEST - allows to quickly reject a request
- CLONE REQUEST - option to clone specific request. Option briefly described below
- DELETE REQUEST - option to delete request. Option briefly described below
- OPEN IN AIRPORT DIRECTORY - allows opening airport information
- SEND MESSAGE - allows sending a reminder message. Option briefly described below
- SHOW STATISTICS - displays statistics of quoted and booked routings. Option discribed below
CLONING REQUESTS

It is now possible to clone the request.
It is useful when the quotes are requested from different sources or brokers.
In that case, rather than inserting one quotation details a number of times, the Sales team can simply clone it (copy it).
The process is quite simple:
- Press
 icon in the Actions column in the main 'Requests/Quotes' view
 - In the pop-up window (screenshot on the right-hand side) select 'Requested by' and a 'Representative' (not mandatory) and press
 button. 'Requested by' is a mandatory field. If it is left empty Leon will not allow cloning the request
 - Cloned request is opened, automatically saved and the person cloning it is selected as an 'Assignee'
The cloned request will always be displayed at the top of the 'Requests/Quotes' list:

The following data are copied from the source request:
- All the quotes within one request including subcharter
- Pricing and VAT rate assigned to each quote
- The list of PAX as long as set up in the source request
The following items are NOT copied from the source request:
- The status of a request. Each copied request is saved with the status 'NEW'
- Comments/Messages, Notes
- Old Client's details including Name and MVT email address
- Checklists
- Trip number if the source request is with the status 'BOOKED' (assigned trip number)
- Assignee
It is possible to clone a request from Avinode. The outcome of this operation will be a Leon quote.
OPEN IN AIRPORT DIRECTORY

It is possible to preview selected airport details from 'Request/Quotes' list.
Simply click with the right click of the mouse on the selected itinerary details and Leon will open a pop-up menu where one of the options is 'OPEN IN AIRPORT DIRECTORY'. Hovering the mouse over this option allows selecting and previewing an airport from the Itinerary in the Airport Directory (upon clicking on selected Airport code).
Hovering the mouse over the airport code, displays the airport details and airport notes.

It is also possible to open the specific request in the new tab by:
- clicking on it with the middle scroll button of the mouse, or
- holding the left 'Ctrl' key and clicking on the left button of the mouse (or a pad)
By clicking any part of the quote Leon gets displayed the quote edition page.
SEND MESSAGE TO CUSTOMER

It is possible to send a message to the Client directly from the 'Requests/Quotes' list.
In order to do that, click with the right-click of a mouse on the request of choice and select SEND MESSAGE TO CUSTOMER option from the pop-up menu.
'SEND MESSAGE TO CUSTOMER' window will open where you can:
- select email template from available 'Sales Messages' templates
- attach documents
If the quote comes from Avinode, 'AVINODE' button will be active which will allow sending messages directly to the Avinode chat.
History of correspondence will display below the current message.
SHOW STATISTICS

Show statistics option is available from:
- Requests/Quotes view - by clicking with the right click of the mouse and selecting it from the pop-up menu
- Edit request section - by editing a specific request and clicking on SHOW STATS button located under the itinerary
The purpose of this functionality is to show which ones of the Brokers provide a good conversion rate from the initial request to the sold trip. Also, it provides information on the pricing of a similar quote in the past.
The statistics window is divided into 2 sections:
- Requester statistics - the top part which indicates the conversion statistics of the requester
- Route statistics - the bottom part which provides information about rooting
Requester statistics
In this section, 'Statistics' window displays the name of the requester as well as the current status breakdown of the requests. Hovering the mouse over the colour will display the status name.

In 'Requested/Quoted' column the following information is displayed:
- REQUESTED - Total number of requested trips
- QUOTED - Number of requests that were actually quoted (status 'QUOTE')
- SOLD - Number of requests that were sold (went through status 'BOOKED' and are currently set to status 'DONE')
Below these values, there is a percentage of a status vs total number of requests
Route statistics
This part displays information about the pricing of the routing in the past.
It only includes requests that were quoted (status 'QUOTE') as well as sold (went through status 'BOOKED' and 'DONE')
The purpose is to ensure that the current pricing is at a similar level to the pricing for the same requester that was done in the past. Also, if this is the new routing for a particular requester, it is possible to see how it was priced for other requesters in the past.
This section is divided into 2 subsections:
- Current requester - shows up to 5 past sold requests for current requester including the price
- Other customers - shows up to 10 past sold requests for other requesters on the same routing including the price
The currency is picked from Settings > General Settings > 'Local currency' field
TAGGING REQUESTS

It is possible to tag requests in a similar to tagging flights/trips in the OPS section.

Creating the tags is only possible from the main 'Requests/Quotes' view.
In order to create a new tag you need to:
- Make sure that the 'Tags' column is activated in the filter
- Click on the 'Tags' column
- In the 'Tags' pop-up window:
- Insert the name of the new tag and press 'Enter' key on your keyboard
- Click on the new tag colour square and select the prefered colour
- Save the changes
- The tag is added to the list as well as added to the selected request
It is possible to assign multiple tags to one request following the abovementioned process. When tagging a request it is possible to both add new tags as well as assign already existing tags. Clicking on the 'Tags:' field will display a dropdown list with already added tags.
If there are multiple tags added to a request, the list will display it as  . Hovering the mouse over the number will display the names of remaining tags in a tooltip.

There is a possibility of filtering by tags. Simply click on the ![]() icon and insert the names of the tags you'd like to filter by.
icon and insert the names of the tags you'd like to filter by.
The filter works based on 'or' rule which means that if there are tags 'A' and 'B' and there are 3 trips - one with 'A' and 'B' assigned, second with only 'A' assigned and third with only 'B' assigned - filtering by 'A' and 'B' will display all of these flights.
Additionally, tags are available in the Report Wizard, scope 'Quote'. We have added column 'Tags' as well as a filtering by 'Tags' with 'Include'/'Exclude' options.
New Quote

To add a new quote you need to perform the following steps:
1. Click on NEW QUOTE option in the 'Requests/Quotes' screen
2. Fill in the information in the 'Add new quote request' window:
- 'Requested by' - name of the Client requesting the trip
- 'Min. category' - a category of the aircraft on which the trip is requested, e.g. Heavy jet, Midsize jet, Piston, etc. This will allow searching for the subcharter flights in Avinode if needed
- 'Aircraft' - selecting aircraft on which the request should be performed. Only operator aircraft available in the dropdown list
- 'Add positionings automatically:' - ticking the checkbox will automatically add the positioning legs
- 'Schedule section' - ADEP, ADES, option to select 'Departure'/'Arrival' date and time (in LT) and the number of PAX
 New request editing window
. 'GCD(NM)' will be calculated automatically. Leon will display the itinerary in the Calendar view as well as on the map (Tab 'MAP'). If the aircraft is selected, the 'CALENDAR' tab will also display the positioning legs. You can also select 'TBA' checkbox which will allow inserting the schedule without having to indicate 'Departure'/'Arrival Time'. In this case, the itinerary will display on the Calendar underneath the flight date

3. Press 'CREATE' to add the request. You can also press 'SKIP' button which will allow you to add a request using quote editing view however this method will require to add a quote manually and also it will not have an option to 'FIND SUBCHARTER/COMPARE PRICE' in Avinode
4. Request editing section will open, where:
- if 'Add positionings automatically:' checkbox has been ticked, the positioning legs should be added automatically and should be marked as 'Ferry'
- the schedule timeframes should be built based on the aircraft performance and the minimum ground time required (Positioning flights)
- the quote should be added and calculated based on the 'Fees' assigned in the aircraft settings > 'SALES' tab. If there are no fees assigned to the requested aircraft, then no quote will be created automatically. If there is an 'AIRPORT CHARGES' integration in place, there is a possibility to automatically recalculate airport fees based on 'AIRPORT CHARGES' (more information in the 'AIRPORT CHARGES' subsection

It is possible to add a request without selecting the aircraft.
In this case, the editing window would suggest creating a quote ('CREATE A QUOTE' button) or finding subcharter in Avinode ('FIND SUBCHARER/COMPARE PRICE' button).
If we choose to create a quote, the standard edition window will appear with the schedule that we inserted initially but with no aircraft selected and no times calculated.
The request with no aircraft assigned will present on the list of requests as per below:

Avinode
Empty legs from Avinode


Active integration with Avinode allows downloading requests for empty legs.
Once the empty leg request is downloaded to Leon, Leon creates the full routing including positioning legs if necessary. The aircraft selected in Leon is the same as sent in the empty leg request. If the aircraft does not exist in Leon, the request will not be accepted by Leon.
Leon also calculates the quotation amount based on the pricelists assigned to the aircraft in Settings > Fleet > Sales tab in the aircraft details.
If the downloaded request is for numerous empty legs and for different aircraft, the routing and the quotation are created for each one of them separately.
Edited empty leg request contains 'Avinode empty leg' label next to the 'VAT' box. By clicking on this label, user will get redirected to this request in Avinode.
Request sent from Avinode will show on the list as a new request with 'Avinode' label in 'Updated' column.

Accepting Avinode requests


To accept the quote that comes from Avinode, you need to:
- Edit the Avinode quote
- Select 'QUOTE' button in the request edit window
- In the 'Accept quote?' window you can:
- Select the aircraft(s) for which you would like to send the response back to Avinode
- Select email template or type in the additional message, which will appear in Avinode
- Select the attachments that you'd like to send to Avinode. This can be the document template or additional pdf file(s) uploaded to this email
- Press 'SEND' button to accept the quote in Avinode
Once the email is sent, the request status will change to 'Accepted'.
Message and files attached will appear in Avinode Marketplace.
It is possible to automatically reject requests in Avinode for the quotes that were not sent as accepted. To activate this option, please mark the 'Automatically reject unanswered quotes' checkbox in Add-ons > Avinode settings.
It is also possible to add Leon quote by selecting 'ADD QUOTE' button. In this case, Leon would recalculate the quote based on the pricelists assigned to this aircraft in Settings > Fleet > Sales tab.
The updated amount would be sent to Avinode.
Rejecting requests from the list

It is possible to reject requests directly from the list of requests.
This applies to requests received via Avinode, Owner App, as well as inserted directly in Leon as a New Quote.
To reject a request you need to:
- Click with the right-click of the mouse on the request you'd like to reject
- Select REJECT REQUEST button
- 'Reject' email window will open. There you can select either:
 - rejects and updates the status of the request only in Leon without updating the status neither in Avinode nor in Owner App
 - rejects requests and updates the status to 'Rejected' in Leon and Owner App, and to 'Declined' in Avinode
Find subcharter/Compare price in Avinode

If a request comes from Avinode, there is a possibility of searching and comparing the offers in Avinode.
The process is quite simple:
- Edit Avinode request in 'Requests/Quotes' section
- Click on
 button located below the itinerary
 - You will get redirected to Avinode search engine where the list of available offers by different sellers will be displayed
Accepting subcharters from Avinode

It is possible to accept subcharter flights requested in Avinode.
Firstly, you need to make sure that 'Add subcharter quotes automatically' checkbox is ticked in the 'Configuration' section in 'Add-ons' > 'Avinode' integration. This will allow accepted Avinode requests to be added automatically as a subcharter quotes to matching requests in Leon.
The process is as follows:
- Client requests a trip which shows in Leon on the 'Requests/Quotes' list
- If we, as an operator, are unable to perform the request with our own fleet, we can search for subcharter in Avinode (by clicking on 'FIND SUBCHARTER/COMPARE THE PRICE' button in quote edit section)
- The request is sent 3rd party operators in Avinode
- Once the 3rd party operator confirms the request in Avinode, then this request appears in Leon as a subcharter
Subcharted requested from Avinode will contain the details of the aircraft as well as aircraft photos, as long as available in Avinode.
The subcharter edit window is divided into 2 tabs:
- BASIC - contains subcharter details such as aircraft details, crew details, contact details (email and phone no.) and aircraft photos, as long as available in Avinode
- MESSAGES - possibility to reply directly to the Operator email (as long as it is available in 'BASIC' tab) or to Avinode. More information below
MESSAGES

In this tab, it is possible to reply to the Broker in Avinode or directly to the Operator.
In order to reply directly to the Operator, Operator's email has to be available in Avinode.
If it is available in Avinode, Leon will import it to Contact email box in 'BASIC' tab and additionally, Leon will automatically create this Operator as a Client in Leon Phonebook.
In order to reply to Operator press REPLY TO OPERATOR link and select:
- AVINODE - this will reply to the Operator/Broker in Avinode
- EMAIL - this will allow replying directly to Operator's email as long as it is available in 'BASIC' tab. 'Subcharter message' email template needs to be created in 'Settings' > 'Email templates'
Currently, replies from all the brokers will display under one 'Messages' window.
Managing the RFQ

The main page of the RFQ - Request For Quote page is divided into 2 sections, which show all details in a transparent way:
- RFQ details with options of adding & managing the quote.
- Displaying the quote in Calendar, managing the Checklist, PAX and other options.
Details of the Request
Top-left part of the page shows details, such as:
- Marketplace - Avinode, HelloJet, Victor or Leon.
- Quote request ID - ID of the quote generated by Marketplace.
- Requested by - client's or company name.
- Representative - client's representative (defined in Leon or imported from Marketplace).
- Assignee - a person who is designated to work the quote.
- T/O & LDG emails - client representative's email address to which Leon should send MVT emails (or client's if Representative is not selected). Can be deleted or overridden by manual entry.
Adding a new client/representative

It is now possible to add a new client (a company or a person) straight from REQUESTS/QUOTES panel, as well as adding a client's representative.
When creating a new quote, click a + icon right next to the 'Requested by' field.

Leon will show slightly different windows if a new client is a company and a different one if a new client is a person (see screenshot on the right).
Once a new client has been added it will be stored in Leon for future usage and its profile is also created in the Phonebook


It is also possible to edit a Requester or Representative by clicking on ![]() icon located next to Requester/Representative box.
icon located next to Requester/Representative box.

The changes applied in 'Edit requester/representative' pop-up window will apply instantaneously.
Operator bases
It is possible to assign requests to bases.
This feature only applies to operators that have more that one base. For the operators with one base only this functionality will not apply.
Bases can be defined in General Settings section.

Once the bases are added, it is possible to assign one to a user, Client or directly to the request.
Operator bases can be assigned as follow:
- Client/Client Representative - by editing Client/Client Representative in RQ details section
- User - bu editing a user in Settings > Users section
If the base is assigned to a Client, the trip requested by this particular Client will automatically be assigned to the Client's base.
Once this request is edited by a user with base assigned then this request will get assigned to the user base automatically.
It is also possible to assign or change original base, including base initially assigned to a Client, without having to assign a specific user.
The 'Requests/Quotes' list includes all the requests including the ones without bases assigned.
If you select a particular base in the operator selection dropdown (top-right corner of Leon), the Requests/Quotes list will only display the requests assigned to this particular base. See screenshot on the right.
Auto update of the booked trips

It is possible to set up an auto-update of the booked trips. Once a quote's status has been set to 'BOOKED', if quote's schedule has changed, Leon can either automatically update the trip in OPS, or the user can do it manually.
AUTO UPDATE
To make it work, mark a checkbox Auto update booked trips in Requests/Quotes in General Settings panel. Once it's done, when changing a quote's schedule, Leon will automatically update the trip in OPS panel (see example on the screenshot on the right).
MANUAL UPDATE
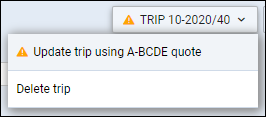
If an auto update is switched off and the booked quote's schedule changes, Leon will show an orange warning triangle in the button 
Click it and select Update trip using (aircraft reg number) quote and Leon will update the trip's schedule in OPS panel.
Statuses of the Quote
In this section, you can find available options for the quote status change. Changing statuses are correlated with actions, among which are: sending emails, documents, etc…
- NEW - highlighted when adding a new quote into Requests/Quotes or as a new quote from Avinode.
- QUOTE - send a quote proposition details with Flight Quotation document - when dealing with Avinode quote, clicking SEND means accepting the quote.
- OPTION - click to add the trip to OPS page with the status 'Option'.
- CONTRACT - shows a new window for Charter Agreement document sending.
- BOOK - click to add the trip to OPS page with the status 'Confirmed'.
- BRIEF - shows a window for Flight Brief document sending.
- INVOICE - an option to send an invoice to the client.
- DONE - closing the transaction.
- REJECT - reject the client's offer (the quote will show as 'rejected' on client's side in Avinode).

Independent from the status change actions you can always print sales document or send it via email using options:

- DOCUMENT - Flight Quotation, Charter Agreement & Flight Brief.
- SEND EMAIL - for sending sales documents via email or sending custom emails.
Itinerary details

Right below request details & quoting options you can find Trip details: Aircraft registration, Price, ADEP, ADES, TBA checkbox, Departure time LT, Arrival time LT, Block Time, Flight Time, PAX number and Ferry flight indication.
By clicking the + icon you can add a new leg into the existing trip - you can do it also in-between existing flights.
It is possible to change the Currency and Leon will recalculate the price in the new currency. The new currency will also apply to the quote's fees (catering, hotel, flight plan, etc…).
If there is no aircraft performance data inserted in 'Fleet' section, Leon will display the following information:

It is also possible to schedule a Fuel Stop. More information in the subsection below.


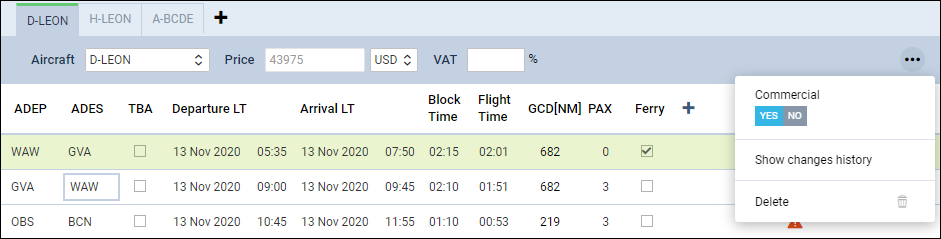
In the top-right corner of the itinerary, there is a icon where the following options are available:
- Commercial - selection whether the quote should be for a commercial flight or not by using the switch
- Show changes history - access to the history of changes of the quote. More information in section below
- Delete - option to delete the itinerary
- Warnings - selecting the types of warnings in the feasibility check window
- Cautions - selecting the types of cautions in the feasibility check window
- Notices - selecting the types of notices in the feasibility check window
With regards to filtering Warnings, Cautions and Notices, only the selected options will trigger the feasibility check icon.
Once the new filtering options have been selected you need to refresh the 'Feasibility Check' column in order to apply new settings.
Only the selected options will trigger the feasibility check icon.
Items that are not selected in the filter will not appear in the feasibility check information window.
Selected elements of the feasibility check filter will be remembered per user.
You can also remove the leg from the itinerary by clicking on ![]() icon. Leon will display the
icon. Leon will display the  validator where you can perform the relevant action.
By clicking on the TBA checkbox Leon will allow you to save the quote/trip without specifying Arrival and Departure times. Such a trip will be displayed in the 'CALENDAR' tab as an “All day” operation (just underneath the date).
Below trip details you can find 3 options to:
 - click to add a positioning flight (Leon will match last flight's ADES and next flight's ADEP in actual confirmed aircraft schedule).
 - adds price list to current quote - this action can be undone to
  which deletes the price list from the quote.
If you click on this icon Leon will display Feasibility check information window which provides specific warning details as presented in the screenshot - all warnings, cautions and notices enabled in Leon, plus the information if on the day of the quote (departure day) no minimum crew (defined in the aircraft profile for cockpit & cabin) have been assigned with the Duty on the aircraft (registration or type - depending on Duties Setup configuration). Also, a caution FTL close to limit for Cockpit/Cabin crew member: warning FDP length exceeded will show up if defined in FTL Settings (by Leon Support Team) FDP threshold has been exceeded.
Modifying timeframes in schedule
1. When changing Block time of the flight, Leon will NOT change Flight time and will also show a tooltip with a question, whether it should be the departure or arrival time that should be updated. Block time cannot be shorter than the flight time.
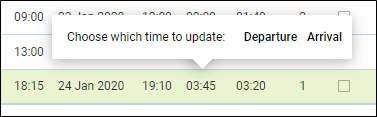
2. When changing Flight time of the flight, Leon will change Block time automatically and will keep initial Taxi times. Leon will ask whether to change 'Departure' time or 'Arrival' time
3. When changing STA, Leon will change the STD by the block time value. The same scenario applies to change of the STD. Leon will NOT require validation.
4. When changing ADEP/ADES Leon will automatically recalculate the Block time and the Flight time value based on the aircraft performance and will ask whether to change 'Departure' time or 'Arrival' time
Fuel Stop
It is possible to add a Fuel stop to a flight in the itinerary section by clicking on a 'Fuel stop' icon.

Fuel stop is indicated by the following icons:
 - fuel stop required. This icon is displayed when the distance (in NM) between ADEP and ADES is greater than 'Max range with '0' PAX(NM)' or'Max range with max PAX(NM)' configured in the Performance section of an aircraft in the 'Settings' > 'Fleet' section in Leon
  - fuel stop optional. This icon is hidden and will be displayed if you hover the mouse over a flight in the itinerary

To add a Fuel stop you have to:
- Click on a 'Fuel stop' icon
- In the 'Create Fuel Stop' window, you will see the list of airports. Airports are suggested based on a 50 NM radius along the route of the aircraft. The list displays up to 99 airports sorted by the proximity from the point on the routing. Option to filter the airports by category allows narrowing the list down to the airports with the required Airport Category. It is also possible to insert your own airport of refuelling in the Custom Airport field.
- Select one of the airports from the list and click 'APPLY' button
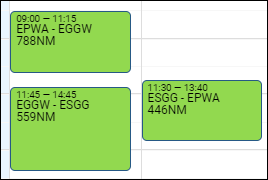
- The 'Fuel stop' leg is added to the itinerary. The fuel stop airport is indicated by frame. The feasibility check can be performed by clicking on
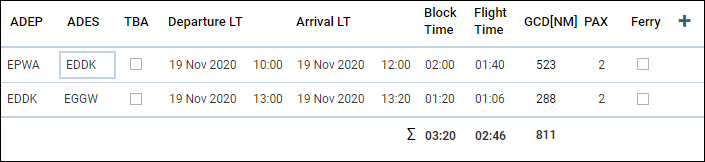
 icon. The new schedule also includes aircraft rotation time. Example, route EPWA-EGGW after adding a 'Fuel stop' in EDDH would look as below:
Handling Requests per Client
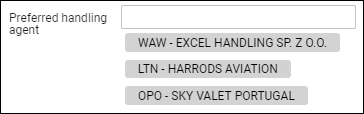
It is possible to assign a default handling agent to a Client in Leon.

In order to assign a Handling Agent to a Client, you need to:
- Edit the Client in Sales module. An agent can also be assigned while adding a new Client in the Sales module
- Select the Agent(s) in the 'Preferred handling agent' box. Handling agent can be searched by using:
- Airport ICAO/IATA/Custom code
- Handler Name
- Combination of 'Airport code - Handler name'
- Once the Handler is assigned, it will appear as a tag below the 'Preferred handling agent' selection box
- Save changes
Only one Handler per airport can be assigned to a Client. Assigning second Handling Agent will replace already assigned Handler.
It is possible to assign multiple Handling Agents at different Airports to one Client.
Once the Handler is assigned, it will auto-populate in the OPS checklist when the trip is booked.
Handler assigned to the Client has higher priority than the Handling Agent selected as preferred in the Airport Directory. This means that the Handler assigned to the Client will overwrite the preferred Handler from 'AD' upon booking the trip from Sales.
Additionally, Handler assigned to the Client is prioritised over the default Handler assigned to the Client Representative.
If the Handler is changed in the OPS Checklist, updating the trip from Sales panel will affect the Handler selection.
If the trip is added in OPS section and the Client is assigned in the TRIP tab, the Client's preferred Handling Agent will be assigned to the trip.
Invoice


Before using this option you need to set up in Documents Manager a new template QUOTE INVOICE - you can set up multiple different templates and re-arrange them the way you want (using HTML & CSS). You can also use Leon default template pdf.

You can also configure EMAIL TEMPLATES for the Invoice in a section Settings > Email Templates - click ADD TEMPLATE, select Quote Invoice and set it up. You can define as many email templates for as necessary.

Once it's all set up, edit the Quote that has already been BOOKED, click button INVOICE and Leon will show a pop-up window where you can select an appropriate Email and Invoice template. Then Invoice details & items should be defined with their Net price and VAT. Below the items list, Leon will show Total price.
Three fields with dates are available in the document:
- Invoice Date - date of invoicing
- Issue Date - date of issuing the Invoice
- Due Date - due date of the payment. If this field is left blank, Leon will assume 10 days in advance from the 'Invoice Date'
Click DOWNLOAD icon to preview the template before sending it out.
 function makes it easier to recalculate the amount on the 'Invoice'.
It is very useful when after sending the invoice to the Client, the amount of the quotation changes, be it due to change in the number of items or the calculated price of the items.
In such a scenario, it is sufficient to go to the 'INVOICE' tab in the 'INVOICE' section, press button and Leon will update the amount on the invoice to the actual one.
If the quote is created for more than one aircraft, Invoice pop-up will allow to switch between tails and define Invoice items accordingly.

In case you wish to upload your own template and send it to the client without creating it in Documents Manager, you can use 'Upload files' button in a tab 'EMAIL' of the Invoice pop-up window.
TAX
It is possible to set up a default VAT rate in the main Quotation view in the 'VAT' box:

This rate will automatically apply to the default items in the Invoice section, including PAX taxes (UK, German, Swedish or Italian) and will increase the total amount by this rate.

It is possible to exclude the VAT rate from the calculations in the Invoice by simply deleting it.

The VAT rate, gross amount, as well as taxes amounts, are included in the available data for Sales documents (including Suncharter) in 'Documents Manager'.
Once the invoice has been paid, you can edit the quote again and in Invoice tab mark a checkbox Paid - then you can generate a report (in a scope 'Invoice') in a report Wizard panel and add a column 'Paid' to the report.
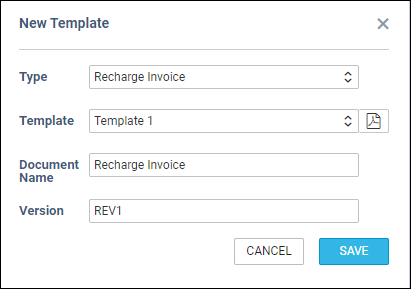
Recharge Invoice & Credit Note
We have added 2 new documents, which can be sent to a client from the Invoice section:
- Recharge Invoice - sent if there was an extra cost for a service not included in an initial trip cost, i.e. deicing or limo.
- Credit Note - sent to a client, if some part of the agreed cost should be returned to client, due to i.e. cancellation of the flight by a client or if the cost of the trip turned out to be lower than the agreed cost and the difference must be returned to a client.
First step to issue these documents is adding it in Documents Manager. Here, click ![]() and select Recharge Invoice and/or Credit Note. Added documents need to be published (set filter to 'No' and click the white dot). You can define multiple templates of these documents.
and select Recharge Invoice and/or Credit Note. Added documents need to be published (set filter to 'No' and click the white dot). You can define multiple templates of these documents.


Second step is adding these document in the 'Invoice' section of the quote's edition panel. Click a button + placed right next to the 'Invoice' button and select documents from the list.
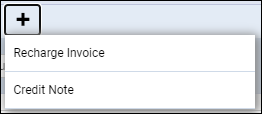
It is possible to add more than one 'Recharge Invoice' & 'Credit Note' document when sending Invoice documents to a client, however, each document needs to be sent out separately.
Owner approval
Owner approval is the functionality which allows sending gain the consent from the Aircraft owner to perform the trip on the aircraft at a given time.
In order to activate the functionality, you need to:
- go to 'Settings' > 'Fleet' section and edit the aircraft
- click on tab 'SALES', click on 'Requires owner approval' and save changes. Make sure that the owners are also selected

Once the option is activated, APPROVAL button will appear amongst the status buttons.

Once the button is available, clicking on it will allow sending an email to the Owner along with the document.
Both, 'Owner approval' email template, as well as the default document, can be created in 'Settings' > 'Email templates' and 'Settings' > 'Document's manager' accordingly.
'To' email is fed from the Owner's email inserted in the profile.
Quote pricing

There are 2 ways of creating price valuation: manual entering price for an entire quote and using a detailed price list for an aircraft and airports.
You can manually enter the Price in the field next to Aircraft. This field is only editable when the detailed price list is not added.
Be advised that when the quote is imported from Avinode and an aircraft is configured in a section FEES, detailed price list shows automatically and an original Avinode price is always displayed next to it and can not be changed.
Once you have added Request & Itinerary details and selected the aircraft, click ![]() button and Leon will show a new section Quote below with Aircraft Fees & Airport Fees (previously defined in the section Fees).
button and Leon will show a new section Quote below with Aircraft Fees & Airport Fees (previously defined in the section Fees).
In this section you can manage the price list:
- Add new item
- Change the item's name
- Change items quantity and their price.
- Delete item.
- Switch price lists to another aircraft price list (by using a button Recalculate).
Each item is editable, which means you can change its name (for edited flight only - default name remains the same) and/or its price.
When you click on the arrow next to the price, Leon will show both airports. The default fee will show for ADEP only but you can still add fees to ADES manually. Another option is adding new fee available in the drop-down box below the items. When changing fees manually, Leon shows Total price simultaneously changed at the same time. Hover the mouse over the Total price amount to see the price per hour of the flight.


If it comes to Aircraft Fees displayed below Airport Fees, you can also change their names and overwrite values.

There are 2 buttons available to manage the quote:
- RECALCULATE
- CHANGE PRICING - should be used when you'd like to recalculate on a different 'Aircraft Fee'. 'Airport Fees' remain untouched.
'RECALCULATE'
The RECALCULATE button now has 2 options available:
- Itinerary
- Airport fees
Itinerary
Itinerary option is used when the aircraft schedule is changed.
The way it works has not changed. Clicking on the 'Itinerary' button will recalculate the quotation based on the updated schedule.
It will also update the Airport Fees if they were changed in the 'Sales' > 'Fees' section,
This option will not affect manually inserted prices.
Example

Following changes applied in the 'Airport fees:
- 'Landing fee' at EP* changed from €1200 to €1500
- 'Additional fee' of €1000 added to EG*
Additionally, the original itinerary's flight time has been changed by 10 minutes and 'De-icing' fee added manually.
As you can see in the screenshot on the right, Leon recalculates based on the new itinerary but also includes the updated aircraft fees.
Airport fees
Airport fee option applies only to airport fees recalculation.
It should be used whenever there are changes to the 'Airport fees' in 'Sales' > 'Fees' which one would like to update within the quote.
It does not add or remove any elements from the quote unless there is a change in the itinerary (see above).
Manually added items of the quote should remain within the quote after the recalculation.
Example

Following changes applied in the 'Airport fees:
- 'Landing fee' at EP* changed from €1200 to €1500
- 'Additional fee' of €1000 added to EG*
Additionally, 'De-icing' fee added manually.
As you can see in the screenshot on the right, only the value of the 'Landing fee' at EPWA has changed.
Once you reviewed the RFQ you can:
 - saves changes to the Quotation/Trip
 - clicking on this one will save the changes and take you back to the List of quotations page
 - transfers to the List of quotations page without saving changes
 - clicking on it will open this trip in the OPS view.


If you have created a quote for 2 different aircraft, or downloaded a quote like that from Avinode, after clicking QUOTE Leon shows a pop-up window with 2 quotes - mark a checkbox which quotes you choose to be sent.
It is also possible to send the email with the details for more than one quotation by ticking more than one checkbox.
Leon will then generate the documents that include these 2 quotations based on the Sales Documents templates.

By clicking SKIP SENDING QUOTE you decide not to send an email, but still the status of the quote changes to 'Quoted' in the main quotes list.
Similarly works sending CONTRACT or a BRIEF - Leon shows a pop-up window where you can send an email with the Charter Agreement, or you can click SKIP SENDING EMAIL - that will change quote's status to 'Contract sent'.
If you tick the  checkbox and press any of the buttons in the 'Send email' window, Leon will revert to the list of Quotes. This setting will be saved so next time when you open an email window this checkbox will be already ticked.

CO2 Emission
More and more clients travelling by airplanes want to know how much CO2 will be emitted during the flight they have bought. Meeting this request we have added an option to show CO2 emission on sales documents: Flight Quotation and Flight Brief.
In order to have CO2 on sales documents, follow below steps.
- In the tab OPS of an aircraft profile (section Settings > Fleet) select Fuel type (JETA1 or AVGAS).
- In the tab PERFORMANCE add Average fuel consumption.
- In a section Documents Manager edit one of the sales documents and add CO2 on it by using an item 'CO2' from Available Data filter.

Request changes history
It is now possible to access Changes History of the Quote in the quote's edition panel, under the 3-dot filter.

Clicking on 'Show changes history' option will generate a pop-up window with details regarding any quote changes such as:
- aircraft changes
- quotation status changes
- price changes
- trip schedule changes
In the changes history window, Leon shows a chronological list of all changes (the latest on top). The colours indication shows added data in green, changed data in yellow and removed data in red.
When you click on the changed detail, Leon highlights previous entrances of the same detail.
Taxes
Italian Luxury Tax
This is an additional item available only in the Requests/Quotes section.
'Italian Luxury Tax' is only calculated for the flights from and to Italian airports and depending on the number of PAX on each flight and the distance. The distance is calculated using Great Circle Distance + 95km.
The values are as per below:
- €10 per PAX for the flights shorter than 100km
- €100 per PAX for the flights between 100km and 1500km
- €200 per PAX for the flights longer than 1500km

Example
Trip consists of 3 flights to and from Italy.
Each flight has 3PAX added.
The distance between the airports on 2 of the flights is greater than 1500km and on the 3rd flight - 800km
In such case the calculation is as follow:
(6PAX x €200) + (3PAX x €100) = €1500
UK Air Passenger Duty Tax
UK Air Passenger Duty Tax (UK APD) applies to trips departing from the UK or Northern Ireland and is based on below criteria:
- Destination bands
- Rate types
- Number of PAX
All the rates and allowances of the UK APD can be found here.
The calculations are performed for the whole trip.
1. Destination bands
The rates vary depending on whether the trip starts in the UK or Northern Ireland and the airport of destination.
The trips starting in the Scottish Highlands and Island are excluded from UK APD.
There are 2 destination bands:
- Band ‘A’ where the distance from London/Belfast to the destination country’s capital city is between 0 to 2,000 miles
- Band ‘B’ where the distance from London/Belfast to the destination country’s capital city is over 2,000 miles
Additionally, the calculation of UK APD for the trips starting at Northern Ireland take into consideration whether the flight is 'direct' or 'indirect'.
The countries falling into each 'Destination band' are listed here

2. Rate types
There are 3 rates of duty for each destination band depending on the class of travel:
- Reduced rate
- Standard rate
- Higher rate
The rate type can be assigned to the aircraft in the Settings > Fleet > Sales tab of the aircraft edit.
3. Number of PAX
Duty is charged on each passenger at the rate for the place where their journey ends (their final destination).
There are 2 stages od UKAPD tax calculations.
The first stage is based on a simplified calculation and only takes into consideration the number of PAX leaving UK and the airport of destination. Based on this data the simplified tax amount is calculated.
Once the PAX names are added, Leon moves on to the second stage of UKAPD tax calculation. Based on the PAX names on each flight, Leon compares the names and calculates the tax based on the actual PAX and their final destination.
The recalculation is required. In order to perform the recalculation, you need to:
- Add PAX names to required flights and delete the quote
- Press 'SAVE & BACK' button
- Edit the request again
- Add new quote calculation
- Save the request with the new quote
If the journey is made of one flight the final destination is where that flight ends. If the journey includes more than one flight, and the flights are connected, the final destination is where the last flight ends and is not followed by a connected flight.

Example 1 - UK
Calculations based on PAX number
Please see screenshot on the right.
The trip consists of 3 flights starts in EGGW and finishes in KJFK.
The aircraft is of higher rate type.
In the simplified version of the calculations, we only consider the flights starting in the UK and looking at the destination band and the number of PAX flying. No actual PAX are assigned.
The calculation is as follow:
3 x GBP78 = GBP234
Explanation:
- rates for the UK based airport of departure
- airport of arrival for 3PAX is in Band A (Russian Federation) and higher class aircraft - the rate of GBP78 per PAX

Calculation based on actual PAX
Please see screenshot on the right.
The trip consists of 3 flights starts in EGGW and finishes in KJFK.
The trip starts with 3PAX and finishes with 2 of the initial PAX on the last flight. 1PAX finishes at EPWA.
The aircraft is of higher rate type.
In such case the calculation is as follow:
2 x GBP515 + 1 x GBP78 = GBP1108
Explanation:
- rates for the UK based airport of departure
- airport of arrival for 2PAX is in Band B (USA) and higher class aircraft - the rate of GBP515 per PAX
- airport of arrival for 1PAX is in Band A (Poland) and higher class aircraft - the rate of GBP78 per PAX
- 2PAX arrived at the destination in Band B and 1PAX at destination in Band A

Example 2 - Northern Ireland
Calculations based on PAX number
Please see screenshot on the right.
The trip consists of 3 flights starts in EGAA and finishes in KJFK.
The aircraft is of higher rate type.
In the simplified version of the calculations, we only consider the flights starting in Northern Ireland and looking at the destination band and the number of PAX flying. No actual PAX are assigned.
The calculation is as follow:
2 x GBP78 = GBP156
Explanation:
- rates for Northern Ireland based airport of departure
- airport of arrival for 2PAX is in Band A (Russian Federation) and higher class aircraft - the rate of GBP78 per PAX

Calculation based on actual PAX
Please see screenshot on the right.
The trip consists of 3 flights starts in EGAA and finishes in KJFK.
The trip starts with 2PAX and finishes with 3PAX on the last 2 flights.
The aircraft is of higher rate type.
In such case the calculation is as follow:
2 x GBP515 = GBP1030
Explanation:
- rates for Northern Ireland based airport of departure
- airport of arrival is in Band B (USA) and higher class aircraft - the rate of GBP515 per PAX for indirect flights
- 3PAX arrived at the destination: 2PAX arrived in Band B country and 1PAX is not charged for
German Aviation Tax
German Aviation Tax is a departure tax on commercial air transport.
It is levied on the carriage, from an aerodrome situated in Germany, of passengers on board fixed-wing and rotary-wing aircraft.
The amount due per passenger depends on the distance of the biggest commercial airport in the country of destination from Germany's largest airport, Frankfurt am Main.
Destination bands
The destination airports are divided into 3 bands:
- Group A - listed in Annex 1 as well as the flights within Germany. Domestic flights and flights to countries allocated to the first destination band are taxed at €7.38 per PAX. This will change to €13.03 from April 2020
- Group B - listed in Annex 2. These are countries not listed in Annex 1 and with a distance of not more than 6,000 kilometres including countries in North and Central Africa, the Middle East and Central Asia. A rate of €23.05 applies to PAX flying to countries allocated to the second destination band. This will change to €33.01 from April 2020
- Group C - countries listed in neither Annex 1 nor Annex 2. These charged at €41.49 per PAX. This will change to €59.43 from April 2020
Similarly to UK APD TAX, there are 2 stages od GAT calculations.
The first stage is based on a simplified calculation and only takes into consideration the number of PAX leaving Germany and the airport of destination. Based on this data the simplified tax amount is calculated.
Once the PAX names are added, Leon moves on to the second stage of GAT calculation. Based on the PAX names on each flight, Leon compares the names and calculates the tax based on the actual PAX and their final destination.
The recalculation is required. In order to perform the recalculation, you need to:
- Add PAX names to required flights and delete the quote
- Press 'SAVE & BACK' button
- Edit the request again
- Add new quote calculation
- Save the request with the new quote
More information about the 'German Aviation Tax' can be found here

Example 1
Calculations based on PAX number
Please see screenshot on the right.
The trip consists of 3 flights starts in EDDB and finishes in DNMM.
In the simplified version of the calculations, we only consider the flights starting in Germany and looking at the destination band and the number of PAX flying. No actual PAX are assigned.
The calculation is as follow:
3 x €7.38 = €22.14
Explanation:
- rates for the Germany based airport of departure
- airport of arrival for 3PAX is in Band A (Russian Federation) - the rate of €7.38 per PAX

Calculation based on actual PAX
See screenshot on the right.
The trip starts with 3PAX in EDDB. The same PAX continues from UUWW and the trip finishes with 2of the PAX on the last flight. 1PAX finishes at UUWW.
In such case the calculation is as follow:
2 x €41.49 + 1 x €7.38 = €90.36
Explanation:
- 2PAX calculated at 'Group C' band (€41.49) because Thailand (VTBS) is the furthest destination from EDDF
- 1PAX calculated at 'Group A' band (€7.38) because this PAX left the trip in Russian Federation (UUWW)

Example 2
Calculations based on PAX number
Please see screenshot on the right.
The trip consists of 3 flights starts in EDDB and finishes in EDDB.
In the simplified version of the calculations, we only consider the flights starting in Germany and looking at the destination band and the number of PAX flying. No actual PAX are assigned.
The calculation is as follow:
2 x 3 x €7.38 = €44.28
Explanation:
- rates for the Germany based airport of departure
- there are 2 flights departing from German airports (EDDB and EDDW) with 3PAX each (6 PAX in total)
- airports of arrival for all 6PAX are in Band A (Germany and Russian Federation) - the rate of €7.38 per PAX

Calculation based on actual PAX
See screenshot on the right.
The trip starts with 3PAX in EDDB. The same 3PAX continues from EDDW to UUWW. 1PAX leaves in UUWW and 2PAX carry on to EDDB.
In such case the calculation is as follow:
3 x €7.38 = €22.14
Explanation:
- rates for the Germany based airport of departure
- 3PAX calculated at 'Group A' band (€7.38) because the same 3PAX from EDDB carried on from EDDW on the second flight

Example 3
Please see screenshot on the right.
The trip consists of 2 flights starts in EDDB and finishes in VTBS.
The trip starts with 0PAX and finishes with 2PAX on the last flight.
In this case, calculations based on PAX number and actual PAX will be the same.
The TAX calculated will amount to €0, because there are no PAX departing from the German airport.
Swedish Aviation Tax
Swedish Aviation Tax is levied on commercial flights carrying passengers and departing from a Swedish airport.
The tax rate depends on the passenger’s final destination. Flights to countries listed under Appendix 1 of the Aviation Tax Act pay 61 SEK per passenger (6 € or $ 7.50). Passengers travelling to countries listed under Appendix 2 are charged 255 SEK (25 € or $ 31.50). For destination countries neither listed in Appendix 1 or 2 of the Aviation Tax Act, the tax rate amounts to 408 SEK per chargeable passenger (40 € or $ 50).
More information about the Swedish Aviation Tax including liability, obligations and the list of the countries included in Appendix 1 and Appendix 2 can be found here

Example 1
Calculations based on PAX number
Please see screenshot on the right.
The trip consists of 3 flights starts in EPWA and finishes in HECA.
In the simplified version of the calculations, we only consider the flights starting in Sweden and looking at the destination band and the number of PAX flying. No actual PAX are assigned.
There are 2PAX assigned to the flights from ESGG and 1PAX assigned to a flight from ESSA.
The calculation is as follow:
2 x SEK122 + 1 x SEK255 = SEK377
Explanation:
- rates for the Sweden based airport of departure
- 2PAX departing from ESGG to ESSA - band 1 (2 x SEK122)
- 1PAX departing from ESSA to HECA - band 2 (1 x SEK255)

Calculation based on actual PAX
See screenshot on the right.
The trip starts with 1PAX in EPWA. For the tax calculations, 2PAX are assigned from the Swedish airport (ESGG) but only one of them reaches final destination located in band 2.
In such case the calculation is as follow:
1 x SEK255 = SEK255
Explanation:
- 1PAX starting at EPWA is not included in the calculation due to being considered as a transfer PAX (PAX that arrives to Sweden from a different country and continues on the journey)
- 1PAX joining at ESGG and departing the journey at HECA. This is band 2 charged at SEK255
Austrian Air Transport Levy
Austrian Air Transport Levy (ATL) is a departure tax charged on the carriage, from Austrian airports, of passengers on board aircraft with an authorized weight of more than 2,000 Kg (4,400 lbs).
Both commercial and non-commercial business aircraft operators are subject to this tax.
The amount due per passenger depends on the geographical distance of the destination country/territory from Austria.
Starting from 1 September 2020, passengers will be taxed the following rates:
- 30 € (GCD < 350km)
- 12 € (GCD > 350km)
If you carry out domestic flights in Austria and are liable to pay VAT for the transport of passengers, the effective tax rate will be slightly lower because VAT can be deducted from air transport levy.
Under this scenario, the tax rates per passenger are:
- 26.55 € (GCD < 350km)
- 10.62 € (GCD > 350km)
There are also the following exemptions from the ATL due:
- children below the age of two
- animals
- crewmembers and maintenance personnel
- training flights
- departures following tech stops and unscheduled landings up to 24h. Departures after 24h are subject to ATL calculations
More information about Austrian Air Tax Levy can be found here
Examples
Calculations based on PAX number

Please see screenshot on the right.
The MTOW of the aircraft is more than 2000kg (4400lbs).
The trip consists of 5 flights, 3 of which start in Austria.
In the simplified version of the calculations, we only consider the flights starting in the UK and looking at the destination band and the number of PAX flying. No actual PAX are assigned.
The calculation is as follow:
3 x €12 + 3 x €26.55 = €115.65
Explanation:
- MTOW of an aircraft is more than 2000kg
- 3 PAX are flying internationally and the GCD is more than 350NM (GCD) - 3 x €12
- 3 PAX are flying domestically and the distance is less than 350NM (GCD) - 3 x €26,55
- Flight from LOWL to EPWA is a positioning leg (FERRY) therefore not included in the calculations
Calculations based on actual PAX

Please see screenshot on the right.
The MTOW of the aircraft is more than 2000kg (4400lbs).
The trip consists of 5 flights, 3 of which start in Austria.
PAX names are assigned to the flights.
The calculation is as follow:
3 x €26.55 = €79.65
Explanation:
- MTOW of an aircraft is more than 2000kg
- the same PAX are assigned on both flights and the tax is calculated on the higher rate (domestic) - 3 x €26.55
- Flight from LOWL to EPWA is a positioning leg (FERRY) therefore not included in the calculations
Calculations based on actual PAX and 24h gap

Please see screenshot on the right.
The MTOW of the aircraft is more than 2000kg (4400lbs).
The trip consists of 5 flights, 3 of which start in Austria.
The calculation is as follow:
3 x €12 + 3 x €26.55 = €115.65
Explanation:
- MTOW of an aircraft is more than 2000kg
- 3 PAX are flying internationally and the GCD is more than 350NM (GCD) - 3 x €12
- 3 PAX are flying domestically and the distance is less than 350NM (GCD) but also there is over 24h gap between EPWA-LOBT and LOBT-LOWL. This is the reason why PAX on LOBT-LOWL are subject to taxation - 3 x €26,55
- Flight from LOWL to EPWA is a positioning leg (FERRY) therefore not included in the calculations
Calculations based on actual PAX including Animal

The MTOW of the aircraft is more than 2000kg (4400lbs).
The trip consists of 5 flights, 3 of which start in Austria.
PAX names are assigned to the flights. Domestic flight with an animal and 2PAX.
The calculation is as follow:
1 x €12 + 2 x €26.55 = €65.10
Explanation:
- MTOW of an aircraft is more than 2000kg
- 2 PAX and 1 animal are flying domestically and the distance is less than 350NM (GCD) - 2 x €26,55
- 3 PAX are flying internationally, where 2 of the PAX are flying on the domestic flight and 1 PAX is not. The 1 PAX is included in the calculations and GCD is more than 350NM (GCD) - 1 x €12
- Flight from LOWL to EPWA is a positioning leg (FERRY) therefore not included in the calculations
Sending contracts to DocuSign
In order to use DocuSign and be able to sign a Charter Agreement using DocuSign, you need to integrate first.
The integration process is explained here.
Once the integration is active, each user will have to connect Leon account with own account in DocuSign and then, will be able to use it.
Connecting Leon account to DocuSign

The connection between user Leon account and DocuSign account takes place when the first Contract after activating integration is sent.
In order to connect own account in Leon to DocuSign account, you need to:
- Click on 'CONTRACT' option in the quote edit section
- In 'Send document' pop-up window switch the tab to DOCUSIGN
- Click on the blue 'CONNECT DOCUSIGN' button
- In the pop-up window, log in to your DocuSign account
Once you signed in, you should see the following message:
SUCCESS. Your Leon account has been connected to DocuSign. Please wait for connection in Leon view.
This is when you can start using the integration.
Usage

DocuSign integration works only with 'Charter Agreement' document and allows reviewing and signing the document in a fast and secure way.
After connecting to DocuSign, each new 'Charter Agreement' will require creating a draft in DocuSign.
Once the draft is created, you will be able to send the document to DocuSign.
In 'Send document' window you will be able to select the 'Charter Agreement' version (based on the number of versions created in the Documents Manager). 'To' email is the default email of the Requester or Representative. The 'To' email can also be inserted manually.
Before sending the 'Charter Agreement' to the Client, you can also select one of the available options:

- SHOW DRAFT IN DOCUSIGN - which will allow you to preview it in DocuSign
- UPDATE DRAFT IN DOCUSIGN - which will allow you to update the document if there are any changes within the request
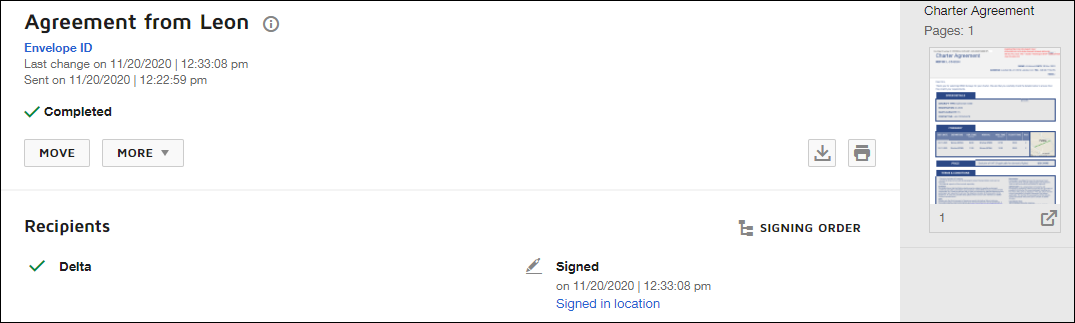
Once the 'Charter Agreement' is sent, the Client will receive it to his mailbox titled 'Agreement from [Airline name]'.
The email will also contain the link to DocuSign which will allow reviewing the document for the Client.
Also, the selections in “Send document' window will change to SHOW DOCUMENT IN DOCUSIGN and UPDATE DOCUMENT IN DOCUSIGN


The client will be able to sign, date and stamp the document without having to print it.
It is possible to include the signature tabs in the document so to indicate, where the document should be signed.
The tab icon can be included in HTML in the Documents Manager - 'Charter Agreement' by using the below:
- {% _SellerSignature_ %} - to indicate where the seller should sign
- {% _BuyerSignature_ %} - to indicate where the buyer should sign
For example, inserting below code HTML

will insert the following tab in 'Charter Agreement' in DocuSign:

The client can click on the 'Sign' tab and insert the signature.
Once Client reviewed it and signed it, Client can press finish which will send a notification to an email that the agreement has been signed and in DocuSign it will be marked as 'Completed'.
Additional options
The right side of the page shows additional panels, which will allow seeing the quote in the Calendar, view the route on the Map, view & manage Sales checklist items and see OPS checklist items, manage PAX, add Notes or Comments.
CALENDAR

The quote itinerary/trip is imposed on actual confirmed schedule of the selected aircraft. The information displayed shows departure-arrival times & ADEP-ADES.
The current day is always displayed in light-blue and the thin, green line shows actual UTC time.

The view shows the 7-days period. Click ← or → buttons to move for another 7 days backwards or forward, or click TODAY to get back to the current day view. You can also switch between UTC & LT.
Aircraft selection dropdown allows you to view a different aircraft activity vs the aircraft used in the RFQ. If you choose a different aircraft in the 'CALENDAR' tab, the activity for this aircraft will be displayed in grey and the RFQ will be highlighted green. This is presented in the main screenshot of this section.
Switching the aircraft registration in the 'Itinerary' section will reset the aircraft registration in the 'CALENDAR' tab to the same one.
MAP
The Map shows the route of the trip. You can navigate with the map by clicking + or - in the top-left corner.
Selected flight shows the arrow in green. Ferry leg shows the arrow in the light-blue.

CHECKLIST

Sales checklist on the trips/quotations added in the Requests/Quotes can be managed in the Checklist section of Requests/Quotes only.
Sales checklist becomes available when the request is created, whether it is a regular fleet or subcharter.
It is possible to add extra items of the checklist by using 'ADD ITEM' button. It is also possible to delete the items by clicking on the bin icon.
It is possible to service the Sales Checklist from the OPS view if the trip/quotation has been added in the Requests/Quotes.
OPS Checklist appears only once the trip is booked.
It is also not possible to service OPS checklist in the Requests/Quotes. This can only be serviced in the OPS view.
Elements of the Sales Checklist can be set by default in the Flight editing section. Any changes to the Sales Checklist items will only apply to the newly added flights. If you wish to add or remove the Sales Checklist item, you can do it in the OPS view by using ”+ADD ITEM“ button.
PAX

In this tab, you can add passengers on a flight.
You can choose either the PAX you already have in your Phonebook and add them in the “DATABASE” section or add Passengers as a free text in the “TEXT” section.
In order to activate the PAX boxes in the “DATABASE' section, you need to insert the number of passengers in the route section of the quotation.

In this section, it is also possible to add new passengers to the Phonebook or edit existing passengers that are already in the database. The process is exactly the same as described here.
If the trip is added in the Requests/Quotes it is possible to add passengers or edit the data in the OPS section, tab PAX.
If a passenger has more than 1 passport you can select which one should be used as default (in PAX profile mark a checkbox 'Default'), but it is also possible to select a different passport for departure & arrival - when adding PAX, click + icon and select appropriate passport. This feature is for PAX selected from Leon database and not available when adding PAX from text.
NOTES

In this section, you can add notes for trips on the regular aircraft as well as the subcharter.
Notes added in this section can be then embedded in Sales documents as all of them have the items available in the Available data.
Once the notes are added, click SAVE button in order to save the changes.
The OPS and Sales notes will be available and can be edited both in Requests/Quotes as well as OPS > FLIGHT tab of the responding Flights.
OPS Notes are not available when the trip is not booked.
Sales Notes are available as soon as the request is created.
MESSAGES
In this section, you can add any messages regarding this particular trip/quotation. If the request was sent from Avinode, you can also reply to the customer from this section.
There are 2 buttons available in this section:
- ADD INTERNAL MESSAGE - this will allow adding an internal message visible only to Leon users. This option is always available
- REPLY TO CUSTOMER - contains 2 options:
- Avinode - allows replying to messages and quotations sent from Avinode
- Email - allows sending emails and receive emails, as long as it is synchronised with a mailbox
ADD INTERNAL MESSAGE

+ADD INTERNAL MESSAGE function is there to allow communicating the stages of the process to the team.
There are 3 options available:
- ADD - option to add an internal message as a person servicing the request
- ADD AS REQUESTER - adding a message and indicating that this message was added by the requested. Such a message is highlighted green
- CANCEL - allows cancelling the message input process
REPLY TO CUSTOMER
There are 2 options available:
- AVINODE - if the quote comes from Avinode, this button is selected by default. Allows messaging with the Avinode broker
- EMAIL - allows communication directly via email by configuring Leon with an external Mailbox
AVINODE

Messages inserted in Avinode when sending a request to Leon will also show in this section and will be highlighted green.
When the request is received from Avinode, you can click on REPLY TO CUSTOMER button and the message will be sent to the Client in Avinode.
In Avinode, the reply will be available in the 'Trips' > 'Buying' section, as per screenshot.
Once the message is added you will be able to see who added a message and what day at what time. The times presented in the messages history are in LT.
This functionality allows you to send and receive emails directly into Leon and keep the track of your emails in one place.
Before you start using the functionality you need to:
- Contact support@leonsoftware.com in order to configure generic mailbox with Leon
- Create additional 'Sales Panel Message' email template in 'Email Templates' section, subsection 'Other'. This will allow you to send an email directly from 'MESSAGES' section
Once you have your mailbox configured, you can go to Settings > Email Templates > Other and create the 'Sales Panel Message' template.
It is important that the email address provided to Leon is inserted in 'RECIPIENTS' tab > 'Reply to' box. This email address can also be inserted in another email templates 'Reply to' boxes which will automatically synchronise the emails with the messages section.

Once you have everything configured, you can start using the functionality:
- any correctly configured types of emails such as Flight Quotation, Charter contract or Sales Panel Message, amongst others, will show in the 'MESSAGES' section upon sending.
- any replies from the Clients to the configured messages will also show in the 'MESSAGES' section. Replies are indicated by green background of the bar
- both sent and received emails will be synchronised with the Mailbox and will be available to view in 'Outbox' and 'Inbox' respectively
- address 'To' is automatically generated from Client or Client Representative email address
- it is possible to attach and send files
- files sent by the Client will be received and available to preview in 'MESSAGES' section
- new message will move the request to the top of the 'Requests/Quotes' list
- 'MESSAGES' section will now refresh automatically
It is also possible to edit or delete the message (apart from 'EMAILS'). In order to do that, click on … on the right-hand side of the existing message box and click on the relevant option.

AIRPORT CHARGES

This is not a default tab and needs to be activated in the Add-ons section. More information about the 'Airport Charges' activation process can be found here.
This tab is showing the airport charges downloaded from the Airport Charges per route for specific airports, as displayed in the screenshot.
Uploading Airport Charges to the Quote

It is possible to download the Airport Charges directly to the quote.
In order to download the Airport Charges' to quotation, the below steps have to be performed:
- Make sure that the integration with 'Airport Charges' is active
- Add 'Landing Fee' item to the quote. The 'Airport Charges' are assigned to this item and recalculate upon clicking on
 icon. As you can see in the screenshot, the total value is a sum of the 'Origin' and 'Destination Charges' and clicking on the arrow next to the 'Landing Fee' will provide you with the breakdown per airport
If 'Landing Fees' item is included in the Aircraft Fees, the quote will initially calculate the fees based on the default price list unless the 'Airport Charges' option is selected. In this case, the default price will be updated based on the 'Airport Charges' and will overwrite the default one.
If the integration is not active, the 'Airport Charges' icon by 'Landing fees' item will still show but will be disabled.
Uploading Airport Charges to the Quote
It is possible to download the Airport Charges directly to the quote.
In order to download the Airport Charges' to quotation, the below steps have to be performed:
- Make sure that the integration with 'Airport Charges' is active
- Add 'Landing Fee' item to the quote. The 'Airport Charges' are assigned to this item and recalculate upon clicking on icon. As you can see in the screenshot, the total value is a sum of the 'Origin' and 'Destination Charges' and clicking on the arrow next to the 'Landing Fee' will provide you with the breakdown per airport
If 'Landing Fees' item is included in the Aircraft Fees, the quote will initially calculate the fees based on the default price list unless the 'Airport Charges' option is selected. In this case, the default price will be updated based on the 'Airport Charges' and will overwrite the default one.
If the integration is not active, the 'Airport Charges' icon by 'Landing fees' item will still show but will be disabled.
Subcharter
When you use occasionally subcharter aircraft from another operator, our panel REQUESTS/QUOTES allows supporting quoting for external aircraft types with Subcharter option.
In order to use subcharter option create a quote (or edit existing one) and in the Aircraft drop-down box select 'Subcharter' - insert the price, add schedule details (or mark times as 'TBA').
The subcharter details edit window is divided into 2 tabs:
- BASIC - contains subcharter details such as aircraft details, crew details, contact details (email and phone no.) and aircraft photos, as long as available in Avinode
- MESSAGES - possibility to reply directly to the Operator email (as long as it is available in 'BASIC' tab)
In a subcharter 'BASIC' section (underneath the itinerary), select an AC type (it is mandatory to save the quote if you don't select the type Leon will show a warning). Other details, such as Registration, CPT, FO and FA are not mandatory.
You can also insert the Subcharter Operator name and the amount you paid for the Subcharter in the Subcharter price input.
It is also possible to select Handling agents for Subcharters. Handlers can be selected from the drop-down list.
If we already used subcharter functionality in the past, Leon will search for an aircraft that was previously used. The dropdown list will display both aircraft registration and the operator name in the format Registration, Operator name. The aircraft is suggested based on the date of the last request created on this particular aircraft.
Once we select the aircraft, all the data is copied from the previous request, including type, crew, aircraft details and photos. The only input that is not copied is the subcharter price.
Once the subcharter quote is saved you can manage it just like a standard quote. There is one exception - you cannot physically book subcharter quote as option / confirmed flight into OPS module. However, you can still change the status to 'option' and book, but the quote will not be booked.
You can send Flight Quotations containing normal and subcharter quotes. You can send subcharter Contract and Flight Brief for subchaters using documents templates which can be customized from Documents Manager and Email Templates from Email Templates panel. In both of these panels, you have access to fields values provided in 'Subcharter' tab of the right panel.


You can also upload the photos of the Subcharter aircraft.
Uploading photos
In order to do it, click on 'EDIT PICTURES' button.
A pop-up window will appear with the 'UPLOAD FILES' button which will allow you to upload photos from your computer.
Once you selected the photos, in 'Edit pictures' pop-up window, you have to assign title to each of uploaded photos (example in the screenshot).
Clicking 'SAVE' will upload the photos.
It is possible to embed the uploaded photos within subcharter sales documents. When naming uploaded photos you need to make sure that the title matches the title used in the HTML.
If the subcharter flight is requested by using the 'FIND SUBCHARTER' button, the photos, if available, will download automatically to the subcharter section.
Messages tab

In this tab, it is possible to reply directly to the Operator.
In order to reply directly to the Operator, Operator's email has to be inserted in Contact email box in 'BASIC' tab.
In order to reply to Operator press REPLY TO OPERATOR link and select EMAIL option. Operator's email will be picked from Contact email in the 'BASIC' tab.
Select 'Subcharter message' template in the dropdown. 'Subcharter message' email template needs to be created in 'Settings' > 'Email templates'
Currently, replies from all the brokers will display under one 'Messages' window.