Table of Contents
PHONEBOOK

To make flight preparations quick and easy you can use this section and add contact data to Leon.
Hover the mouse over ![]() icon and select 'New Phonebook'.
icon and select 'New Phonebook'.
Filtering options are located at the top of the 'New Phonebook' view.
The list of contacts displays the following information:
- Name - name of contact
- Code - code of contact
- Email - email, to which all the emails are sent
- Phone - work phone number
- Type - type of contact:
 - indicates person
 - indicates company
- Client - indicates whether the contact is or isn't a Client. This can be indicated by selecting the 'Client' checkbox in contact profile
- Country - a country where the contact is based
Filters
The filtering options are located at the top of the page.
There are the following filtering options available:
 - allows filtering by contact name and the contact code
 - allows displaying all the contacts or the animals only
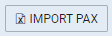 - allows importing PAX data from Excel
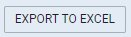 - allows exporting Phonebook data to Excel
Resetting the filters can be done by deleting already selected options.
New Contact


In order to add a new contact press ![]() button.
button.
A pop-up window will appear where the type of contact can be selected between:
- Company
- Person
Depending on the selection, the details are very similar. There are some details that do not apply to the Company' such as Gender, Place of Birth, etc.
Some of the important fields are:
- Language - an indication of the language that the contact speaks. This could be important when contacting the Client, especially if sales emails and documents are to be sent (can be customized in a specific language in the Documents Manager and the EMAIL TEMPLATES)
- Salutation - salutation selected here can be used in email and documents templates by default
- Operator base - more information below
- Client - checkbox indicating in the contact is a Client or not
- Preferred handling agent - more information below
- Exclusion zones - more information below
In order to edit the existing contact, simply click on the contact and the editing pop-up window will display.
The contact details in the editing window are the same as in the 'New contact' window.
Operator base
This feature only applies to operators that have more than one base. For the operators with one base only this functionality will not apply.
Bases can be defined in General Settings section.
Once the bases are added, it is possible to assign one to a Client.

If the base is assigned to a Client, the trip requested by this particular Client will automatically be assigned to the Client's base.
It is also possible to assign or change the original base, including the base initially assigned to a Client, without having to assign a specific user.
If you select a particular base in the operator selection dropdown (top-right corner of Leon), the Requests/Quotes list will only display the requests assigned to this particular base.
Handling Requests per Client
It is possible to assign a default handling agent to a Client in Leon.
In order to assign a Handling Agent to a Client, you need to select the Agent(s) in the 'Preferred handling agent' box.
Handling agent can be searched by using:
- Airport ICAO/IATA/Custom code
- Handler Name
- Combination of 'Airport code - Handler name'
It is possible to assign multiple Handling Agents at different Airports to one Client.
Once the Handler is assigned, it will appear as a tag below the 'Preferred handling agent' selection box:
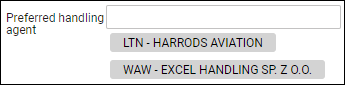
Only one Handler per airport can be assigned to a Client. Assigning second Handling Agent will replace already assigned Handler.
Once the Handler is assigned, it will auto-populate in the OPS checklist when the trip is booked.
Handler assigned to the Client has higher priority than the Handling Agent selected as preferred in the Airport Directory. This means that the Handler assigned to the Client will overwrite the preferred Handler from 'AD' upon booking the trip from Sales.
Exclusion zones
Exclusion zones are the countries over which the aircraft should not be flying.
The exclusion zones can be indicated in the Client profile - 'Exclusion zones' box as per below. Simply start to insert the country name and select it from the dropdown list.

Once the exclusion zones are selected, the flight time calculations in the 'Requests/Quotes' section ('Calculate Flight Time' option) will take these zones into consideration.
Edit Contact
In order to edit the contact simply click on the contact name in the list of contacts.
Depending on the type of contact, a different set of details will be available.
When it comes to the Company type client, one page with general information is available. Some of the elements are explained in the 'New Contact' section.
When it comes to the Person type client, the following sections are available:
- Basic
- Documents
- Characteristics
The sections are explained below.
Basic

Basic tab contains very detailed information of the Contact as well as address and the contact details.
Some of the more important details are:
- * Language - an indication of the language that the contact speaks. This could be important when contacting the Client, especially if sales emails and documents are to be sent (can be customized in a specific language in the Documents Manager and the EMAIL TEMPLATES)
- Salutation - salutation selected here can be used in email and documents templates by default
- Operator base - more information in the 'New Contact' subsection
- Client - checkbox indicating in the contact is a Client or not
- Preferred handling agent - more information in the 'New Contact' subsection
- Exclusion zones - more information in the 'New Contact' subsection
Additionally, details inserted in the Email section will be used to send any emails (sales documents and movement emails) to the Client.
Documents

In the documents section the following details can be inserted:
- Passport - clicking on the 'NEW PASSPORT' button will allow inserting the PAX passport details as well as uploading the passport scans and marking the passport as a default passport (will be automatically used on the flight to which the contact is assigned as a PAX). Additionally, it is possible to have the deleted passports displayed by switching the 'Deleted Passport' option from 'Hide' to 'Show' - in this case, the deleted passport will appear with the 'Deleted' label in the 'Default' column
- VISAS - clicking on the 'NEW VISA' button will allow adding new visa details and connecting it to the specific passport
Access to this section can be allowed in the 'Privileges' by selecting DENY/VIEW/EDIT on the 'New phonebook - Documents' place.
PAX Characteristics

Section PAX Characteristics contains important information about the PAX preferences such as likes, dislikes, favorite dishes, and drinks as well as other notes.
Access to this section can be allowed by privileges by selecting DENY/VIEW/EDIT on the 'New phonebook - Characteristics' place.
Any information populated in this section can be populated on the PAX and Crew Tripsheet.