Table of Contents
PAX
PAX panel is available in the right-hand filter. It shows list of passengers (names or TBA). You can edit PAX profiles by clicking the icon ![]() where you can define PAX details, Travel document or preferences. Mark a checkbox FERRY if no PAX should be added to the trip.
where you can define PAX details, Travel document or preferences. Mark a checkbox FERRY if no PAX should be added to the trip.
Passengers can be added to Leon in 2 ways: selecting names from Leon database or manually by inserting details. You can add pax number while adding a new trip, then in a tab PAX you just input their details.

If you have reduced PAX number by navigating with arrows (which result PAX names disappear from the filter) and you again increased PAX number - Leon will bring the same PAX names to the filter. PAX will not be brought back to the list if you reduced the number and saved changes.
The PAX panel is divided into 2 sections: Database and Text.
If you hover the mouse over the PAX number window, Leon shows a pop-up window with the information of how many males, females, children and infants are on the flight.

Database


In Leon all Pax data can be stored in Phonebook. When you add pax from the database all you need to do is to insert passenger's first 3 letters of either his name or surname, then Leon will open a drop-down box with suggestions.
Apart from inserting different characteristics of the PAX, there is an option to assign default Salutation which will be applied to Sales Documents and Email templates (salutation item in the available data). You can select the salutation from the list of available options where @F will apply the First name and @L will apply the Last name
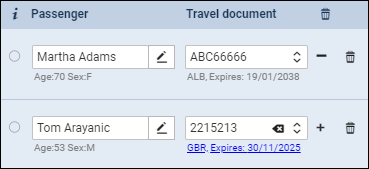
If a passenger has more than 1 passport (or Travel document) you can select which one should be used as the default (in PAX profile mark a checkbox 'Default').
It is also possible to select a different passport for departure & arrival - when adding PAX, click + icon and select appropriate passport.Or any other Travel document.
This feature is for PAX selected from Leon database and not available when adding PAX from text.
Adding PAX to the flights in the 'Database' section

PAX can be added to the flight in the following ways:
- Phonebook - select PAX from the Phonebook
- IMPORT PAX - importing PAX as a list either from:
- another flight within a trip
- 'IMPORT FROM TEXT'
- 'Import from Excel' file
- ADD PAX LIST selection:
- 'PICK FROM LIST'
- 'TRAVEL DOCUMENTS'
Options to add PAX to the flights are explained below.
Adding PAX from Phonebook

If the PAX are already in the database (Phonebook), it is sufficient to insert the first letter of PAX name in the PAX name field and Leon will display the list of names.
Simply pick the name from the list and save changes.
If you type a new PAX name/surname (which has not been added yet) into the field 'To be announced', Leon will show a button + ADD PAX.
Click it (or press Enter key) to have a window displayed where you can add all PAX details (apart from name/surname which will already show). Once the details are added and saved, PAX will be added to the flight as well as to the Phonebook
Picking PAX from the contact list
It is now possible to select the PAX on the flights using the PICK FROM LIST option.
This option allows to quickly select and add the PAX to the flight.
Click on the PICK FROM LIST option to open the Select PAX pop-up window.
'Select PAX' window
The Select PAX window is divided into the following sections:

- Search passenger - option to search for PAX. If the 'Requester' is selected, the 'Search passenger' option is looking for the PAX only assigned to this specific Requester
- Requester - can be assigned in the 'TRIP' tab ('Client' field) or automatically selected from the quote (for Clients using Requests/Quotes section)
- Available passengers - list of PAX assigned to the Requester Company and containing the basic details (Name, DoB, Companies one is assigned to). If the requester company is not selected the list displays all the PAX available in the Phonebook. In this case 'Search passenger' option can be used. Clicking on the + next to the PAX name will move the PAX to the Selected passengers section
- Selected passengers - PAX selected in the 'Available passengers' section. Press - to remove the passenger from the list
- Action buttons:
 - option to cancel PAX selection procedure
 - option to clear the list of selected PAX
 - option to add PAX to selected flights:
- if there are more PAX names selected than the PAX number, the number of PAX will increase accordingly, i.e. PAX number is 2 but 4 names selected and added - PAX number will increase to 4
- adding further PAX to the list will not overwrite already added PAX, i.e. adding 2 new PAX to 2 already assigned PAX will increase the PAX number to 4
 - option to replace already added PAX with the new ones
Assigning PAX to the flight by scanning Passport or a National ID

It is also possible to assign PAX to the flight, by scanning the Passport/National ID.
In the tab PAX, click on ADD PAX LIST option > TRAVEL DOCUMENTS and select a scan of the passenger's travel document.
Once the scan has been uploaded, Leon will show a new window with the scan attached as well as the person's details filled in.
To add passenger's details to the database (so that it can be used again when the same passenger travels) click a button  and save changes.

Once added to the flight, the person will automatically be added to the Phonebook upon saving changes.
Import PAX
Import from Excel file
PAX data import from Excel file is possible only if the file is in the same format as the one which is generated in Leon when you export PAX data to Excel (see screenshot below). If you change columns order in the file or add a column, Leon will not import PAX data. Below you can see the format of Leon PAX Excel file.

In order to import PAX from Excel, once the file is filled in with PAX details, in a section OPS open a tab 'PAX' in the right filter, click icon IMPORT PAX and select Import from Excel, then select PAX file (make sure it is saved as .xls) and Leon will automatically import all PAX data (click SAVE to finish the import).
All other PAX details which can not be inserted into to file, such as i.e. place of birth, need to be added manually.
Import from text
It is possible to import PAX from a leg assigned to the same trip or import PAX from text.
If there are Passengers assigned to the flights within the same trip Leon will display available flight that the PAX can be imported from. In this case simply select a leg of the trip of which pax should get imported from and click 'OK'.

It is impossible to Import PAX if Text section of Passenger List is already filled in. In such case, when you click on  button Leon will display following information:
“Pax import from the text is disabled because pax have been written as a note in Text tab. Please clear the note in Text tab to activate pax import from text”.
Import from text option will allow you to add Passenger details from a file.The Passenger details will be added to the flight and Phonebook at the same time. The Passenger details have to be inserted in certain format. There are currently 2 formats available. Both are presented in the Text section of this page.
The process of importing PAX list from text is very simple:

- Choose format - select the format you wish to use to insert your passengers from the dropdown in the 'Import pax list from text' window. Leon will accept both 2 and 3-letter country codes, e.g UK or GBR.
- Insert PAX list - in the left editable field you can either 'enter' or copy/paste PAX list in the chosen format.
- Parse - after inserting the list,
 button will activate. This button will check whether there is any inconsistency between the format and the data inserted. If there are mistakes, Leon will display the following message: Please check if items left in the text editor match the chosen format.. If the PAX data is inserted correctly, Leon will display: 1 pax will be added to the flight. Clicking 'OK' button will add Passenger list to the flight.
 - SAVE - this allows saving PAX list on the flight
Export PAX

When adding passengers from the Phonebook, Leon shows a link EXPORT PAX.
By clicking it you get an access to an Excel file where assigned PAX details are sent, such as:
- Name
- Surname
- Company
- Email address
- Mobile phone number
- Nationality
- DoB
- Travel document number
- Travel document's expiry date
If the Travel document is different on arrival and departure, Leon will include both in the Excel file.
PAX DETAILS EDITION
Open a tab 'PAX' and click the button  - Leon will show a new window, where missing PAX details can be inserted, such as:

- Ticket number
- Accompanied by - select PAX name from the list - the list shows only PAX added to the same flight.
- SSR code - Special Service Code, i.e. PNUT for Passenger is allergic to peanut dust.
- National ID number - any other ID number, apart from ID card number, i.e. National Insurance Number.
- Traveler number
- Residence address
- City
- Zip code
- Country
- Destination address
- City
- Zip code
- Country
- Luggage Quantity
- Luggage Weight
- Weight Unit
PAX name & surname, passport & national ID details can't be added from this window - only from a single PAX profile.
VISAS

To add a visa to a particular passport, edit PAX profile, click a button  and add details:
- Passport - select a passport to which a new visa should be added.
- Country - select a country which concerns the visa.
- No. - insert visa's number.
- Date of issue - insert visa's date of issue.
- Expiry date - add visa's expiry date.

Adding details of visas to OPS documents (Trip Sheet and Gendec), can be obtained from Documents Manager panel, by using items under visaList.

If you want to add a new passenger to the database just click ![]() and a new pop-up window will show up where you should input details. Passenger's characteristic (his favourite dishes, drinks or dislikes) will appear on the Trip Sheet document.
and a new pop-up window will show up where you should input details. Passenger's characteristic (his favourite dishes, drinks or dislikes) will appear on the Trip Sheet document.
It is possible not to mark a default Travel document at all, but in this case - if such a passenger is added to the flight - Leon will show a caution (PAX number in yellow) and if you hover the mouse over PAX number Leon will show information: 'At least one of PAX passport missing'. Double-click on PAX number to select an appropriate Travel document for the passenger.

If a new passenger should be assigned to a certain Company you can do it by typing the 1st letter of a company name.
If a passenger is under 2 years old he/she will appear in the tab PAX as (I). If between 2 and 12 years old - as (C). If you hover the mouse over PAX number in either OPS or Calendar section that information also appears.

If you need to add some extra information to an existing passenger that is already assigned to a flight you can do it by clicking on 'Edit in phonebook' link. This will redirect you to the Phonebook where the data can be filled in.
To mark a Lead Passenger (who can be an aircraft owner or a company president) mark a checkbox right under the 
If you want to remove a passenger from the list just click X on the right.
NATIONAL ID
Travelling within EU does not require using a passport by EU citizens - passengers can use national ID cards instead.
It is now possible to add ID card's details to PAX profile and use it on the trip. Leon will show ID card's details on documents, such as: Crew Trip Sheet or PAX Trip Sheet as long as it's set up in Documents Manager panel, by using data items: 'arrivalNationalId' & 'departureNationalId'.
Adding ID card
When adding a new passenger's profile (or when editing the profile of already added passenger), click on the button  and insert ID card's details.

In the OPS panel (tab PAX) Leon shows expiry date of the ID card.

When adding a new PAX to Leon (or editing already added PAX profile), a new column Type shows in National IDS section. By default it shows 'ID Card' - click it to get the drop-down list open and select appropriate ID type from available list:
- Alien card
- Residence card
- Facilitation document
- Military card
- Nexus card
- Refugee document
- IRPA exempt
- Naturalisation Certificate
- HK return permit

Text

Click Text tab if you want to add pax details manually. Pax number in this section needs to be changed manually.
To generate pax data in the document Pax Manifest details need to be inserted in a certain format. There are currently 2 formats available:
- Number, Title, Surname Firstname, Date of birth, Passport number, Passport expiry date, Nationality
- Number, Title, Surname Firstname, Date of birth (dd-mm-yyyy)
Example:
1, Mr, Smith John, 06-03-1978, ABC123456, 13-12-2020, UK
2, Ms, Smith Jessica, 03-06-2001
As you can see from the screenshot, depending on the format inserted, PAX Manifest document will be filled in fully or partially.
Catering
It is possible to order catering directly from Leon. In order to make this work, a few settings must be defined.
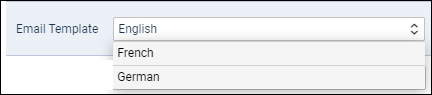
EMAIL TEMPLATE

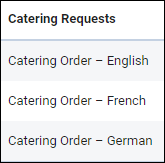
In a section Settings > Email Templates find Catering Requests and click it to set it up. You can change the default one's name or remove it and add a new one (you can add multiple templates).

Edit a template to define its Subject, Body and default Recipients emails: From, Reply to, CC & BCC. Use Available data items to re-arrange the email template.
ORDERING CATERING
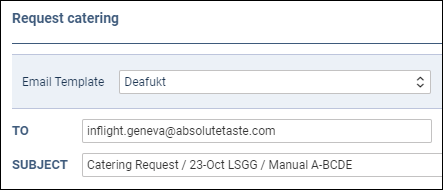
Once catering email templates have been defined, open OPS checklist item 'Catering', click a button  and Leon will show a window for order sending.

A drop-down 'Email templates' will show all previously defined templates. Insert an email address into a field TO to which the catering order should be sent out and click SAVE.
Caterers list
It is possible to select a caterer from the drop-down list - the list in the checklist matches caterers in the 'Airport Directory' panel, tab Suppliers.
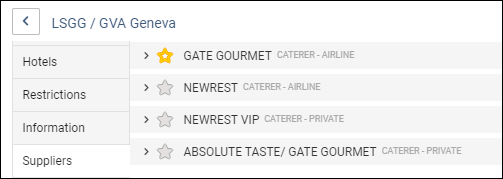
![]()
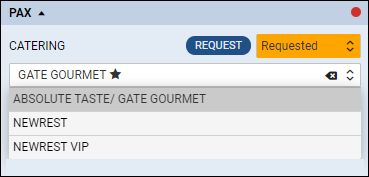
When ordering catering, Leon will show selected caterer's email address in a field TO.