Table of Contents
SCHED
SCHED is the functionality allowing you to build and manage the schedules.
Functionality is designed with Airlines in mind. However, it still can be used by business and charter operators to build schedules.
Main SCHED view
The main SCHED view is divided into 2 sections:
- Versions - the top part of the screen representing schedules assigned to a specific schedule version. At this stage, the schedule is created but the aircraft isn't assigned yet
- Aircraft schedules - schedules assigned to the specific aircraft. The list of aircraft includes both the real fleet (indicated in italic font) and the virtual aircraft (standard font)
Once the schedule is assigned to a specific aircraft, this flight, or a number of flights, is moved to the bottom part of the view.

Actions available
There are following options available:
 - creating new schedule
 - selecting flights for further actions
 - publishing selected flights
 - modifying selected flights
 - option to export selected schedule with 2 options available upon hovering over the 'EXPORT' button:
- SSIM - export of schedule to SSIM file. SSIM not available on the non-published schedules
- EXCEL - export of schedule to an Excel file
 - deleting selected flights
 - displaying selected published flights in OPS > TABLE view
Next to ![]() button there is a dropdown available where you can choose between UTC and BT (Base Time) which can be set up in Settings > General Settings section.
button there is a dropdown available where you can choose between UTC and BT (Base Time) which can be set up in Settings > General Settings section.
In the top-right corner of the page, you have the  filtering option where you can switch the SCHED between IATA and ICAO codes.
NEW VERSION OF THE SCHEDULE
This option allows creating a schedule version where new schedules can be inserted either by uploading an SSIM or XLS file from a specific Client (e.g. travel agents) or by adding manually a new schedule without assigned aircraft.

In order to create a new schedule click on  button.
In the 'Create New Version' pop-up window insert the name of the schedule, select the Client, and add a short description (as per the screenshot on the right).
Once the version is created, it will be available in the dropdown selection available at the top of the screen.

MULTIPLE VERSIONS PREVIEW

It is also possible to select multiple versions of the schedule to preview in the SCHED overview.
To do that you need to open the versions list and simply click on the versions you would like to view, as per the screenshot on the right-hand side. SCHED overview will refresh upon selecting each additional version.
In case of a situation where there are different versions assigned to one aircraft, each version is presented in a separate line within the aircraft block.
If the versions are not assigned to an aircraft, they will be displayed in the unassigned aircraft section as separate TBA lines.

Version selection will appear in the following windows:
- New Schedule pop-up window as per screenshot on the right-hand side
- Schedule Import
- Schedule Export
- Select Flights
It is possible to publish schedules for one version only.
IMPORT


If a file with the schedule was provided it could be uploaded to Leon using the  button.
It is possible to import schedules from SSIM and XLS files. XLS file has to be in the same format which is exported from Leon (the same columns and correct data).
Select the schedule to which the file should be uploaded and click on the button. If multiple versions are selected in the overview then the specific version can be selected in the import pop-up window.
The 'Import' pop-up window will open where the file can be uploaded:
- select the version to which the file should be uploaded
- select the airport code format
- select the file format
Once the file is uploaded the flights will appear in the top part of the screen for the selected schedule, as per the screenshot on the right.
If there are changes to the previously uploaded schedule, the new upload will replace them.
The uploaded schedule can be modified as per the options available and described further down in this part of the Manual.
EXPORT

To export the schedule to a file click on the  button.
The schedule can be exported as SSIM or XLS file.
For SSIM It is important that in the aircraft configuration fields 'Passenger Reservation Booking Designator' and 'Configuration/Version' are filled in.
The procedure is quite simple. Hover the mouse over the button and select the desired format of the file, and the place on your computer to which such file should be saved.
Leon will save it to the .txt (for SSIM) or XLS file format.
NEW SCHEDULE
This option can be used if the SSIM file has not been provided and the Schedule needs to be inserted manually.
It is possible to build the schedule in 2 ways:
- Based on 'To date' module - creating a schedule based on 'From/To' selection
- Based on 'Block hours' module - creating a schedule based on the number of block hours allowed within the schedule
In order to build a new schedule you need to perform the following steps:


- Select the Schedule to which the new schedule should be added
- Click on button
- Select the version of the schedule to which flights shoult be added
- Select the model you'd like to use to build the schedule ('To date' or 'Block hours')
- Select the Aircraft if known. If the aircraft is not selected, the schedule will appear in the top part of the screen with the 'TBA' label. IMPORTANT! - schedules can be assigned to the virtual aircraft as well as the actual aircraft
- Select schedule Rotation (weekly, biweekly, triweekly) and the ICAO Type
- Select the days on which the schedule should repeat (Mon-Monday, Tue-Tuesday, etc)
- In the Schedule section you can insert the flight details. To add the next flight within the same schedule click on a + and the second line will be available. In the second line, you can also select a 'Day Shift' number which means shifting your order for the selected number of days forward. I.e. if you select +1 and the order is supposed to start from Wednesday, then the order will start from Thursday.
- Optionally, you can select Tags. You can either select the existing ones or add new ones. After the schedule is published, the tags will appear in the tab 'TRIP' in OPS section. If the tags are amended in SCHED, they will overwrite already existing tags in the 'TRIP' tab in OPS
- Click the 'Add Schedule' button to save a new Schedule
It is possible to switch between UTC and Base Time if Base times are set up in the General Settings section.
If the schedule is built based on 'Block hours' model, you need to indicate the number of hours that the aircraft is allowed to perform.
Once it is indicated, Leon will limit the schedule and the number of rotations up to to this limit.
Example
As you can see in the screenshot, the schedule was limited to 30 block hours. There are 6h25m of block time within each rotation, which means that there can only be 4 rotations built within 30h worth of allowed block time:
4 x 06:25 = 25:40

In the 'General Settings' panel you can define Bases (and then assign aircraft and crew to a particular Base).
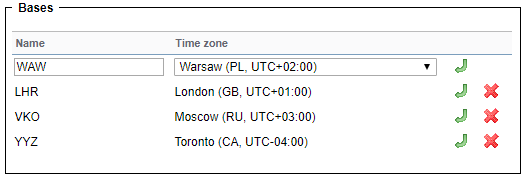
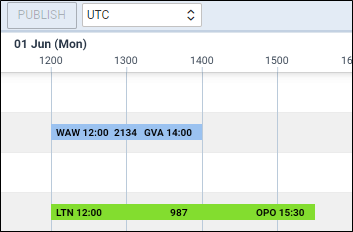
On the SCHED main page, right next to the button 'Publish', you can find a drop-down box with the list of predefined Bases, as well as UTC (which shows by default).
When switching between Bases, Leon will show appropriate ADEP & ADES times on the flight-belt (see example below).


An option to select between UTC & chosen BT also appears when creating a ![]()
Once the schedule is saved, the flights are displayed as blue squares.
You can click on the flight and perform further actions, such as modifying the schedule or deleting it. You can select more than one flight by holding Shift/Ctrl buttons on the keyboard and clicking on the flights or by using ![]() option.
option.
SELECTING FLIGHTS

This function allows selecting a flight or a number of flights for further actions.
It is possible to select flights in 2 ways:
- Holding Shift/Ctrl key on the keyboard and clicking on the flights
- Using button
The 'SELECT FLIGHTS' option allows you to select a number of flights from the already added schedules.
The 'Select Flights' window is divided into two sections:
- Filter
- Schedule
In the Filter section you can filter by the following:
- Version - option to select version/versions of the schedule
- Date range - selecting 'From' and 'To' dates
- Days - selecting the days within the schedule
- Aircraft - selecting flights on a specific aircraft(s). Flights can be assigned to both real aircraft as well as the virtual aircraft
- Flight number - filtering by the specific flight number or numbers (insert multiple flight numbers separated by space)
- Adep and ADES - searching for flights from or to a specific airport or routing
The Schedule section displays the results of the filtering. There you can select the flights that require further action.
Once the flights are selected they're marked by the frame in the 'Sched Overview' - ![]()
PUBLISHING FLIGHTS

Option ![]() is there to publish the selected flights of the schedule.
is there to publish the selected flights of the schedule.
The publishing process is as follow:
- Select flights
- Click on the 'Publish' button
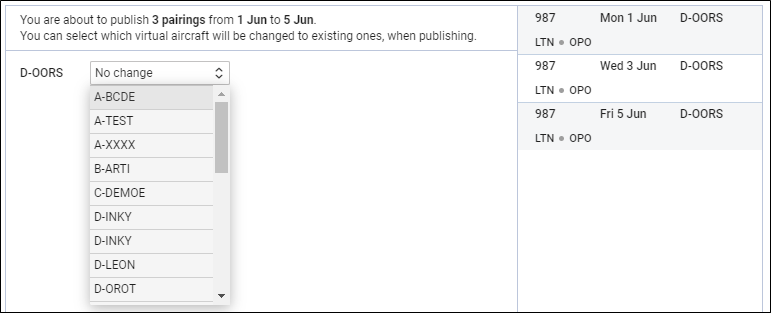
- In the 'Publish' window Leon displays the 'Aircraft assignments' section in the left column and selected flights and pairings in the right column.
Once the schedule has been added to the SCHED panel, you can select whether it should be published with the initially assigned aircraft (either virtual or the real one), or with the existing one.
Select flights (use Shift or Ctrl to mark multiple legs) and click the icon ![]() - Leon will show a pop-up window, where you will be able to either leave the same aircraft as it was selected when creating the schedule or select between existing aircraft for the schedule publication (no option to select a different tail).
- Leon will show a pop-up window, where you will be able to either leave the same aircraft as it was selected when creating the schedule or select between existing aircraft for the schedule publication (no option to select a different tail).
Once the schedule has been published with an existing aircraft, you will find it in the OPS panel.

There is a following color coding to the flights in 'Sched Overview':
 - flight not published
 - flight being published
 - flight published
MODIFYING FLIGHTS
It is possible to modify selected flights or a number of flights or modify pairings.

In order to modify flights you need to:
- Select the flights to modify
- Select option
- Remain on 'FLIGHTS' tab
- Perform relevant modifications in the 'FLIGHTS' window
- Press the 'SAVE' button to save the changes
'Modify flights' window is divided into 2 sections:
- Modification options
- Selected flights
In the Modification options section you can change the following:
- Shift - shifting whole schedule by a number of hours/minutes
- Block time - changing block time to the number of hours/minutes
- ADEP/ADES Slot - option to modify planned slots timegrames. They will apply to the 'Slot ADEP/ADES' items in the OPS Checklist
- Aircraft - allows changing the aircraft
- Flight No. - changing the Flight number
- ADEP and ADES - changing airports of departure and arrival respectively
- ALTN - choosing the alternative airport
- Ferry - switching between 'Ferry' and 'Not ferry'
- Tags - option to modify tags and to remove all tags altogether
If you want to change the schedule of multiple sectors, in MODIFY FLIGHTS panel, you need to move times in fields 'Shift' or/and 'Block times'. Below you can find some examples.
- If the schedule is 12:00-14:00 and you want to change it to 11:00-13:00 you need to insert -01:00 in the field 'Shift'.
- If the schedule is 12:00-14:00 and you want to change it to 13:00-15:00 you need to insert 01:00 in a field 'Shift'.
- If you have the schedule 1200-1400 and you want to change to 1500-1715 (so STD by 0200 and STA by 0215) you need to insert 03:00 in a field 'Shift' and in a 'Block time' field you add 00:15.
TRIP MODIFICATION
Under tab Trip it is possible to make the following changes on selected trips:
- Client - add client
- Trip type - change trip type
- Option - mark the trip as an option
- Commercial - indicates the commercial or non-commercial type of trip
DELETE

In order to delete flights or schedule you need to:
- Select the flights you want to delete
- Click on the button
- Review the flights in the 'Delete flights' window
- Press the 'Delete' button to confirm
It is possible to delete the planned flights as well as the published flights.
SHOW IN OPS

![]() button becomes available only upon selecting published flight or a number of flights from one pairing.
button becomes available only upon selecting published flight or a number of flights from one pairing.
Once you selected the flight(s) and clicked on the ![]() button, you will be transferred to OPS > TABLE view, and the pairing will be edited.
button, you will be transferred to OPS > TABLE view, and the pairing will be edited.
It also is possible to move back from the OPS view to SCHED as long as the flight selected in OPS views was added in SCHED.
Simply select the flight originally added in SCHED. ![]() button will appear. Clicking on it will transfer you to SCHED view, where the flight will be selected. This will happen for flights with either virtual or non-virtual aircraft assigned.
button will appear. Clicking on it will transfer you to SCHED view, where the flight will be selected. This will happen for flights with either virtual or non-virtual aircraft assigned.