Table of Contents
PHONEBOOK
To make flight preparations quick and easy you can use this section and add contact data to Leon.
Hover the mouse over ![]() icon and select 'New Phonebook'.
icon and select 'New Phonebook'.
Filtering options are located at the top of the 'New Phonebook' view.
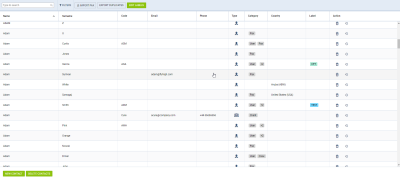
The list of contacts displays the following information:
- Name - name of contact
- Code - code of contact
- Email - email, to which all the emails are sent
- Phone - work phone number
- Type - type of contact:
 - indicates person
 - indicates company
- Category - indicates whether the contact is or isn't a Crew, Client, or PAX. Client can be indicated by selecting the 'Client' checkbox in the contact profile
- Country - a country where the contact is based
- Action:
 - clicking on a bin icon allows deleting a contact
 - accessing the changes history of a contact
Filters
The filtering options are located at the top of the page.
There are the following filtering options available:
 - allows filtering by contact name and the contact code
 - the following options are available:
- Show - allows displaying animals or deactivated contacts only
- Labels - allows filtering by labels assigned to the contacts. It is possible to filter by multiple labels (filtering based on 'or' method)
- Category - filtering by the category of the contact: Client, Crew, PAX and User
- Type - filtering by the type of the contact: Company, Person, Animal
 - allows importing PAX data from Excel
 - this option allows the creation of a report with potential duplicate entries. The data within the report will be separated into two tabs: 'Person' and 'Company'. the report will contain a 'Contact URL' column with the link that leads to the contact profile in the Phonebook. The duplicates are matched by either Name, Travel document number, Phone number, work email address
Resetting the filters can be done by deleting already selected options.
Edit labels
By clicking  you can open a pop-up window, where it is possible to add or delete labels available in the contacts' profiles. If you delete a label, it will be removed from all the contacts.
New Contact
In order to add a new contact press ![]() button.
button.
A pop-up window will appear where the type of contact can be selected between:
- Company
- Person
Depending on the selection, each of the types contains different tabs where the details can be inserted.
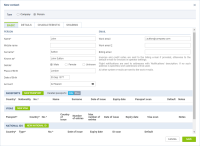
In order to edit the existing contact, simply click on the contact and the editing pop-up window will display.
The contact details in the editing window are the same as in the 'New contact' window.
The formats for inserting dates recognized by Leon are dd.mm.yyyy, dd-mm-yyyy, dd/mm/yyyy
Operator base
This feature only applies to operators that have more than one base. For the operators with one base only this functionality will not apply.
Bases can be defined in General Settings section.
Once the bases are added, it is possible to assign one to a Client.

If the base is assigned to a Client, the trip requested by this particular Client will automatically be assigned to the Client's base.
It is also possible to assign or change the original base, including the base initially assigned to a Client, without having to assign a specific user.
If you select a particular base in the operator selection dropdown (top-right corner of Leon), the Requests/Quotes list will only display the requests assigned to this particular base.
Handling Requests per Client
It is possible to assign a default handling agent to a Client in Leon.
In order to assign a Handling Agent to a Client, you need to select the Agent(s) in the 'Preferred handling agent' box.
Handling agent can be searched by using:
- Airport ICAO/IATA/Custom code
- Handler Name
- Combination of 'Airport code - Handler name'
It is possible to assign multiple Handling Agents at different Airports to one Client.
Once the Handler is assigned, it will appear as a tag below the 'Preferred handling agent' selection box:

Only one Handler per airport can be assigned to a Client. Assigning second Handling Agent will replace already assigned Handler.
Once the Handler is assigned, it will auto-populate in the OPS checklist when the trip is booked.
Handler assigned to the Client has higher priority than the Handling Agent selected as preferred in the Airport Directory. This means that the Handler assigned to the Client will overwrite the preferred Handler from 'AD' upon booking the trip from Sales.
Exclusion zones
Exclusion zones are the countries over which the aircraft should not be flying.
The exclusion zones can be indicated in the Client profile - 'Exclusion zones' box as per below. Simply start to insert the country name and select it from the dropdown list.

Once the exclusion zones are selected, the flight time calculations in the 'Requests/Quotes' section ('Calculate Flight Time' option) will take these zones into consideration.
Permanently delete & anonymize data
This functionality is created as part of the process of adhering to the Regulation (EU) 2016/679 of the European Parliament and of the Council of 27 April 2016 (General Data Protection Regulation).
It is possible to permanently anonymize and delete PAX from Leon.
The process is as follows:
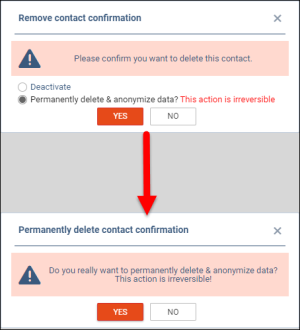
- Click on the bin icon located in the 'Action' column on the list of contacts
- Select the 'Permanently delete & anonymize data' option and click 'YES'
- In the 'Permanently delete contact confirmation' window, confirm the anonymization of the user by clicking on YES
- Contact is deleted
Once the PAX has been deleted the following areas will be affected:
- PAX Profile will be permanently deleted from the New Phonebook
- If PAX was added to any flight, instead of PAX name, there will be a 'Permanently Deleted' information instead of a Name. Also when hovering the mouse over PAX Number in the OPS view, Leon will display 'Permanently deleted' in the tooltip

- Deleted PAX will show as 'Permanently deleted' in the reports that show Flights to which this PAX was added, for example, Custom Flights List Report

Possibility to delete multiple contacts
It will be possible to delete multiple contacts at once in the Phonebook.
In order to delete multiple contacts the following steps need to be performed:
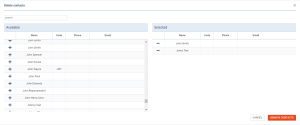
- Click on the DELETE CONTACTS button located at the bottom panel of the Phonebook
- The 'Delete contacts' pop-up window will appear. The window is divided into two sections:
- Available - all the contacts available in the Phonebook. Contacts can be searched for by inserting the name in the 'Search' box
- Selected - contacts selected for the removal
- In the 'Available' section, click on the + next to the contact(s) that are to be removed. Contact will appear in the 'Selected' section. Clicking on the - in the 'Selected' section, removes contact from the list for removal
- Once the contacts are selected, press REMOVE CONTACTS button
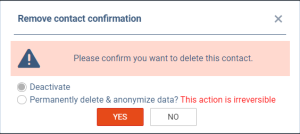
- Remove contacts confirmation pop-up will appear where one of the two options can be selected:
- Deactivate - this option deactivates contacts
- Permanently delete & anonymize data? - this option removes the contacts permanently from the Phonebook and Leon database. Once the contact is permanently removed it cannot be reinstated
- Once confirmed, the proper action based on the selection is performed
The following types of contacts cannot be removed in the Phonebook:
- Leon Users
- Clients assigned to the requests in the 'Requests/Quotes' section
- Leon Support/Leon Commission users
Edit Contact
In order to edit the contact simply click on the contact name in the list of contacts.
Depending on the type of contact, a different set of details will be available.
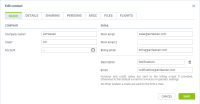
When it comes to the Company type client, the following tabs are available: Basic, Details, Sharing, Persons, Misc, Files, Flights
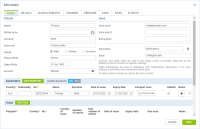
When it comes to the Person type client, the following sections are available: Basic, Details, Characteristics, Sharing, Persons, Misc, Files, Flights
The sections are explained below.
History of contact changes
The history of contact changes can be accessed by clicking on ![]() icon located in the 'Actions' column in the main view or in the 'Edit contact' pop-up window, next to the 'Edit contact' label.
icon located in the 'Actions' column in the main view or in the 'Edit contact' pop-up window, next to the 'Edit contact' label.
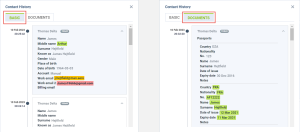
In the case of Person type contacts, the history pop-up window is divided into two tabs, as per the screenshot on the right:
- Basic - containing basic contact information such as Name, Gender, Place of Birth, Date of Birth, and emails
- Documents - changes to Contact documents details
In case of Company type contacts, there is only one Basic tab, containing basic company information.
The Changes history window displays the date and time of change in UTC as well as the name of the User that changed the details.
The changes are represented by colours:
 - no change
 - new information inserted
 - information amended
 - deleted information
TABS
BASIC
Basic tab contains some basic information as well as the documents and, VISA and Vaccinations details.
As for the generic information, these are:
- Name and Surname
- Gender
- Place and date of birth
- Account - Client name to which contact is assigned
- Email addresses:
- Invoices and credit notes are sent to the billing e-mail if provided, otherwise to the default e-mail for invoices in operator settings.
- Flight notifications are sent to addresses with a 'Notifications' descriptions. If no such address is specified, work addresses will be used.
- All other system e-mails are sent to the work e-mails.
It is very similar when it comes to the Basic tab in the Company contact, apart from the documents, Visas and Vaccinations subsection which is not there.
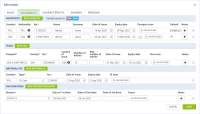
In the documents subsection the following details can be inserted:
- PASSPORTS - clicking on the 'NEW PASSPORT' button will allow inserting the PAX passport details as well as uploading the passport scans and marking the passport as a default passport (will be automatically used on the flight to which the contact is assigned as a PAX). Additionally, it is possible to have the deleted passports displayed by switching the 'Deleted Passport' option from 'Hide' to 'Show' - in this case, the deleted passport will appear with the 'Deleted' label in the 'Default' column
- VISAS - clicking on the 'NEW VISA' button will allow adding new visa details and connecting it to the specific passport
- NATIONAL IDS - section where the National ID details can be inserted
- VACCINATIONS - section where the vaccination details can be inserted. The diseases can be selected from the dropdown list
Access to this section can be allowed in the 'Privileges' by selecting DENY/VIEW/EDIT on the 'New phonebook - Documents' place.
DETAILS
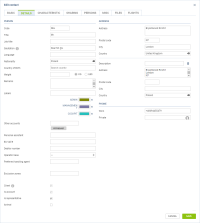
The 'Details' tab contains very detailed information about the Person/Company, some of which include contact details such as Address/Addresses, Phone numbers, important remarks and labels (these display when assigning PAX on the flights).
Some of the more important details are:
- * Language - an indication of the language that the contact speaks. This could be important when contacting the Client, especially if sales emails and documents are to be sent (can be customized in a specific language in the Documents Manager and the EMAIL TEMPLATES)
- Salutation - salutation selected here can be used in email and documents templates by default
- Operator base - more information in the 'New Contact' subsection
- Client - checkbox indicating in the contact is a Client or not
- Preferred handling agent - more information in the 'New Contact' subsection
- Exclusion zones - more information in the 'New Contact' subsection
- Avinode ID - field where the Avinode ID can be inserted and previewed
- Customer Commission - this subsection consists of 2 fields: 'Price' and 'Currency'. This allows defining the Client's default commission, which will automatically fill in the 3rd Party Commission field in subcharter and cost-based quotes, subject to this Client being a requester
- Quote recipients - this list of persons receiving copies of all quotes requested by that contact
- Is account - an indication if the contact is also an account. The company is an account by default. A person can be indicated in the DETAILS tab - Is account. Once it is an account, Persons can be assigned to it
- Is representative - indication if the person is also a Representative of the Client/Account that one is assigned to
- Is provider - indication if the contact also falls under the category of providers
CHARACTERISTICS
Section PAX Characteristics contains important information about the PAX preferences such as likes, dislikes, favorite dishes, and drinks as well as other notes.
Access to this section can be allowed by privileges by selecting DENY/VIEW/EDIT on the 'New phonebook - Characteristics' place.
Any information populated in this section can be populated on the PAX and Crew Tripsheet.
SHARING
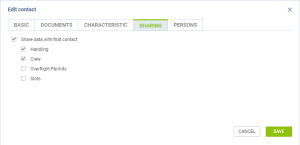
SHARING tab allows selecting the data that are to be shared with a buyer in the 'OPS&CREW' tab in the edit request section.
Currently, the following data can be selected:
- Handling
- Crew
- Overflight Permits
- Slots
The details are selected per Client and will apply to all the trips requested by the Client.
Once the details are selected and saved, the 'Trip data sharing status' will switch to 'SHARED' in the 'OPS&CREW' tab.
Additionally, it is possible to select the trip data directly in the 'OPS&CREW' tab by clicking on the 'EDIT SETTINGS' button.
Apart from the trip data, it is also possible to apply the settings to the future buyer quote by selecting the relevant checkbox.
Once the sharing details are saved, the Trip data sharing status will change from 'NOT SHARED' to 'SHARED'.
PERSONS
Persons tab displays the list of contacts assigned to the specific account (Company/Person indicated in the 'Account' field in the tab 'Basic').
The tab contains the following information:
- Name
- Work email
- Work phone
This list of persons will be available when assigning the PAX from the contact list when the trip is requested by the specific Account.
MISC
This tab allows selecting extra settings that apply to the specific client.
Currently, the following options are available
- Receive mvt messages - this setting allows selecting the client for MVT messages, subject to the 'Client' checkbox being marked in the 'MVT Messages' settings.
- Newsletter - possibility to subscribe PAX to the newsletter
- Never delete automatically - this functionality is connected to the functionality located in the General Settings > 'Phonebook' tab called 'Automatically delete PAX after given days'. It allows to specify passengers that are never to be deleted
FILES
In this tab, the files can be attached to the PAX profile.
The files can be uploaded/saved in various formats including pdf, txt. doc, docx, xls, xlsx, jpg, png, zip, rar, mp3, wav.
Maximum single file size is 10MB.
FLIGHTS
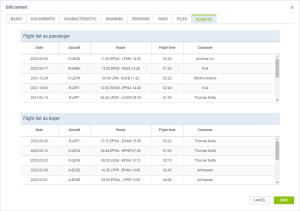
In the 'Flights' tab, it is possible to preview contact flights, both as a buyer of a trip as well as the passenger.
In order for the flights to appear in this tab, the following conditions have to be met:
- flights have to be booked ('Options' are not included)
- ferry flights do not appear on the list ('Flights as a buyer' list)
- deleted flights do not appear on the list ('Flights as a buyer' list)
The list takes into account flights from 'Requests/Quotes' as well as from the 'OPS' section (if 'Requests/Quotes' isn't used).
The flights are listed from the most recent one in descending order.
ACCOUNTING
INVOICES
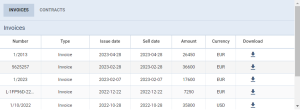
The 'INVOICES' tab presents the list of the invoices issued to a person, if the person was the Client of the Trip.
The list includes Pro-forma invoice, Invoice, Credit Note, and Recharge invoice.
CONTRACTS
The 'CONTRACTS' section allows adding basic contractual information that the Operator might have with a Client.
The following information can be inserted:
- Name - Contract name
- Number - Contract number
- From/To - start and end dates of the contract
- Block hours - contracted block hours
- Active - checkbox allowing to mark the contract as active
Once the contract is added it will be available in the 'Contract' dropdown, when adding/editing the request for the Client with the contract available:

Additionally, the Contract Name and the Contract number columns are available in the Report Wizard > scope Quote.
SETTINGS
The 'SETTINGS' tab allows inserting the following:
- Cost centre - manual input of PAX's cost centre
- Project number - manual input of PAX's project number
EXPORT HISTORY
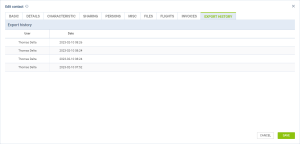
This section contains information about the export of contact data.
Access to this section can be allowed/denied by selecting the relevant status in 'Phonebook - Export' in the Admin Panel > 'Privileges'.
The table contains the following information:
- User - Name and Surname of the person that performed the export of Contact data
- Date - Date and time in UTC when the export was performed
