Leon Mobile app
Table of Contents
Leon is available as a mobile application for crew members using Apple iOS (iPhone, iPad) and Android devices. You can download the latest app version for free from Google Play or App Store:


You can also look up ‘Leon Software’ directly in the search box of one of those marketplaces and install the application.
In order to upgrade to the new version, please visit your app marketplace. If a new version is available, this should be indicated by an “Update” button.
Once you have downloaded the application, click on Leon icon in order to bring up the login page. Insert the same logging in details you use for the web Leon version.
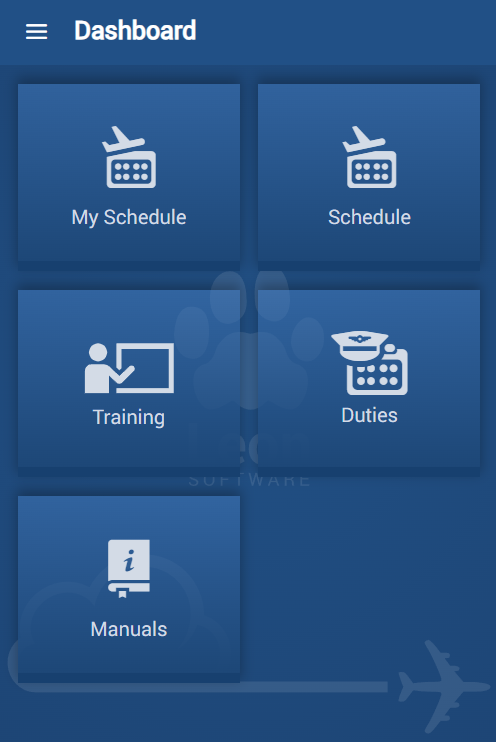
The main screen of the application contains 5 main panels:
-
My Schedule – Calendar view with own duties, flights, simulators, positionings and hotel reservations assigned to the currently logged crew member.
-
Schedule – Calendar view with own duties and all OPS activities for every tail in the system, depending on the privileges configuration.
-
Training – Contains user endorsements details: Certificates, Currency details and Experience.
-
Duties – Contains user Duty Requests and Duty Accounts.
-
Manuals – Allows downloading files uploaded for the user’s privileges group. More details: Manuals Distribution.
In the top-left corner, under the hamburger menu, you also have access to the Dashboard, which gives options to Reset or to Log out.
My Schedule
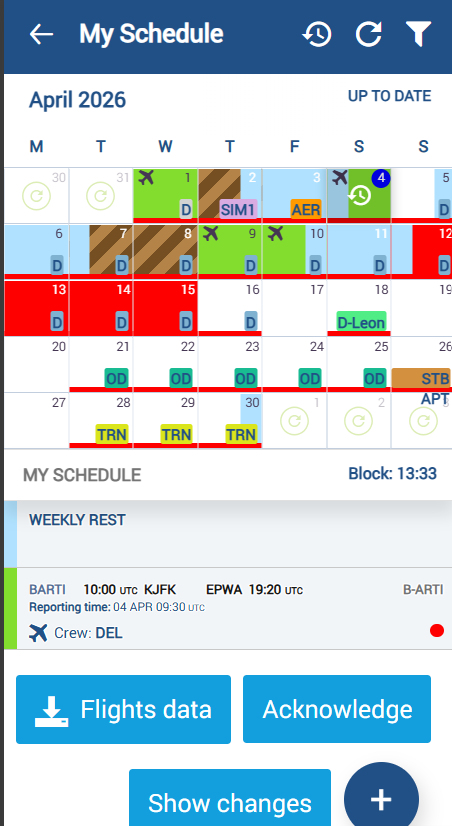
This section allows a crew member to for brief overview or see detailed information about all activities assigned to them.
These include:
-
Flights
-
Simulator sessions
-
Positionings
-
Hotel reservations
-
Duties
Flights, positionings, and other activities that are not assigned to the crew member, or are assigned to a different crew member, will not be displayed in this view. Flights are displayed in Crew App on the reporting day (Report On) rather than the departure day. This change affects the My Schedule and Schedule views, so crew members see flights on the day they actually need to report.
Additionally, the crew member will be able to see their Weekly Rest, the aircraft schedule for which they are assigned as preferred crew, and maintenance activities for that aircraft.
On the right-hand side of the “My Schedule” belt, between the calendar view and the activities list, the total accumulated Block time for this month is presented.
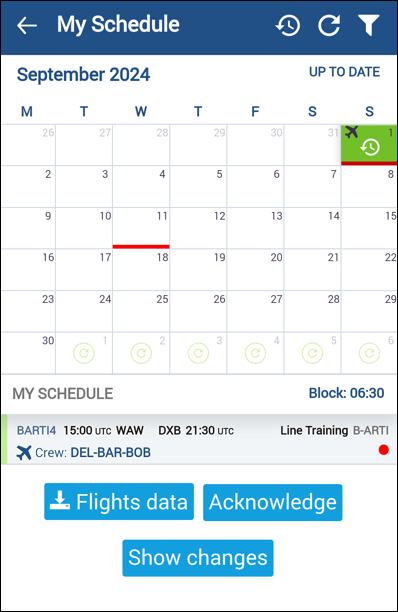
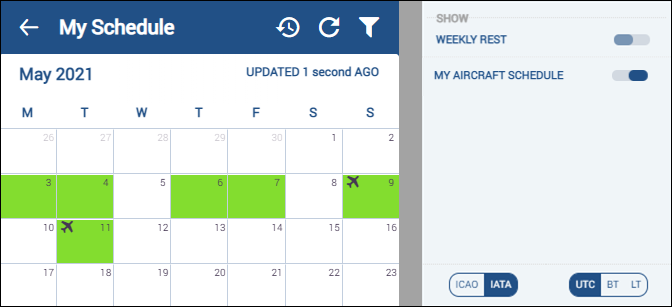
If you click on a specific calendar day tile, Leon will display a clock icon on this very tile. Click on it again to view the Roster history for that day. You can also click the same icon in the menu bar in the top-right corner to view the same roster changes for the selected day (as shown in the screenshot on the right) or click on the “Show changes” button located at the bottom of the activities list.
In the filter, it is possible to switch between IATA/ICAO codes and UTC/BT times. All other functions, with a few exceptions, are the same as in the ‘Calendar’ section.
CREW MOBILE APP - Clock In / Clock Out feature
With this feature, a crew member can record the start and end times of the duty to which they are assigned. When configured, this option will be available from 4 hours before the duty begins until 4 hours after it ends.
The data registered are:
-
Duty start time
-
Duty start location
-
Duty end time
-
Duty end location
To record the duty start/end time and location, in the Leon mobile app:
-
Go to My Schedule
-
Open the duty you are assigned to
-
Tap the “Clock in” or “Clock out” button
To have the location recorded, the user should allow the Leon app to access geolocation data.
The details recorded using this feature are available in the Report Wizard, under the “Crew Roster” scope. The columns available are:
-
Clock in localization
-
Clock in time [UTC]
-
Clock out localization
-
Clock out time [UTC]
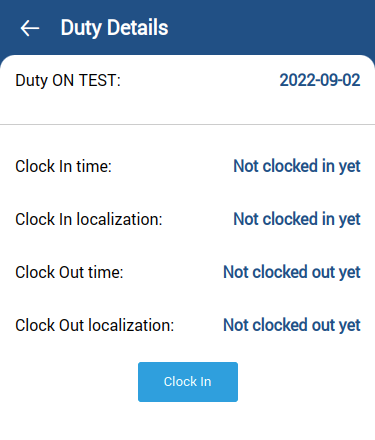
before clocking in
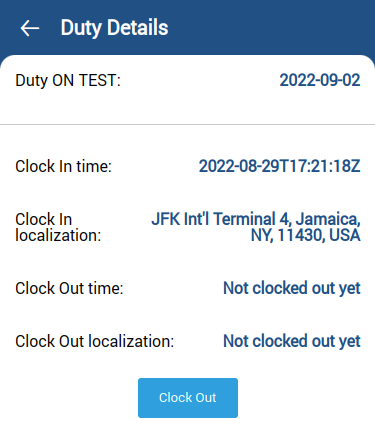
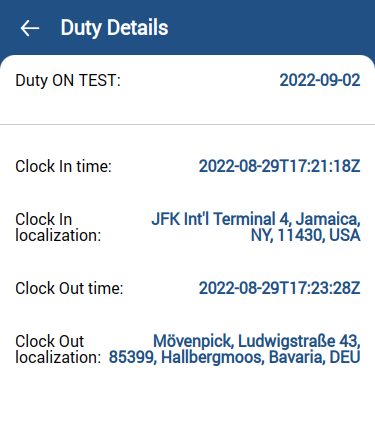
It is also possible to set up fixed Clock-in/Clock-out locations. More information in the General Settings section of Leon.
Weekly Rest
“Weekly Rest” is defined as 36 hours free of duties, including two local nights, within a 168-hour period.
My Schedule – Show Weekly Rest
To control the visibility of Weekly rest in the Crew App, use the checkbox located in Admin Panel > General Settings > Crew App.
When the checkbox is selected, crew members can view the Weekly rest option in the app. If it is unticked, the Weekly rest option is hidden and is not available in the filter or displayed in the schedule view.
Click the Filter to enable showing weekly rest in the roster calendar.
‘Weekly Rest’ in ‘My Schedule’ view indicates where the weekly rest actually takes place.
Caution: The weekly rest has a slightly different role in the Crew mobile application than in CREW TIMELINE. In the Crew Timeline, it appears at the latest time when it should be applied, while on the Crew mobile application, it always applies when conditions are met. That’s why indicated weekly rest may not match in both applications.
Weekly rest is indicated by the light blue colour of the tile and is applied only after a flight, positioning, simulator session, or any other duty that is included in FTL calculations.
The presentation is as follows:
-
Left half of the tile - half of the day when the weekly rest begins
-
Full tile - full day included in weekly rest
-
Right half of the tile - half of the day when the weekly rest ends
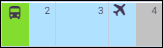
Clicking on the tile will show the details of the duty as well as the information that the ‘Weekly rest’ applies.
DOWNLOADING FLIGHT DOCUMENTS & MORE
Below the roster, Leon shows a button for Flights data, allowing downloading flight documents, including those added to the Checklist.
Button Acknowledge allows crew to acknowledge flights & duties changes(acknowledge or lack of it will show in Crew panels). It is not available for the past duties
Button Show changes allows to check roster changes history - the app will show the exact date & time of changes.
My aircraft schedule
A functionality: My aircraft schedule allows for including flights of the aircraft to which a crew member has been added as ‘Preferred crew’, even though he/she is not assigned to those flights.
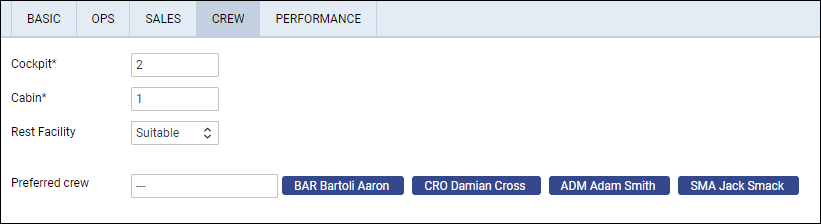
In a panel FLEET, tab CREW, it is possible to add ‘Preferred crew’ to the aircraft.
A screenshot below shows an example of a crew Bartoli Aaron (BAR) added as ‘Preferred crew’ to the aircraft ‘B-ARTI’.
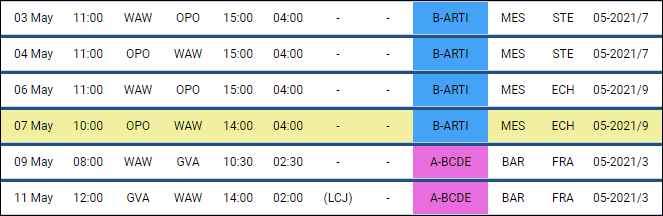
Crew BAR has been assigned to 2 flights on the aircraft ‘A-BCDE’ (to which he is not added as ‘Preferred crew’), and there are 4 flights on the aircraft ‘B-ARTI’ (to which he is added as ‘Preferred crew’) where he is not assigned as a pilot.
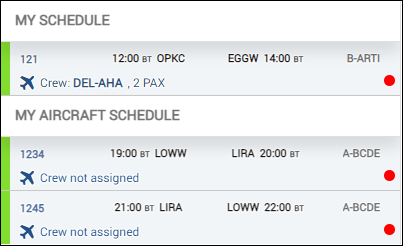
When crew BAR is logged in to Leon Crew App, in the panel ‘My Schedule’, he can see 2 flights he is assigned to, on the tail ‘A-BCDE’ (an option My aircraft schedule is switched off).
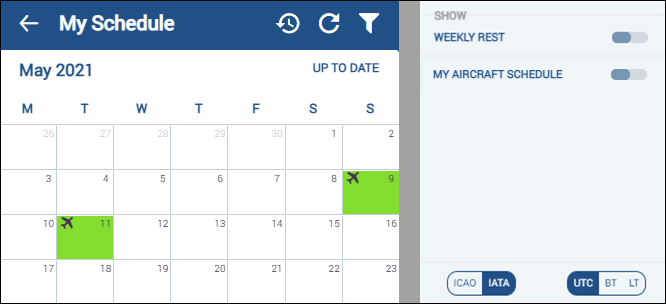
If in the Filter an option My aircraft schedule is switched on, crew BAR will also see all flights of the tail ‘B-ARTI’.
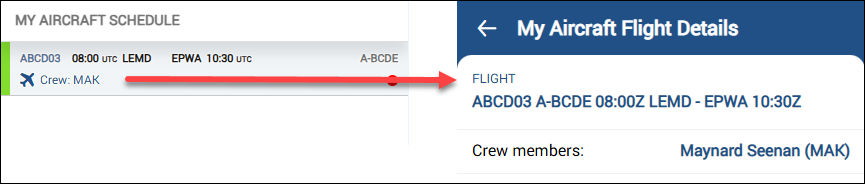
Below the duties calendar, Leon shows flights divided into 2 sections: MY SCHEDULE and MY AIRCRAFT SCHEDULE.
Same-Position Crew Members Only
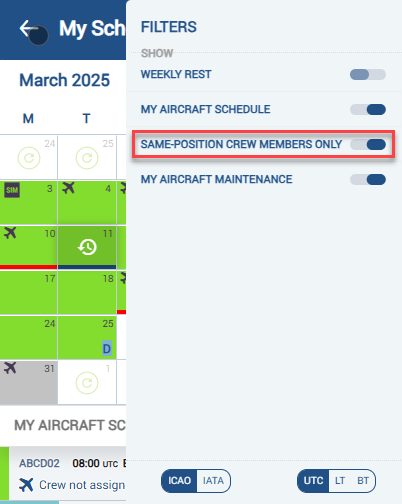
The ‘Same-Position Crew Members Only’ filter is available only when the ‘My Aircraft Schedule’ filter is activated.
Once this option is activated, the ‘My Aircraft Schedule’ view will only display the Crew Members with the same ratings as the logged-in User. For example, if a logged-in user has the CPT/FO ratings on the aircraft to which the crew is assigned, ‘My Schedule’ will only display the Crew Members who have the same ratings on at least one of the aircraft to which the logged-in User is assigned.
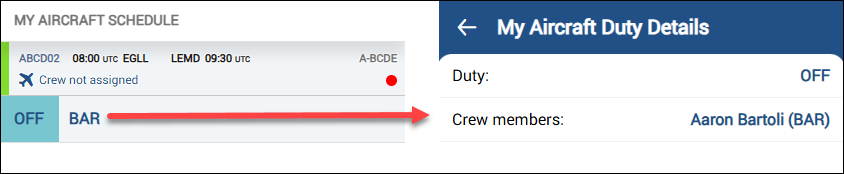
Additionally, the logged-in User, upon clicking on the tile, will be able to preview the following in the MY AIRCRAFT SCHEDULE section below the calendar:
-
My Aircraft Duty Details - the section which appears upon clicking on the same aircraft crew duty. It displays the duty name and crew member’s name
-
My Aircraft Flight Details - the section which appears upon clicking on the same aircraft crew flight. It displays basic flight details and the assigned crew members’ name
My aircraft maintenance
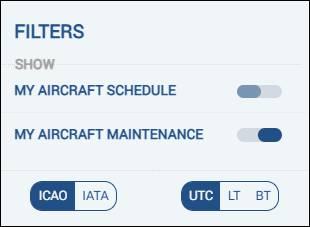
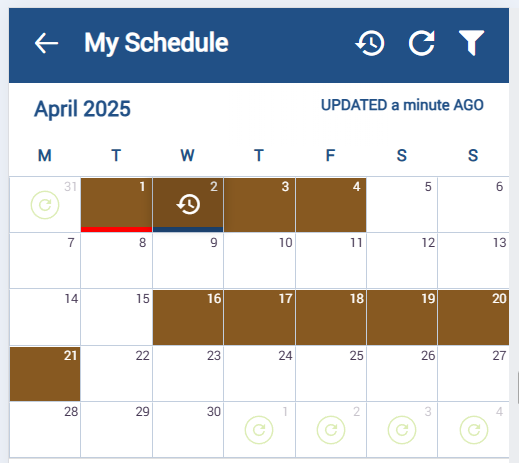
It is possible to view aircraft scheduled maintenance in Crew App > My Schedule by enabling My aircraft maintenance in the filter.
Leon will display maintenance only for aircraft for which the crew member has assigned ratings. Maintenance, similarly to the web version, will be indicated by a brown tile for non-confirmed maintenance and a red tile for confirmed maintenance.
Positioning and Hotel Reservations
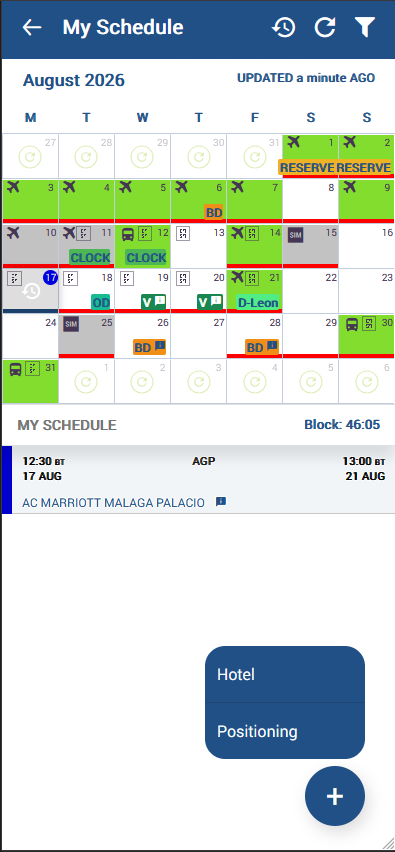
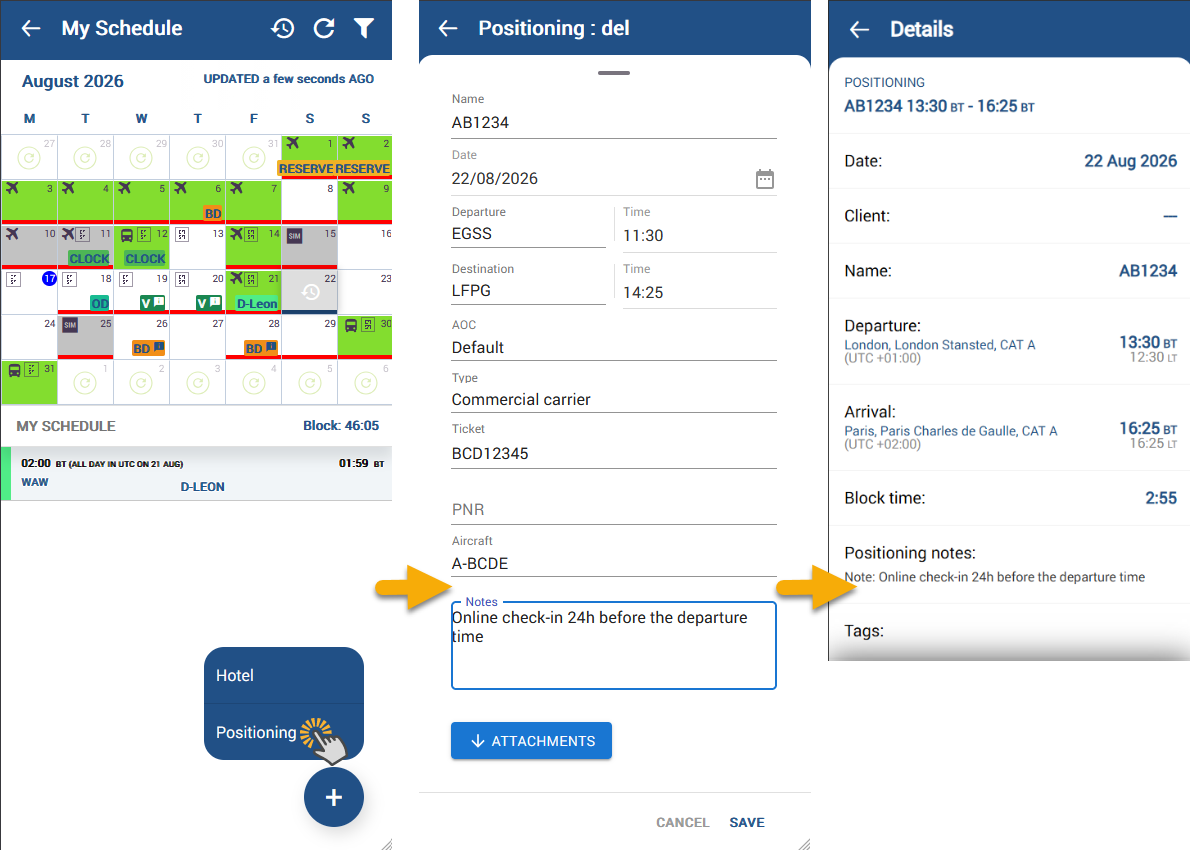
With this feature, you can now create a positioning (repositioning duty) or hotel reservation directly from the My Schedule view in the Crew App. Any positioning created this way will be assigned only to the logged-in user, while hotel reservations can be made for logged user and other crew members.
How to use the feature?
-
Open the Crew App and go to the My Schedule view.
-
Click the “plus” icon and select the option to create a positioning or hotel reservation.
-
Fill in the hotel or positioning form (e.g., select airport, date, upload the attachment, etc.). Please note that logged user can create positioning only to themself, but the hotel reservation can be created for more crew members.
-
Confirm – the positioning or hotel booking will be visible in the CREW module (web version) as well.
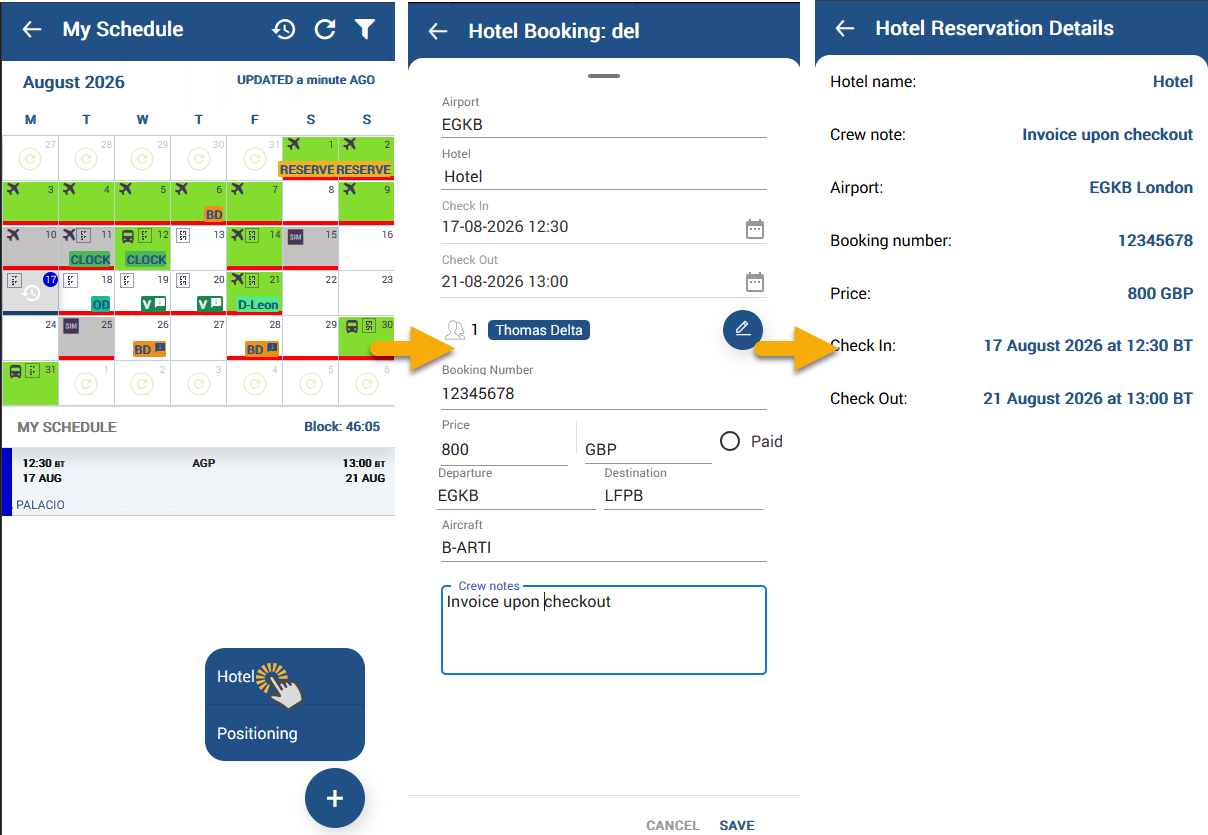
Tapping a hotel reservation in My Schedule opens its details. Alongside the hotel name and the check-in and check-out dates, the preview shows the booking number — or the confirmation number for reservations coming from an integration — and the airport the reservation belongs to. This applies to reservations created in the Crew App and to those created in the web application.
Note: This feature is available only to users with the appropriate permissions. If you do not see this option, please contact your administrator to request access.
Schedule
The schedule section of the mobile app shows a calendar view of crew flights, positionings, office duties as well as all duties added in the Duty Roster. Users can check Flights details, PAX details, Checklist items status & notes, FTL Calculations and add Journey Log data.
On top of the screen following actions are available:
-
Filter

-
Refresh

Filter
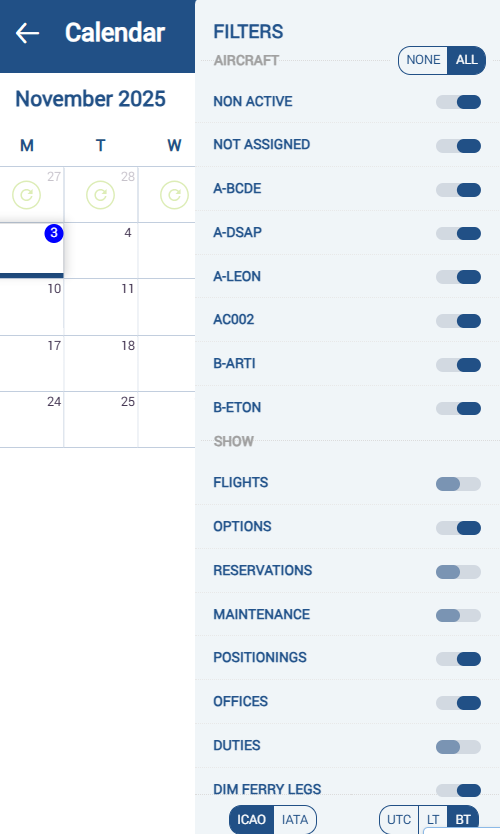
The filter window is divided into 2 sections:
-
Aircraft – only activities assigned to the aircraft selected in this section will be displayed in the view. You can easily enable or disable all aircraft by using the All or None options.
-
Show - select the types of activities you want to see on the main screen, including Flights, Reservations, Maintenance, Positionings, Offices, and Duties. You can also choose to display only your own activities.
Ferry flights can be easily identified by enabling the Dim ferry legs filter, which displays those duties in a lighter colour.
In this section, you can also select the airport code type (IATA or ICAO) and the time format (UTC, LT, or BT).
In order to see Non-Aircraft duties, you need to unmark Flights in the filter. Once this is done, you will only see duties such as Maintenance, Reservation, Positioning and Office, considering they are still ticked in the filter.
If the “Flights” are ticked in the filter, flying activities will override Non-Aircraft duties in the calendar screen. In this case, if you want to see Maintenance details, you have to click on the specific day, and it will be displayed below the calendar. You can find more information on viewing and displaying duties further down in this section.
Options when marked will show all flights with the status ‘Option’, which on the mobile calendar are displayed with stripes. Only my activities will allow you to filter by the flights and duties you are assigned to.
Viewing duties
Select a period of time, and by clicking on the particular tile, you can view your duty. The current day is marked by a blue line at the bottom of the tile. The selected day will stand out with a blue belt at the bottom edge of the tile.
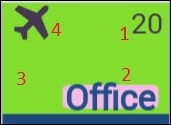
The meaning of markings on each calendar day are as follows:
1 - Day of the month.
2 - Duty name - It‘s displayed in the same way as in the ’Crew Duty’ roster in Leon.
3 - Tile’s colour reflects the kind of fleet activity on the day:
-
Green - confirmed flights
-
Light green - ferry flights
-
Grey - terminated flights (JL filled in)
-
Purple - reservations
-
Brown - maintenance
-
Red - AOG maintenance
Although all activities of the day will be displayed in the tiles, the flights, maintenances and reservations will take priority in display. The colours correspond to the view in the calendar of the browser application. Full colour coding of the application is available in our main manual: CALENDAR.
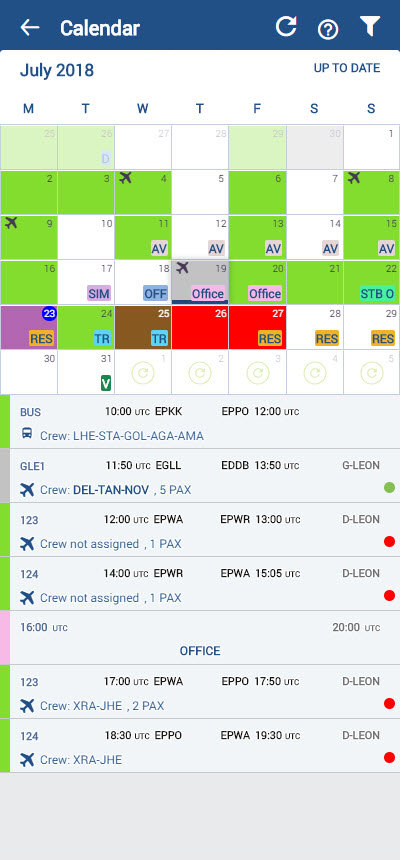
The maintenance and reservations contain the following information:
-
scheduled maintenance/reservation dates and times
-
the airport code where maintenance/reservation will take place
-
aircraft registration
If you see a “Refresh” symbol on Maintenance Duty, this means that there are other duties apart from Maintenance that might be hidden. Refreshing it brings up these duties. Such a situation usually happens when Maintenance falls on the borderline days of duties display.
4 - Main activity symbol - appears if the logged-in user is scheduled as a crew member for any flight on that day, according to the filter settings. The same applies to positioning (bus icon) or office work (computer icon). Only one icon is displayed. If there are multiple activities, the most important one is displayed in the following order: flight, positioning, and office work.
Below the calendar, there will be displayed duty details, such as:
-
flight number
-
schedule times
-
destination airport & arrival airport codes
-
aircraft registration
-
crew codes
-
number of passengers
If you need to see the duties performed more than 1 month in advance, simply click, and the duties will get uploaded up to the date chosen in the calendar.
Flights Spanning Multiple Calendar Days
When a flight’s STD in UTC is just after midnight, but the crew reporting time falls on the previous day, the flight may appear across two calendar days.
In the UTC calendar view:
-
The flight is shown on both days (previous day – reporting, current day – STD),
-
In the daily flight list, arrows indicate that part of the activity occurs outside the selected day (previously, only one arrow was shown for overnight flights).
Additionally, the activity bars now include a separate reporting time row:
-
An arrow is displayed if the reporting occurs on a different day than the selected one.
This behaviour is consistent across all time modes:
-
UTC
-
LT (Local Time)
-
BT (Base Time – based on the logged-in user’s base)
In LT and BT modes, the reference is the user’s base time, not the aircraft or flight time.
Viewing duties offline
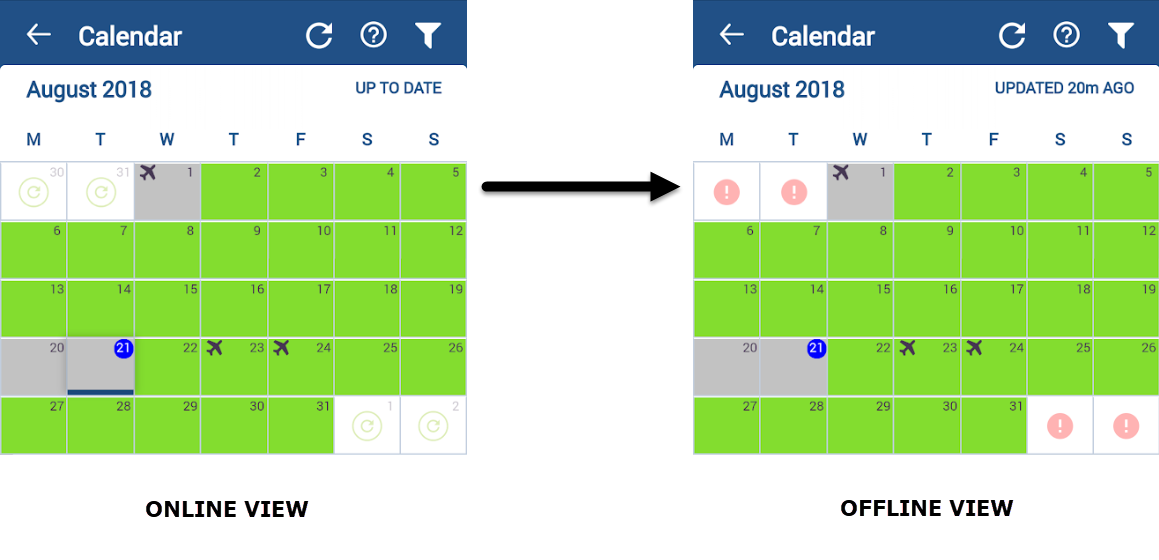
The Leon Mobile application has an option to view duties when offline, but first the data must be downloaded in online mode.
In such a case, Leon Mobile App will display the following:
-
roster of the current month
-
roster of prevoius and next month if the user has transfered the view to them in online mode
-
information when the last update of the page was performed
-

the button will switch to

indicating that uploading any further hidden duties is not possible
Push Notifications
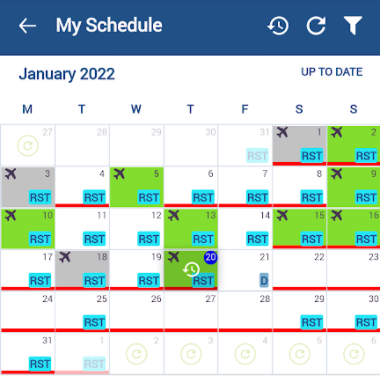
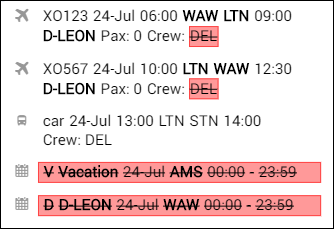
Any roster changes, including flight crew changes, are indicated in the ’My Calendar” view by a red underline (screen on the right).
Additionally, a crew member for whom the roster is changed will have the push notification displayed on the mobile device:
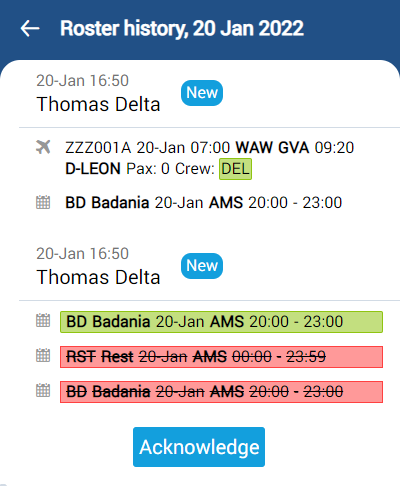
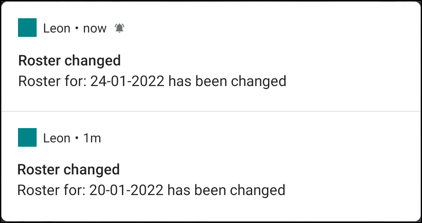
Clicking either on the notification or on the roster changes history tile in ‘My Calendar’ will display the roster changes history in the Crew Mobile App (presented in the screenshot on the right), as well as the option to acknowledge changes.
The option to acknowledge roster changes can be activated in the Mobile Notifications by selecting the ‘Enable crew roster changes acknowledgements in Crew app’ checkbox.
Once the duty is amended, it is also indicated in the OPS section tab ‘CREW’ in the ‘ACKNOWLEDGEMENTS’ subsection.
The ‘ACKNOWLEDGMENTS’ subsection indicates whether the crew member has familiarized himself/herself with the changes to flight duties.
The ‘ACKNOWLEDGEMENT’ for each crew displays 3 statuses:
-

- notification not sent
-

- push notification received by crew but not familiarized with
-

- familiarization confirmed
Additionally, the duty acknowledgement status is indicated by the colour of the lower bar in the CREW Timeline & CREW CALENDAR sections:
-

- acknowledgement not sent to crew
-

- acknowledgement sent, but not familiarized with
-

- acknowledgement familiarized with by the crew
Flight details
To check flight details, select it in the calendar and click it when it appears below the calendar. Leon will show 6 tabs, each displaying different trip data.

Flight
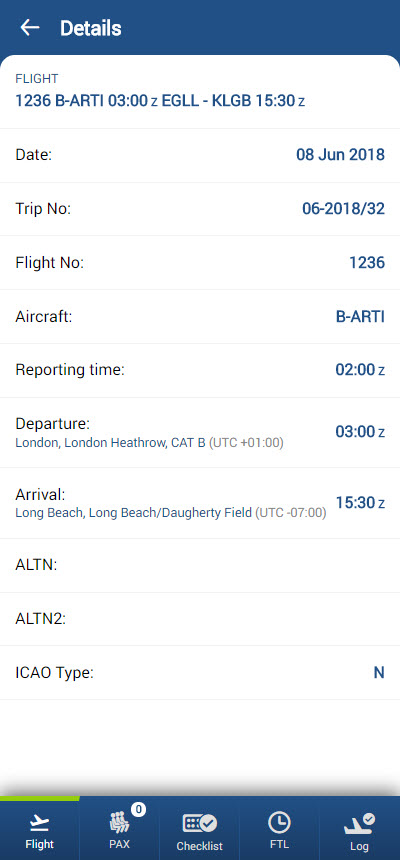
A tab Flight contains all the important flight details on top of the screen, such as:
-
Date
-
Trip No
-
Flight No
-
Aircraft Registration
-
Reporting time
-
STD
-
STA
-
HIL
Below, Leon shows additional information:
-
ADEP & ADES name & UTC difference *ALTN airports *ICAO trip type *Tags (both Flight & Trip tags created in OPS panel)
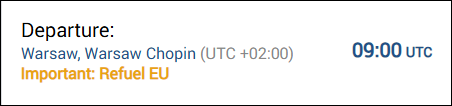
If an airport is added to the Refuel EU program, Leon will show a caution right under the airport’s details in the app:
Viewing OPS documents
Crew can view OPS documents via the Leon app - documents show in a tab ‘FLIGHT’ and get open after clicking them.
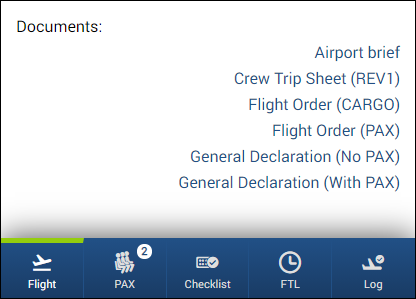
It is possible to print the documents for the flights ending within 24h before ‘now’.
HIL
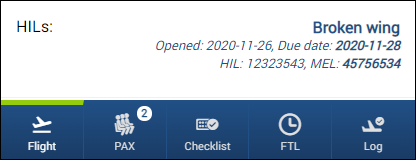
Once the Hold Item List has been added to Leon (in a section MX > Hold Item List) to a particular aircraft, Leon will show it in the Crew app, in a tab FLIGHT - example below.
Pax List
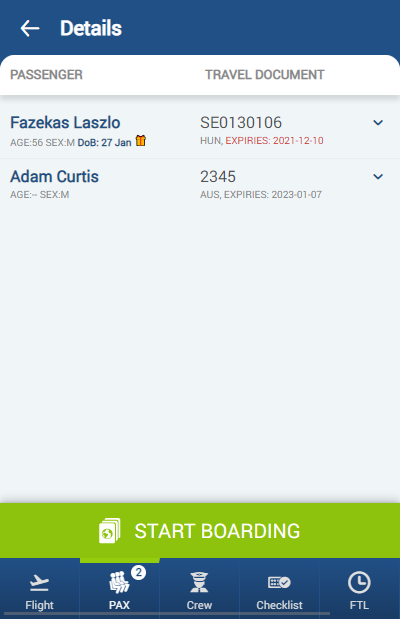
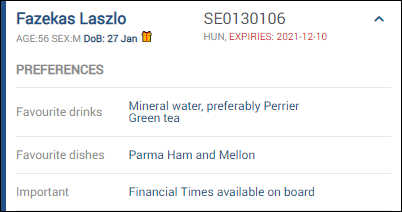
The Tab PAX section displays the PAX number as well as the list of passengers added to a flight. If additional details were added to the passenger’s profile, ie, preferences, they can be found by clicking on a passenger’s name.
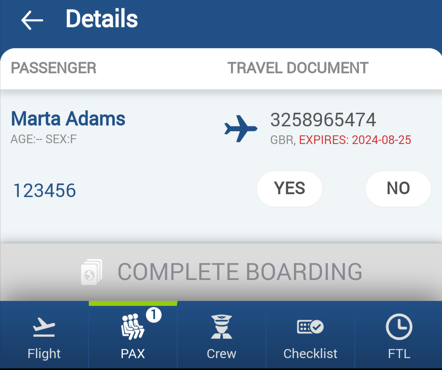
If the passport number has expired, it will be displayed in red. Additionally, if the DoB of the PAX falls on the day of the flight, the date will be presented in bold, and the gift icon will appear next to the DoB:
PAX data is not available for past flights.
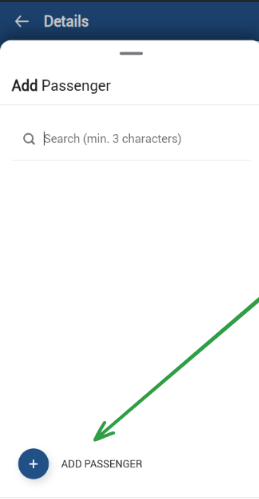
It is also possible to create passenger profiles directly from the PAX list.
Simply click the plus button and fill in the required data. It is also possible to add travel document details.
BOARDING PAX
Boarding passengers from the Leon crew mobile app is now possible.
Once passengers have been added to the trip, it is possible to mark whether they have been boarded. The condition which has to be met is switching in the ‘Privileges’ panel (for a selected group of users, i.e. crew), an item 
To start PAX boarding, select a flight in the crew app and in a tab PAX of the crew app, click 
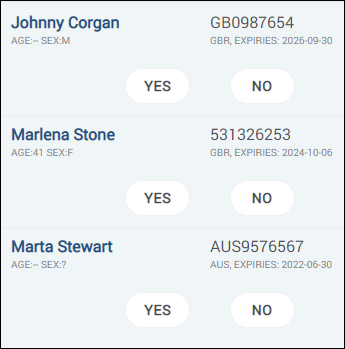
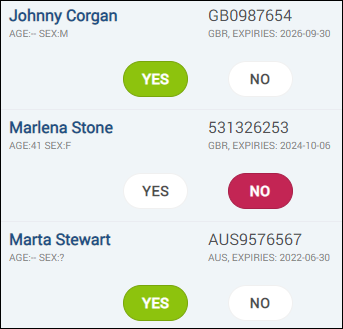
Before PAX are boarded, in a section OPS (tab ‘PAX’), Leon shows grey dots by each passenger.

Also, the button 
Marking either ‘YES’ or ‘NO’ results in those grey dots turning either green (for boarded PAX), or red (for unboarded PAX).
Unknown Attachment
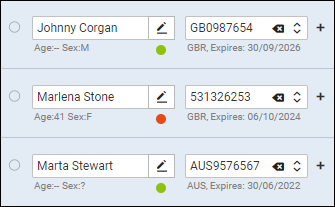
It also results in the button 
It is possible to resume PAX boarding, if i.e. a passenger who had ‘NO’ status showed up - a button 
LUGGAGE TAG
It is possible to add a Luggage tag when adding PAX to the flight - in OPS, tab PAX, section PAX DETAILS, insert PAX luggage tag:
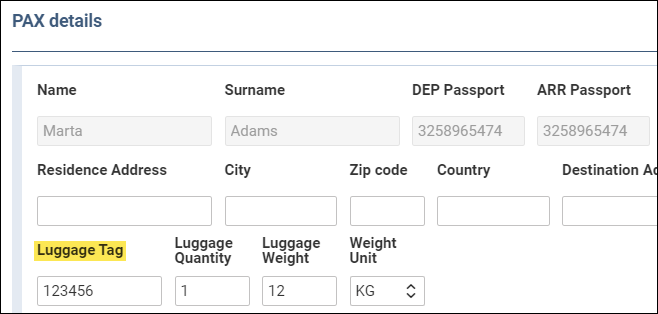
In the crew app, the added luggage tag will show under the ‘Boarding PAX’ button - click it to confirm it.
Crew
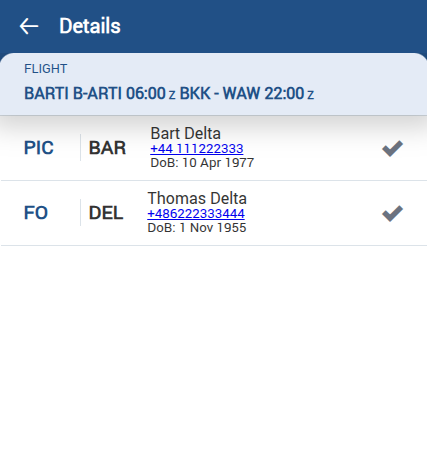
The crew tab in the mobile app contains the following crew details:
-
Position
-
Code
-
Name
-
Phone number
-
Date of birth
If the crew are not assigned to the flight, or if the logged-in person is not a part of the crew composition, the ‘Crew’ tab is inactive.
It is possible to hide the Crew contact details by selecting the Show crew contact details in Crew App - My Schedule option in the ‘SETTINGS” tab in the Admin Panel > Privileges > group of privileges. This option will only work in ’My Schedule’ view.
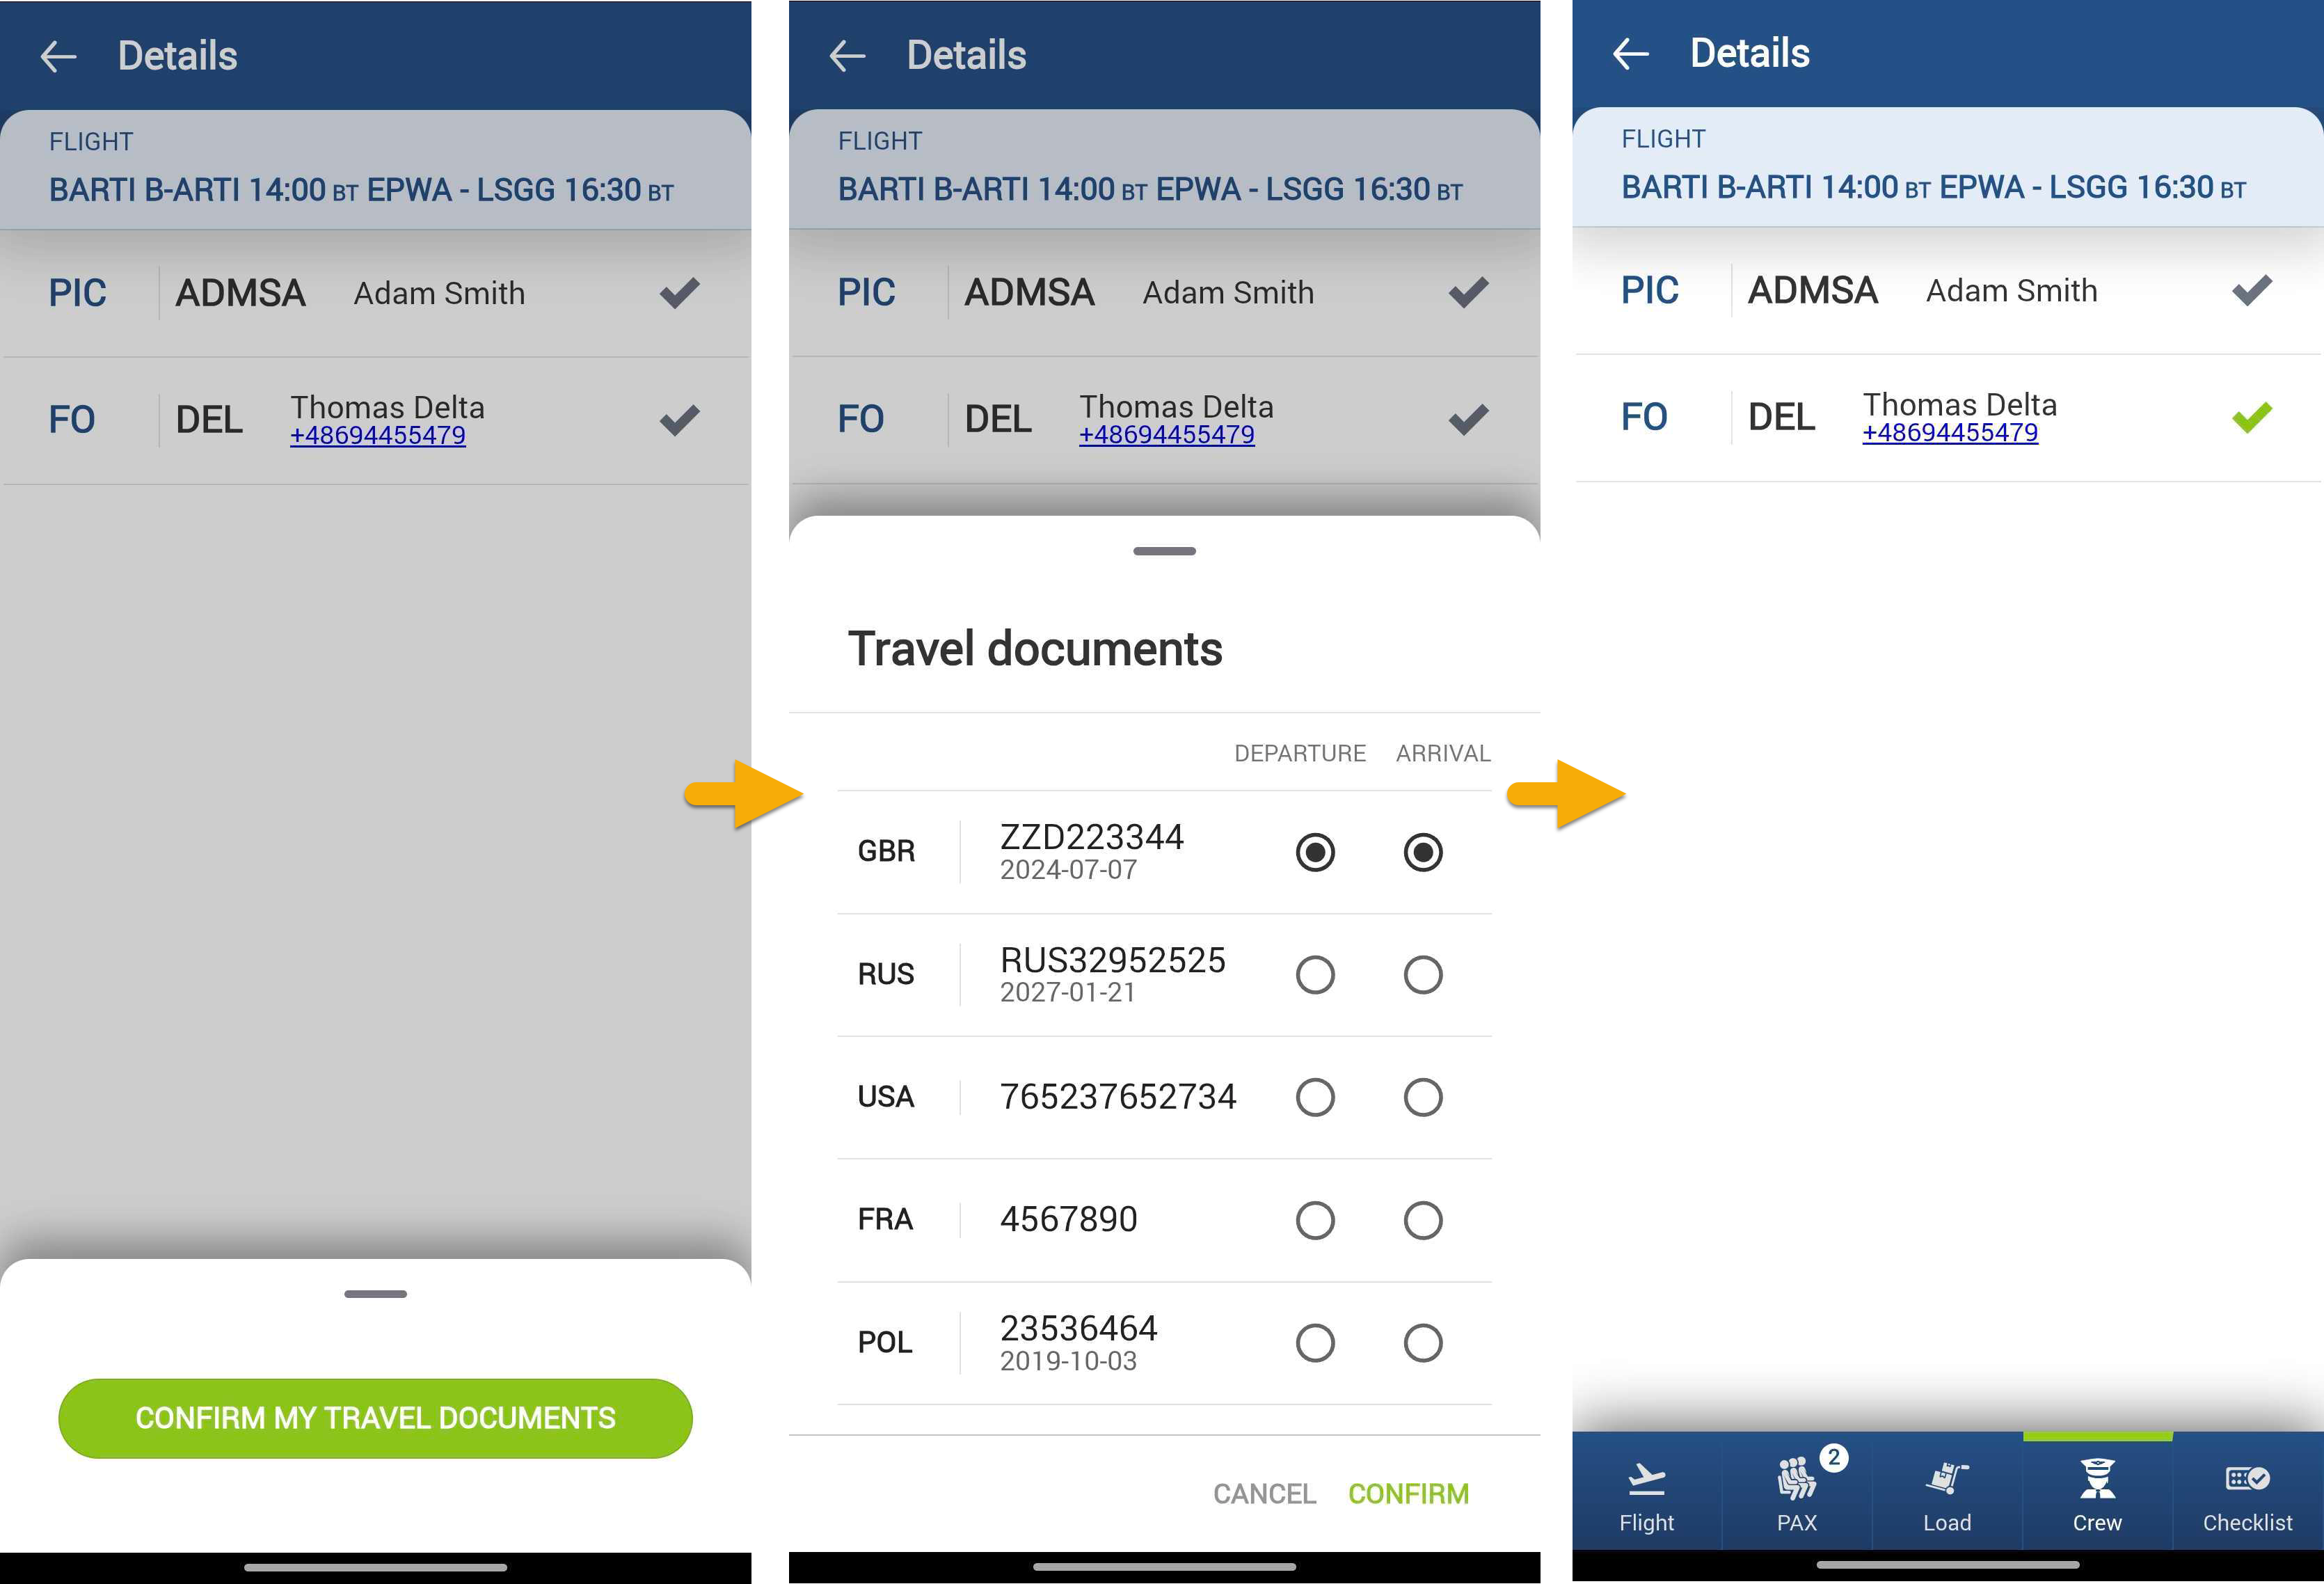
In the Crew tab, you can confirm Travel Documents. To do so, open the Crew tab for the selected flight and click "Confirm My Travel Documents". Then select the appropriate Travel Document and confirm it.
A green check icon will indicate that the confirmation was successful.
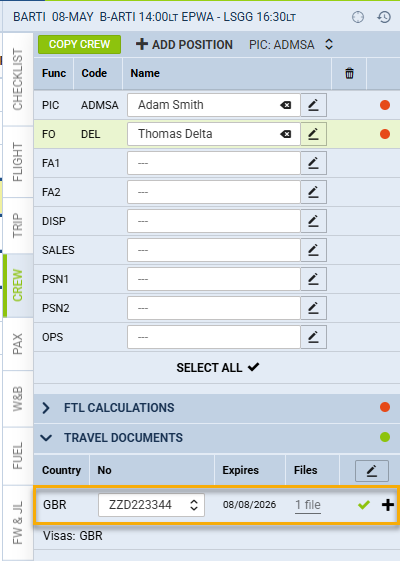
Once confirmed, the document status will also be updated in the OPS view, under Flight Details → Crew tab → Travel Documents.
Checklist
All checklist items added to the flight appear in this tab along with all notes and statuses. If notes have been added to the item, Leon shows an arrow - click it to view any extra information inserted into the checklist item.

It is possible to edit the Checklist and change the statuses in the Mobile app.
In order to edit the Checklist, the person has to have the following privileges switched to ‘EDIT’ status:
-
Crew App - Checklist Ops
-
Crew APP - Checklist Sales
Editing and changing the statuses of the checklist is quite simple:
-
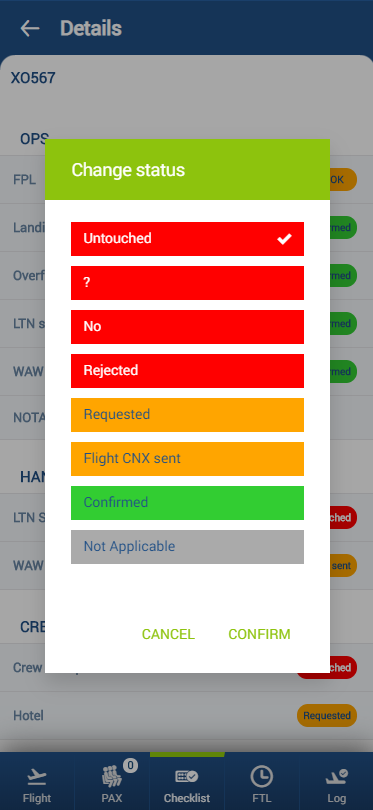
Click on the status you‘d like to change. In the pop-up window, select the new status - Select ’CONFIRM’ to save the new status or ‘CANCEL’ to ignore the changes
FTL
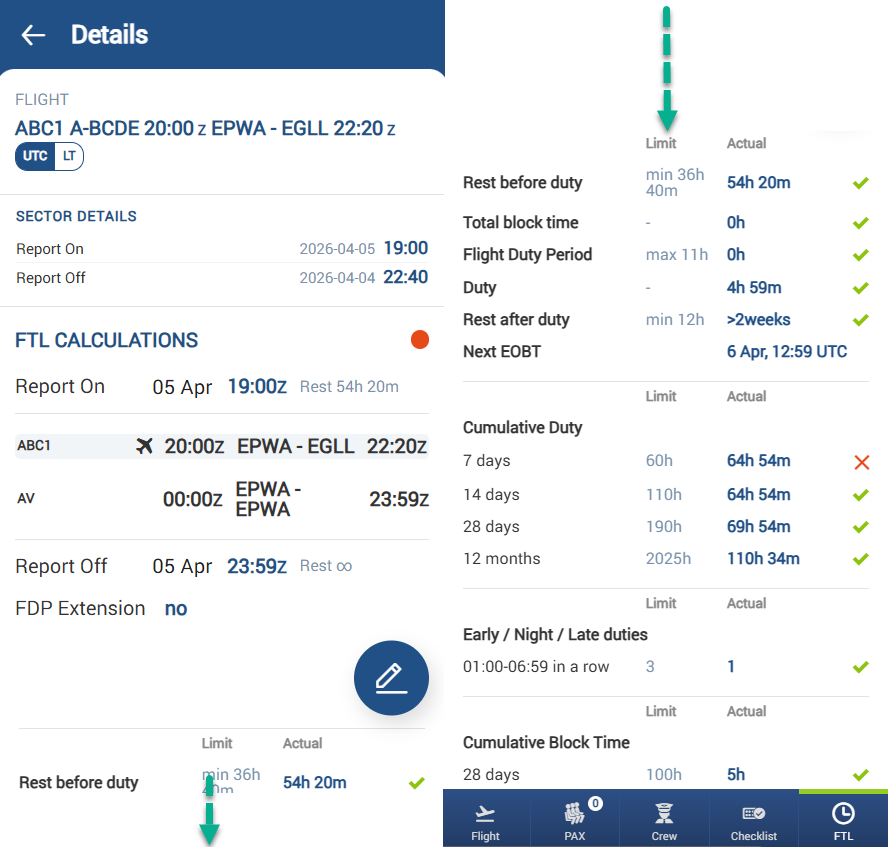
The tab FTL displays the FTL Calculations as per the FTL Calculations tab in the section CREW in the browser version of the SCHEDULE.
It is divided into 2 sections:
Flight details
This section contains information about the flight to which the FTL regulations apply.
The data can be displayed either in UTC time or in local time.

FTL Calculations
This section displays the full FDP period (all sectors - including the flight numbers - and duties falling into one FDP period) along with reporting times and dates and rest before and after flights/duties.
The colour of the dot next to the FTL CALCULATIONS represents the legality to fly. Red dot indicates a violation of any of the regulations listed below the FDP activity. The regulations display limits according to OM7 and the actual times performed by the crew member. To see which regulation is violated simply scroll down the screen. The green ticks next to the regulations indicate that the given regulation is not violated. Red cross will be displayed next to the violated regulations.
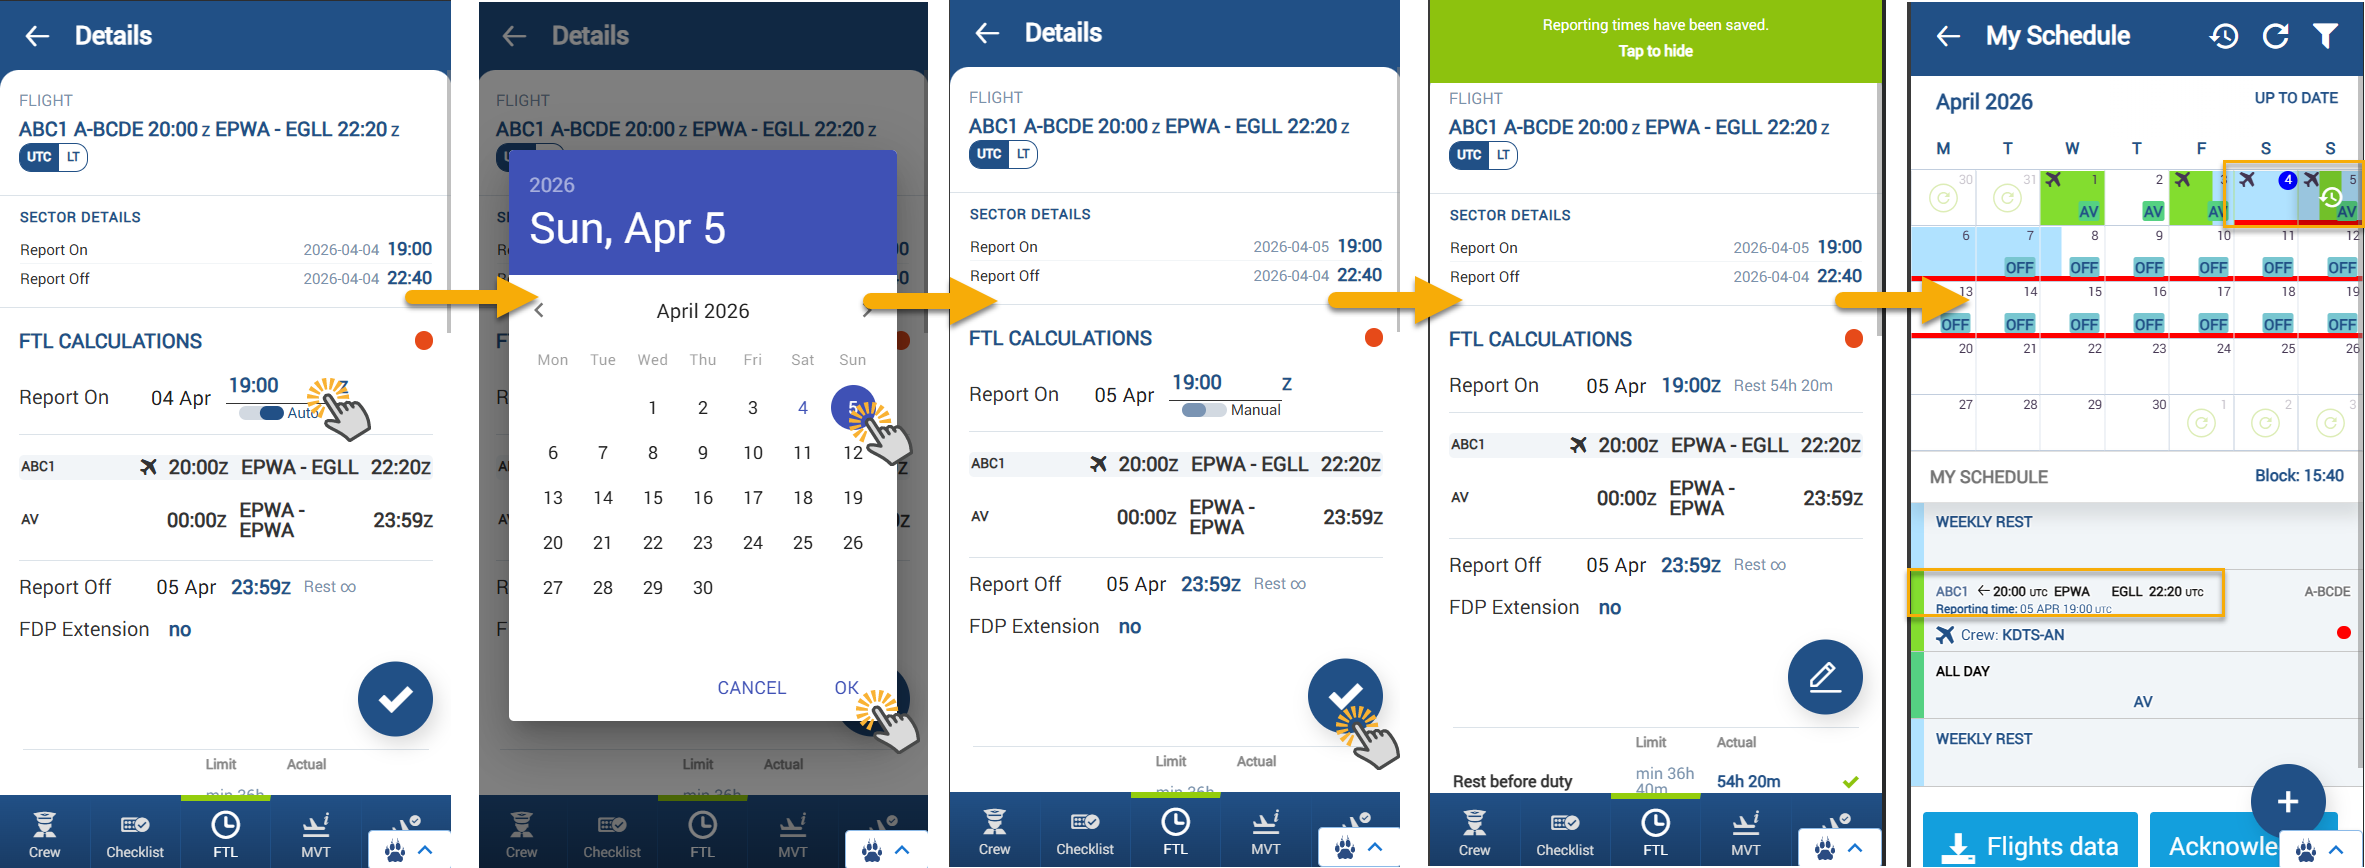
Report On and Report Off times and dates can be edited using the edit icon 
FDP Extension information is displayed below the Report Off time.
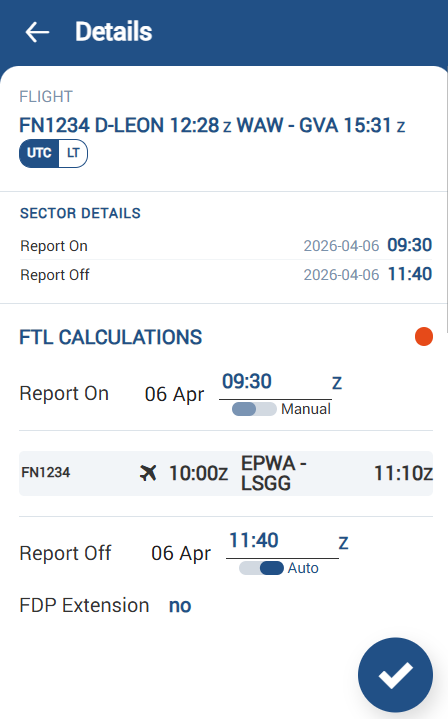
Auto mode applies reporting times automatically, in accordance with the operator's OM Part 7:
-
The automatic Report On time corresponds to the STD. If the actual flight date or time differs from the planned one, the Report On time/date must be updated manually.
-
The automatic Report Off time corresponds to the STA. It will update automatically once the BLOFF time is entered in the Journey Log.
To save the changes, use the 
Since both the reporting time and date can be adjusted, note that the reporting date determines on which day the flight appears in the My Schedule and Schedule calendar views.
MVT
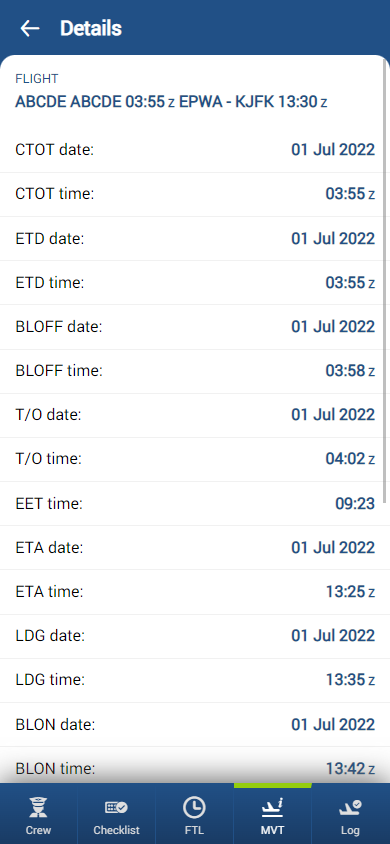
The MVT tab allows the pilots to insert the Flight Watch details.
This tab contains all the fields that are available in the desktop version of the ‘Flight Watch’.
The timeframe details are split into the date and the time value.
Clicking on the date field will open a calendar pop-up where the specific date can be selected, if other than suggested.
Clicking on any of the timeframe fields (CTOT, ETD, BLOFF, etc.) will open a pop-up identical to the one in the ‘JL’, where the time value can be inserted, as well as one of the 3 options selected:
-
CANCEL - cancelling the input and closing the pop-up
-
CONFIRM - saving the inserted value and closing the pop-up
-
NEXT - saving the inserted value and moving to the next FW field
Flight Watch inserted and saved in the ‘MVT’ tab will automatically appear in the desktop version of Leon and vice versa.
Journey Log
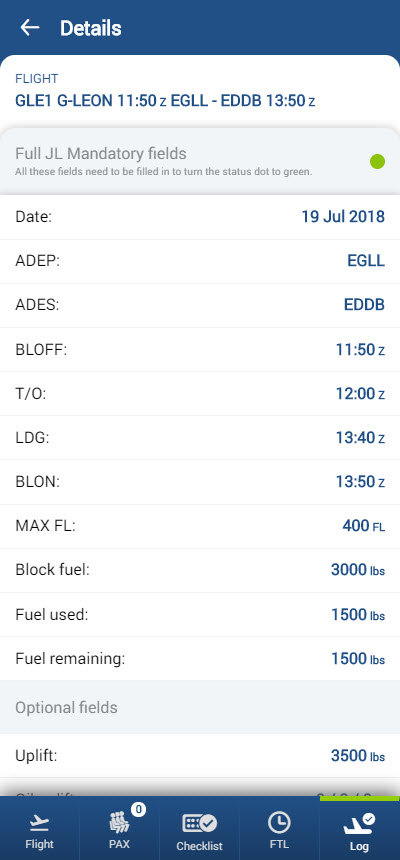
The Journey Log tab shows flight schedule data on top of the screen. Below all there are all the post-flight data inserted into Leon. The screen is divided into 2 parts:
Both the Full JL mandatory fields and the Optional fields can be selected in the Settings>Journey Log settings.
The Confirmation of data correctness checkbox can only be selected by the CPT who certifies that all the above details are inserted correctly
The allowed size of the uploaded file is 20 MB
Passenger Number Validation: The Crew App reflects flight occupancy by including infants in seat capacity checks.
When the Infants field is filled in the Journey Log, the system automatically counts those infants toward total passengers. If the Infants field is left blank, the system uses infant data from the passenger list.
This ensures consistent and accurate seat capacity validation, reducing discrepancies in passenger reporting.
.png?cb=c692796779177d082c4d8176195ee919)
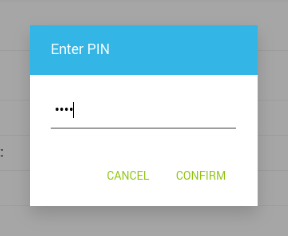
Confirm JL entry using PIN
In a section Admin panel > Journey Log, it is possible to mark a functionality “Confirm JL entry using PIN (click ‘Additional Settings’ and mark a checkbox).
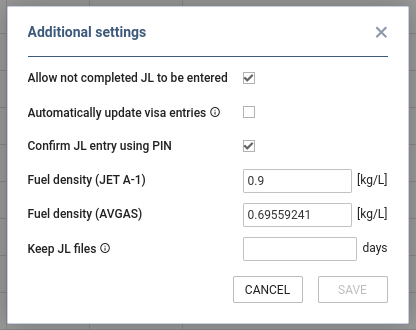
When the crew add JL data, the system will require the password and PIN.
Handover data
It is important for the crew, once they have finished their duty, to inform the crew assigned to the next leg, on the same aircraft, about the remaining fuel on board and other details. For this purpose, we have added 2 new fields to the Journey Log panel (to be enabled in Settings > Flight Editing section).
Fuel before uplift
Leon will show the value of JL Fuel remaining from the previous flight in a section Flight of the mobile app, as Fuel on board before uplift - see example below.
On the flight WAW-GVA, in the Log panel, fuel details have been inserted, where ‘Fuel remaining’ shows as 2155 KG.
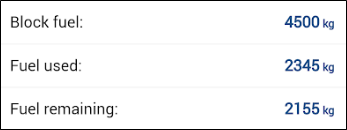
When the crew assigned on the next leg GVA-WAW click on the flight in the mobile app and view details in a section ‘Flight’ - Leon will show the value of 2155 KG as ‘Fuel on board before uplift’.

The same value will also show in the ‘Log’ section of the app as ‘Fuel before uplift’.
Aircraft Handover
Once this item has been added to the default JL items, the crew will be able to leave some important information for the crew assigned on the next flight - see example below.
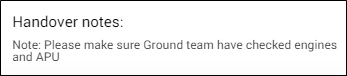
On the flight WAW-GVA crew inserted information in the JL item Handover notes.
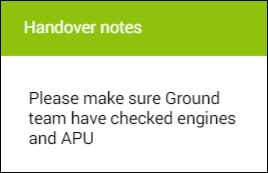
Crew assigned to the next flight will see it in the mobile app when they enter the section ‘Flight.’
Adding Journey Log data
Click a particular JL detail to insert data (i.e. BLOFF or T/O). When selecting JL times, Leon shows a pop-up window - click on the time to get a clock pop-up displayed, where you need to click on the hour, then on minutes.
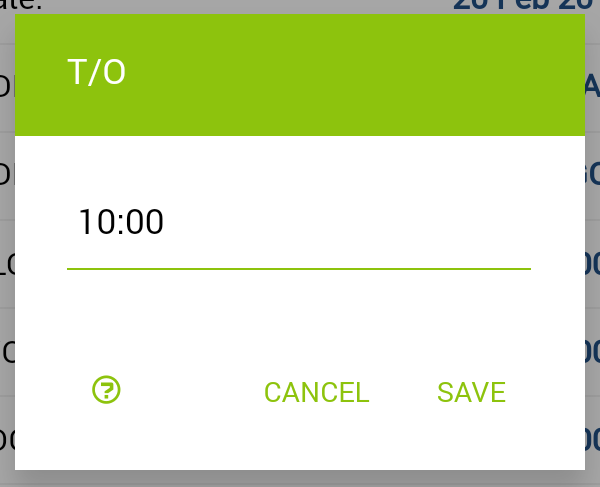
Unknown Attachment
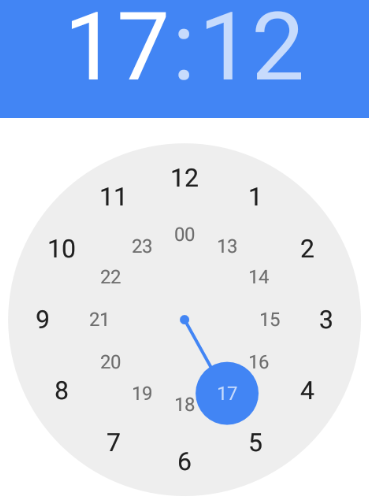
Unknown Attachment
Leon will not let you save JL until you add mandatory flight times. If fuel details are missing, Leon will show an orange dot. Once fuel data is added, the dot becomes green.
You can send a file/screenshot along with the JL (one or more). The attached file/screenshot will appear in Leon web version. It is also possible to remove the attached file/screenshot at any time and attach a new one.
Leon will show TAH & TAC data at the bottom of the JL panel in the application (as long as CAM has been defined in Leon and all previous Journey Logs have been filled in in Leon).
Adding Journey Log in offline mode
It is possible to add Journey Log data in offline mode in Leon mobile application.
When switching to offline mode, Leon displays the message ‘Data not available in offline mode’; however, you can still access the Journey Log panel in the mobile app. Click it, and Leon will show the JL panel, with the information that it is a DRAFT.
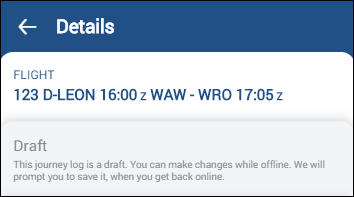
All changes will need to be saved when the device is back in online mode - Leon will show a button SAVE NOW.
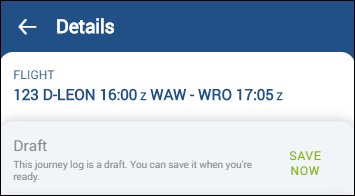
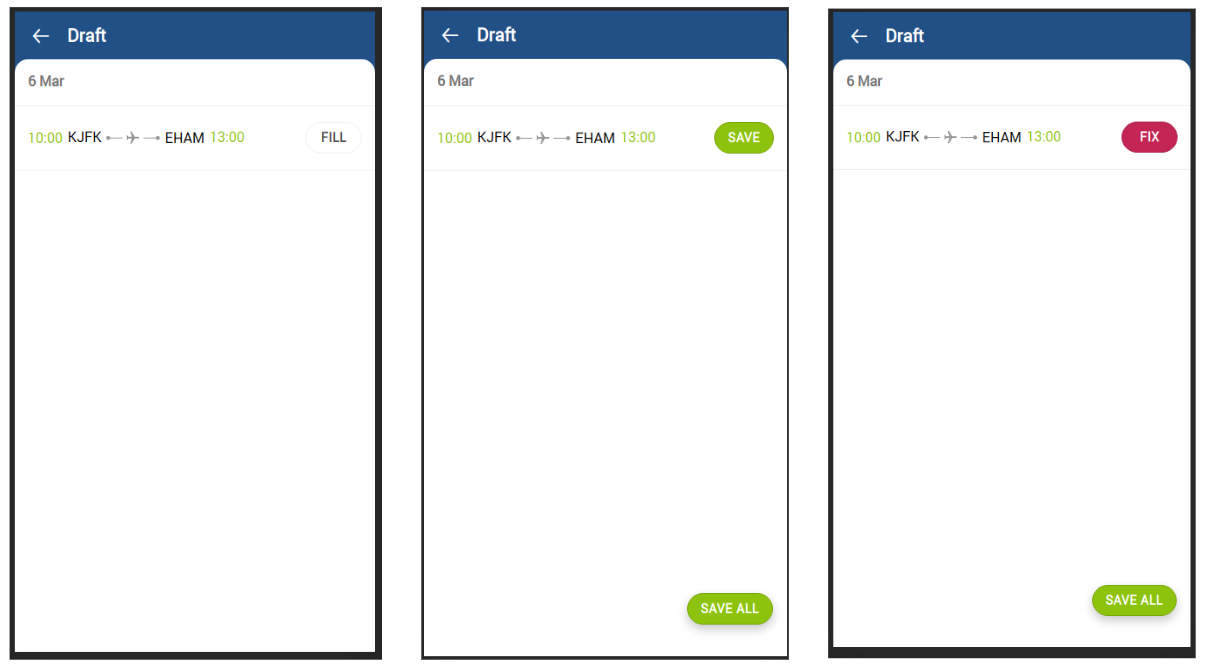
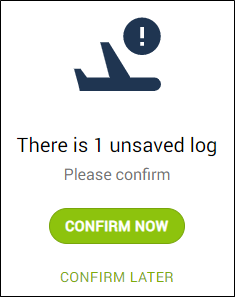
When logging in to the mobile application, Leon will show a reminder if there is an unsaved JL draft. By clicking ‘Confirm now’, Leon will show the draft to be saved or to be fixed (see screenshot on the right to see 3 states of the draft: Fill, Save and Fix)
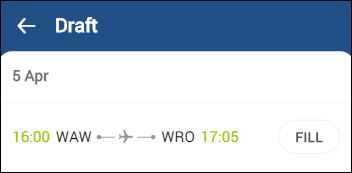
Pilots can also check if there is any JL Draft pending to be saved by clicking 

In a new window, Leon shows details of the JL Draft along with the option to FILL in all remaining JL details.
In offline mode, pilots can only edit their own drafts or add new Journey Logs, but will not be able to edit already saved Journey Logs.
Training
Tab Training consists of 3 sections: Certificates, Currency and Experience.

Certificates
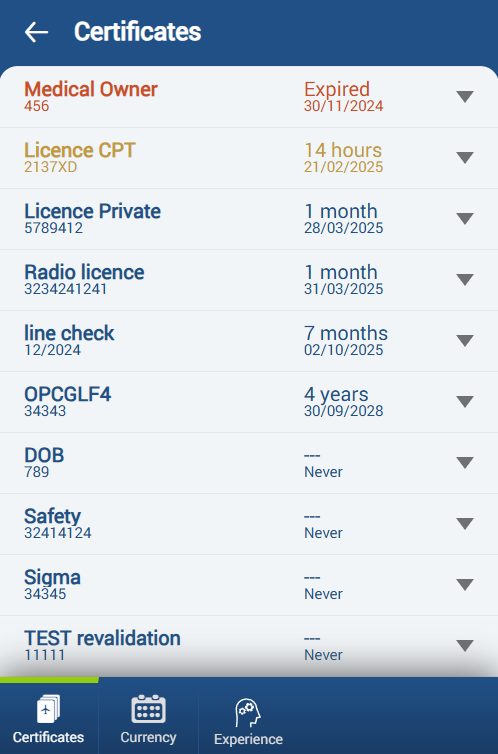
The Certificates section of the mobile application consists of a list of Certificates assigned to the crew member logged in.
It is possible to decide which certificates should show in the app by marking a checkbox Show in crew app, in the certificate’s definition (section Admin > Crew Certificates).
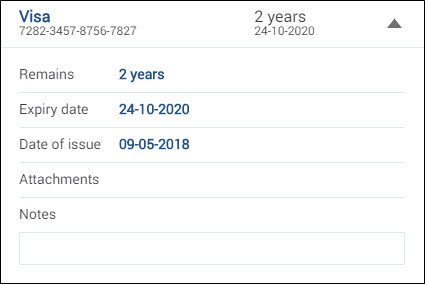
The list includes:
-
The name and number of the certificate
-
Time left to expiry and a specific expiration date
-
Information in case the certificate does not expire
-
Attached files and notes
Colour coding:
-
Blue - valid certificate
-
Yellow - certificate expiring within one month
-
Red - certificate expired/expiry date not issued
The 
Certificate Revalidation
Access the certificate editing view and click the Revalidate button to open a pop-up where you can complete the revalidation process, which works identically to the web version. The system automatically handles revalidation according to the configured Revalidation Policy settings. Manual entry of expiry dates is disabled to ensure data consistency and compliance with revalidation rules.
Currency
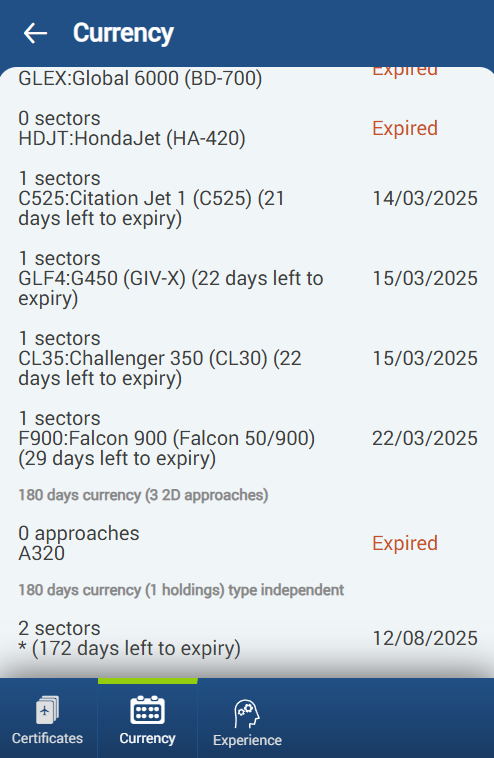
A section Currency in the Leon Crew App shows all types of currency status enabled for the crew in the Settings -> Crew Currency.
Leon shows the name of the currency, the aircraft type it concerns and the expiry date.
Experience
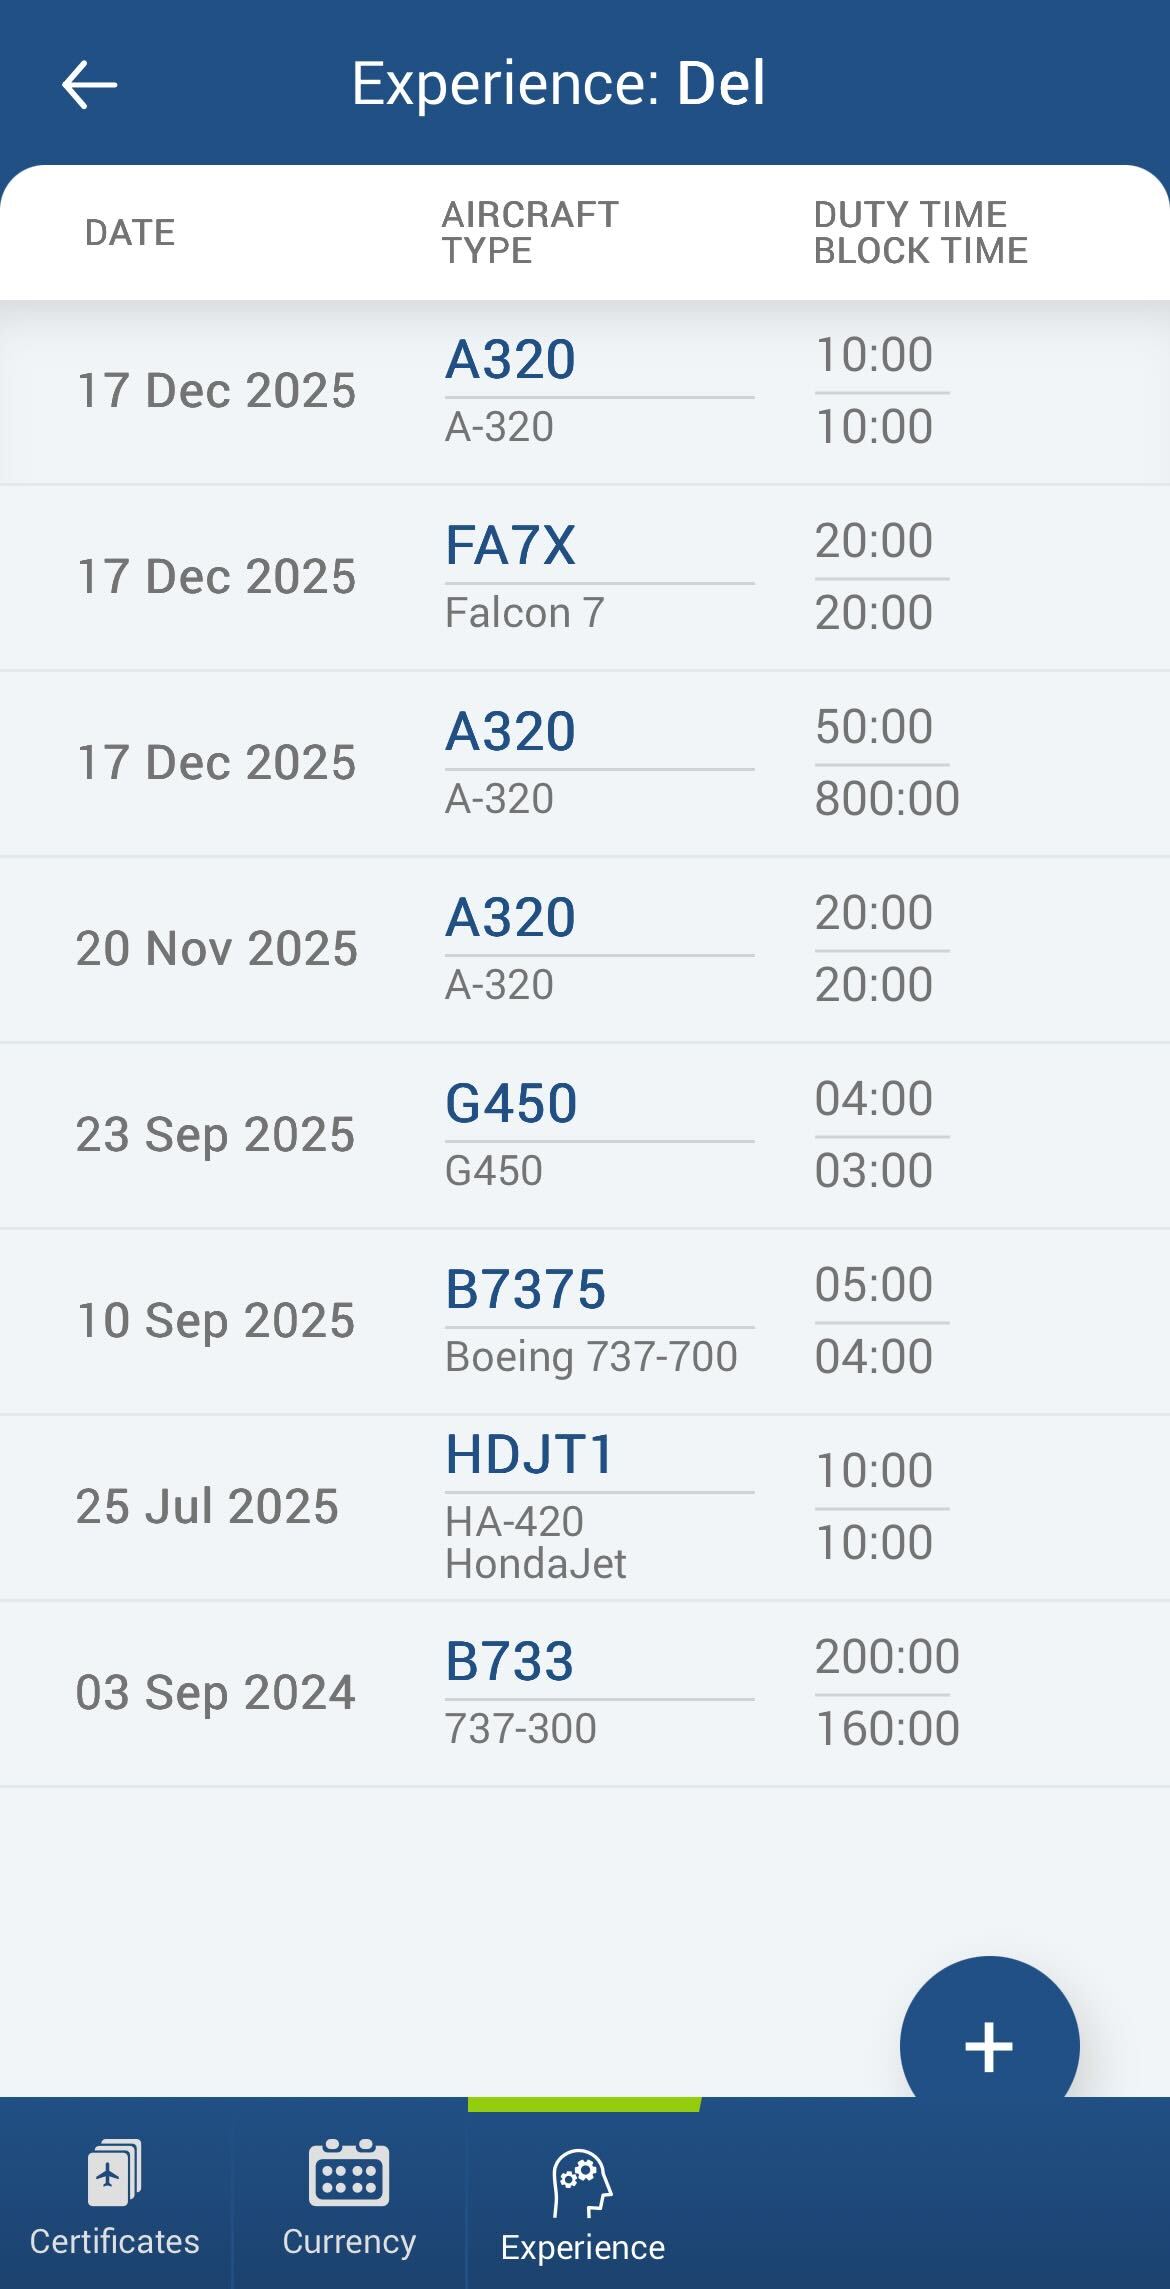
Experience is a tab where crew members can enter experience gained before joining the company or record flights performed outside the company.
The main view displays experience data in 3 columns:
-
Date
-
Aircraft type
-
Duty time/Block time
If allowed by the system administrator in the Privileges section, crew members are able to add experience by clicking on 
Duties
Duties section is divided into 2 tabs:
-
Requests - pilot duty requests
-
Accounts - pilot duty account balance
Requests
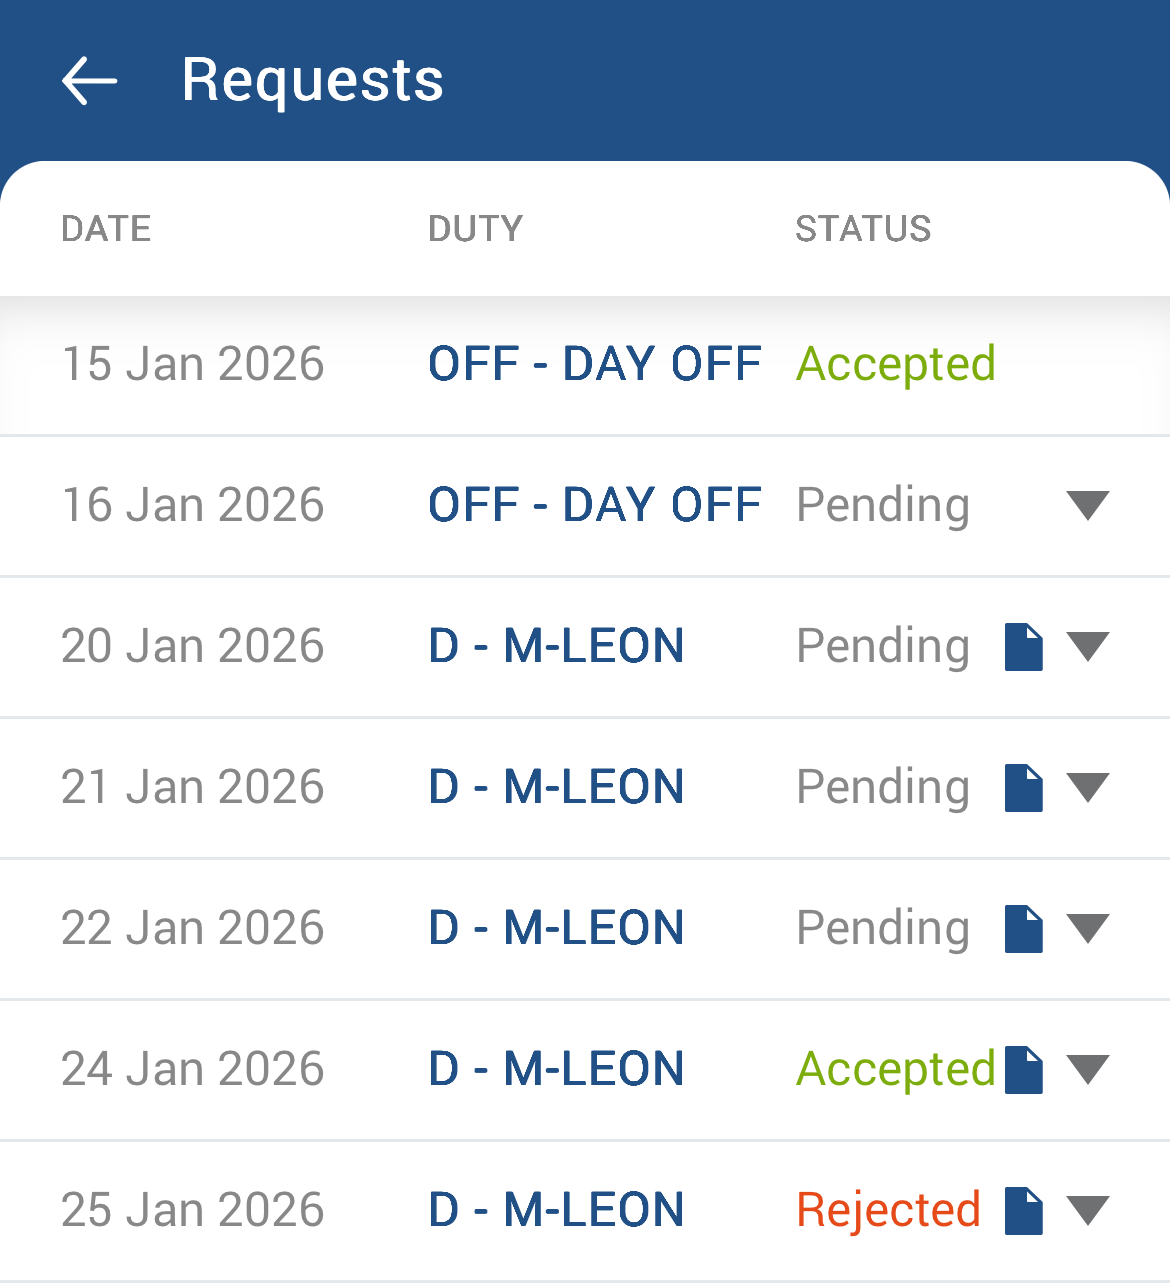
This tab is available depending on the privilege ‘Crew App - Duty Requests’. In order to request a duty, select the menu “Requests” and use the icon 
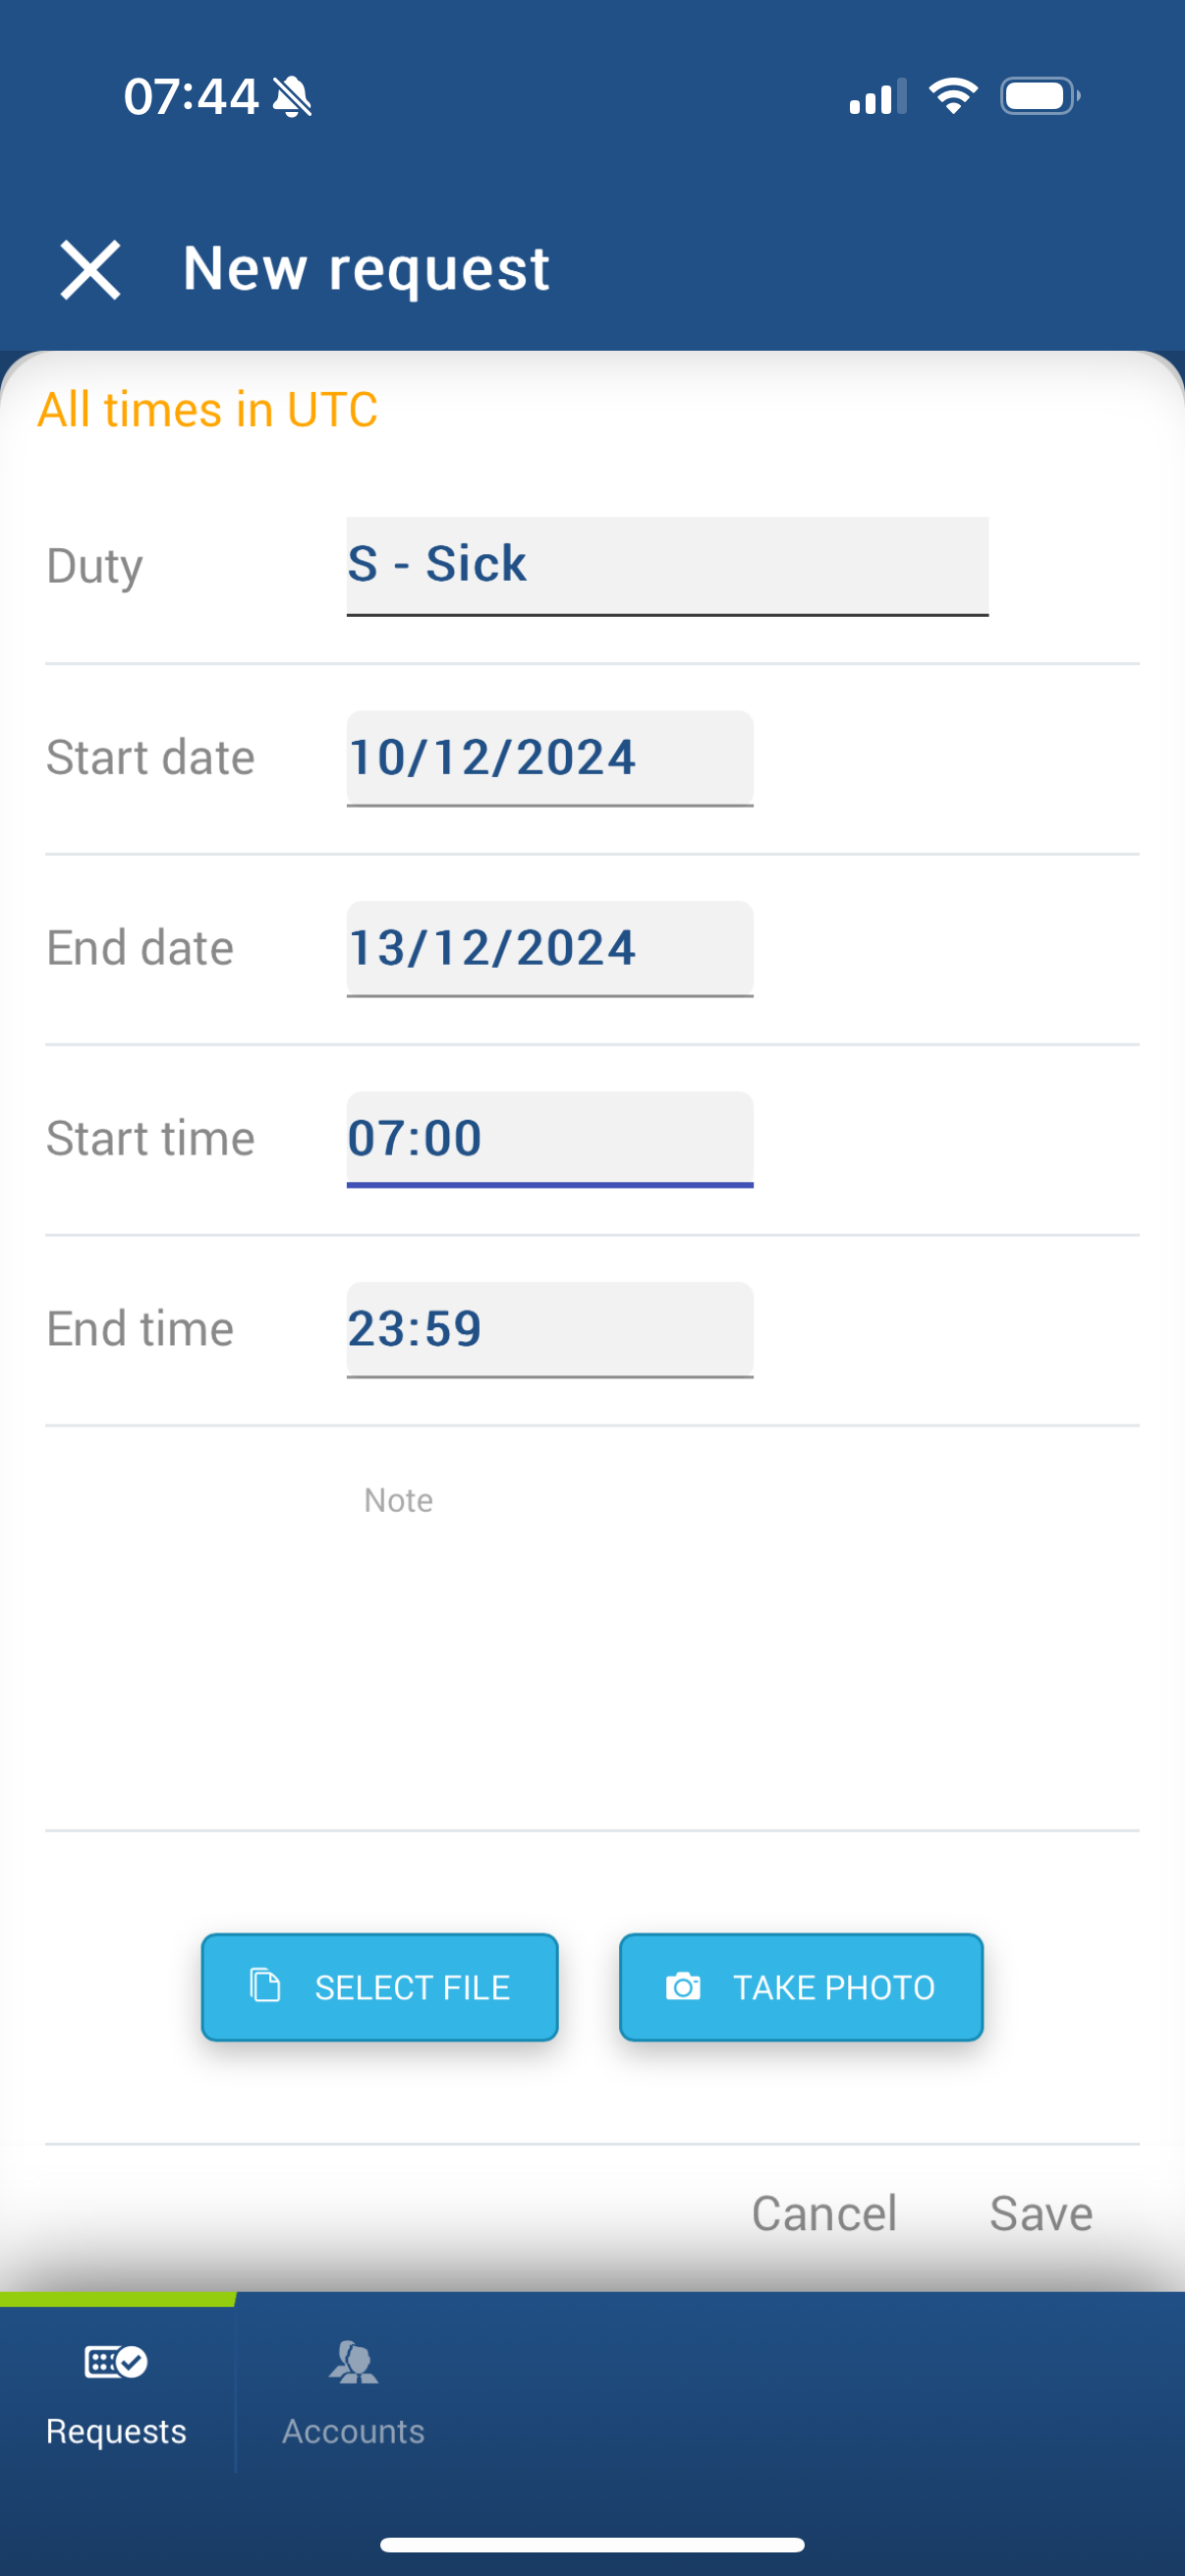
Select a start date, end date, start time, end time, and the duty (e.g. Day Off, Holiday, Training).
The duty list includes all duties defined by the operator in Settings → Duties Setup. You may also add a note explaining the reason for the request, upload a file or a photo. These details will be visible to the person responsible for duty planning.
To delete a request, return to the list of requests, select the request you want to remove, choose Delete, and confirm.
Once a duty is requested, the person or department responsible for duty planning will see the request in the roster. The requested duty is indicated by red font colour:

Approved requests will be reflected in the roster immediately, and the status on the list will be changed accordingly.
Request status can be either Pending, Accepted or Rejected.
It is possible to select which duties can be requested by selecting the ‘Can be requested’ checkbox in the Duties Setup section.
Adding ‘Duty Requests’ by crew can be disabled in a section Privileges by setting item ‘Crew App - Duty Requests’ to VIEW or DENY
Accounts
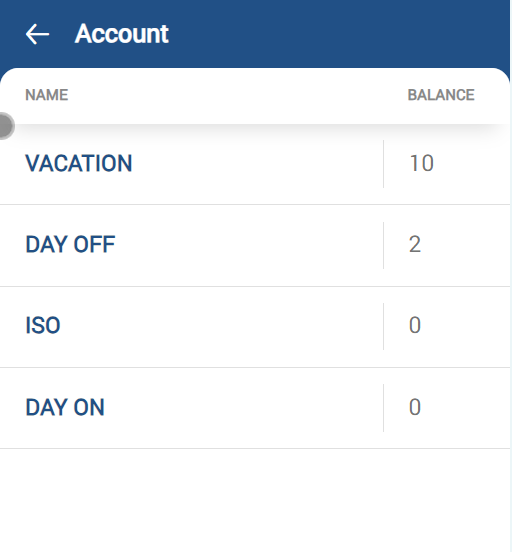
This section allows previewing the current balance of assigned duty accounts for the crew member.
Duty account is part of Duty trading functionality explained here.
The list of accounts available in this view is the accounts assigned to the User in the User profile > tab ‘OTHER’.
If there are no accounts assigned to a User, the tab will still be available, but it will not display any accounts.
Showing ‘Duty Accounts’ can be disabled in the section Privileges by setting the item ‘Crew App - Duty Accounts’ to DENY
Manuals
The Manuals section in the Leon app displays all uploaded files from the Manuals tab in the Privileges section.
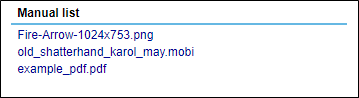
Once files are uploaded, the crew can easily find them in this app section (as shown in the screenshots below). The manuals are sorted alphabetically, and by clicking on a particular file, Leon will open it. Please note that this functionality won’t work offline.
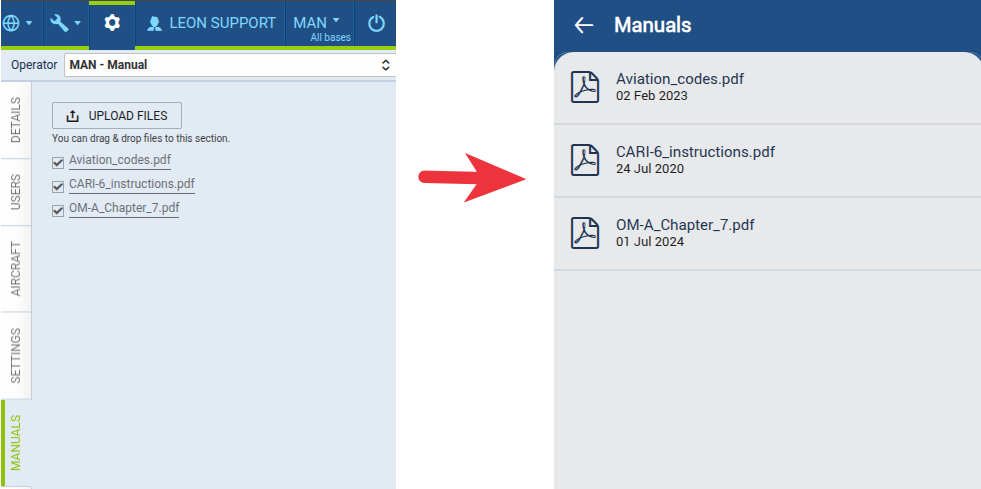
Users can also access the uploaded files through their Full Profile Page by clicking the user’s name in the top-right corner of the browser Leon version: