SCHED is a module that allows you to create and manage flight schedules.
It is designed primarily for airlines, but business and charter operators can also use it to build and manage their schedules.
Main SCHED view
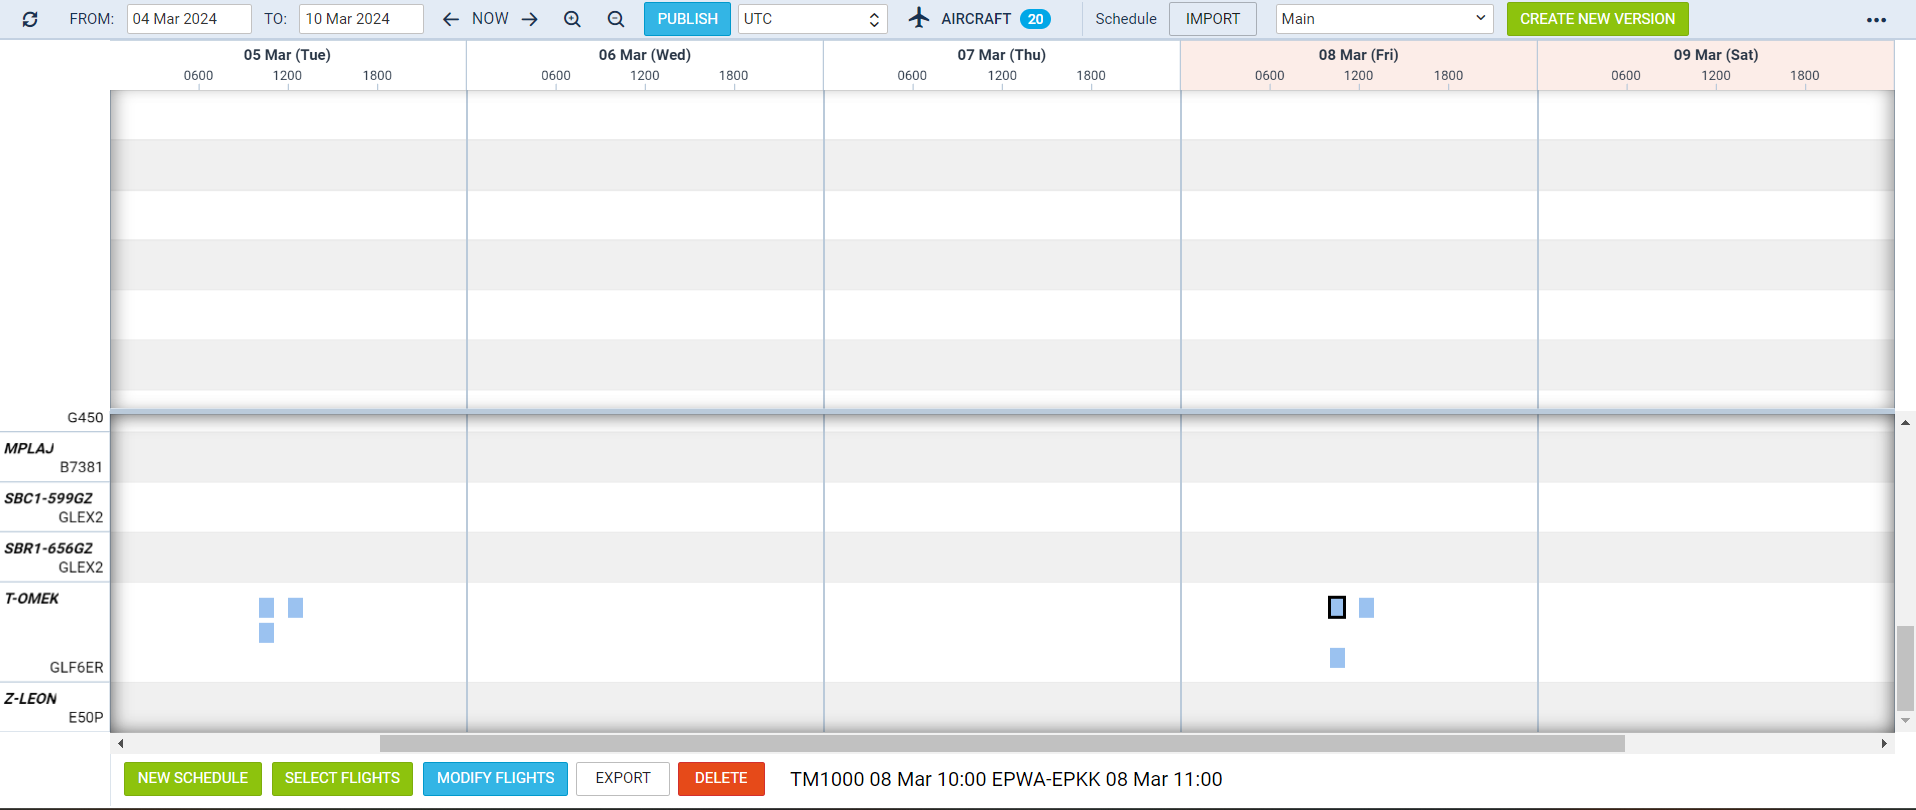
The main SCHED view is divided into two sections:
-
Versions – The upper section displays schedules assigned to a specific schedule version. At this stage, the schedule has been created, but no aircraft has been assigned.
-
Aircraft schedules – The lower section displays schedules assigned to specific aircraft. The aircraft list includes both the real fleet, shown in italic, and virtual aircraft, shown in standard font.
Once a schedule is assigned to a specific aircraft, the relevant flight or flights are moved to the lower section of the view.
Actions available
There are following options available:
-

-

-

-
-

-
SSIM - export of schedule to SSIM file. SSIM not available on the non-published schedules
-
EXCEL - export of schedule to an Excel file
-
-

-

in OPS > TABLE view
Next to
In the top-right corner of the page, you can use the 
NEW VERSION OF THE SCHEDULE
This option allows you to create a schedule version and add new schedules either by uploading an SSIM or XLS file from a specific client (e.g. a travel agent), or by manually creating a schedule without assigning an aircraft.
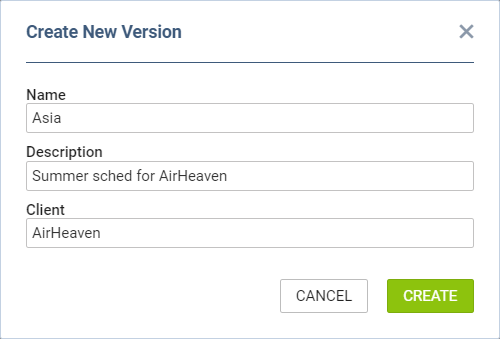
To create a new schedule, click the following button: 
In the Create New Version pop-up window, enter the schedule name, select the client, and add a short description, as shown in the screenshot on the right.
Once created, the version will be available from the drop-down menu at the top of the screen.

MULTIPLE VERSIONS PREVIEW
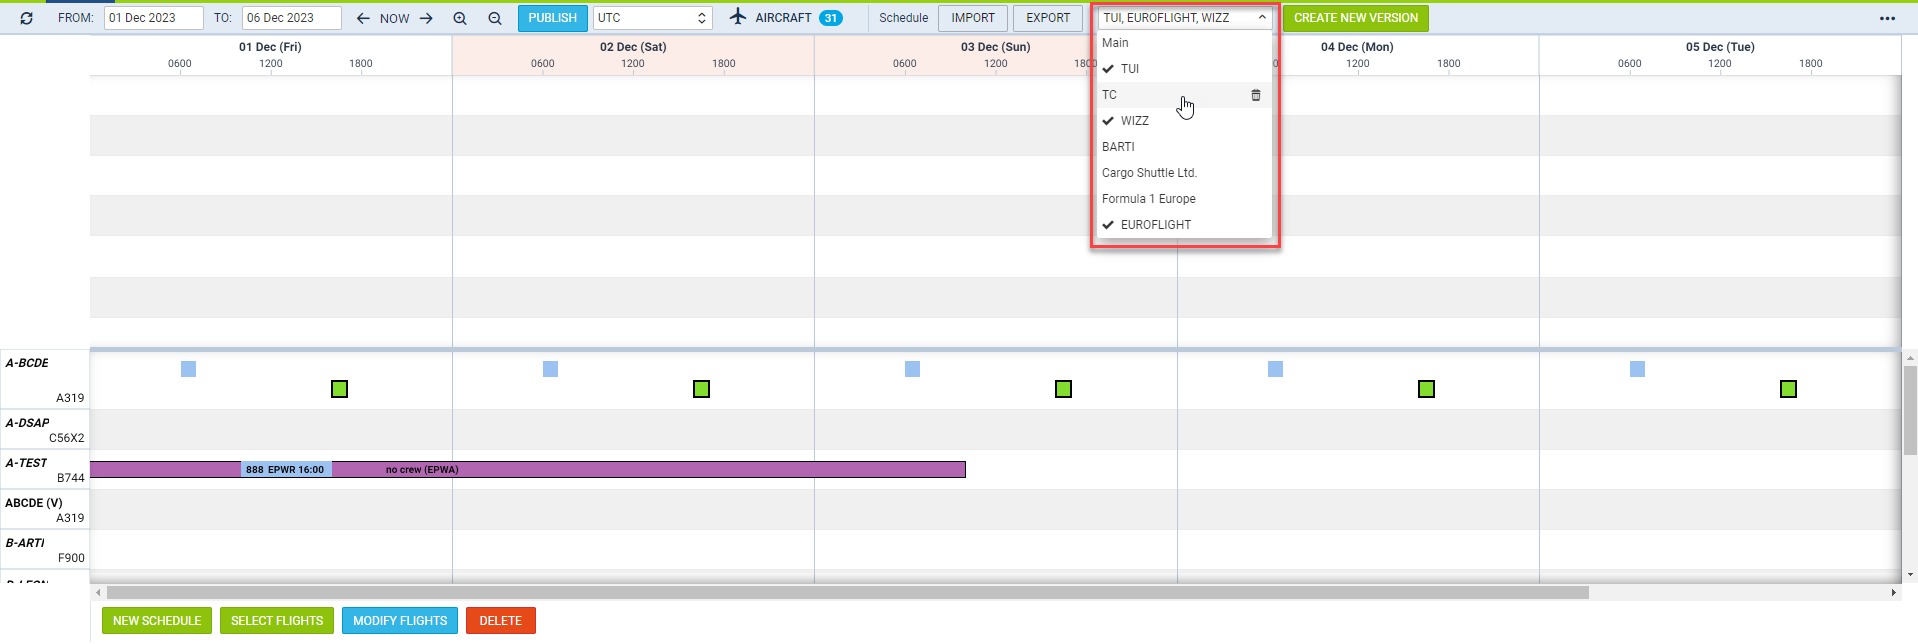
You can select multiple schedule versions to preview in the SCHED overview.
Open the versions list and click the versions you want to view, as shown in the screenshot above. The SCHED overview refreshes each time you select an additional version.
If different versions are assigned to the same aircraft, each version is displayed on a separate line within that aircraft’s block.
Versions that are not assigned to an aircraft are displayed as separate TBA lines in the unassigned aircraft section.
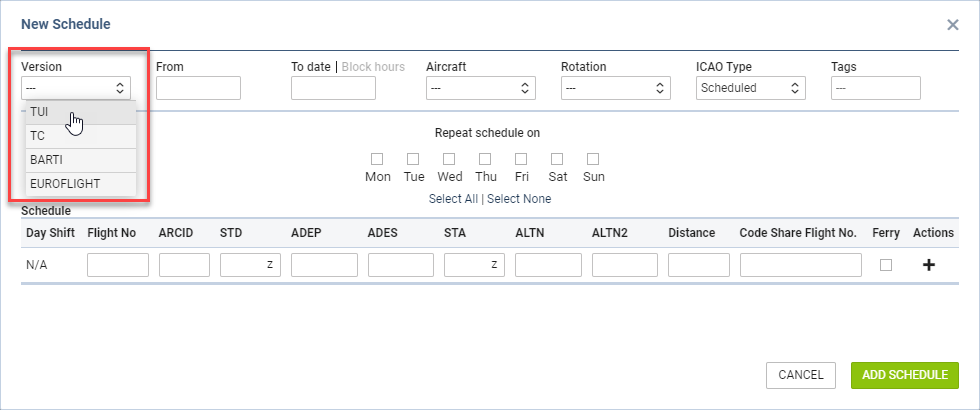
Version selection is available in the following windows:
-
New Schedule pop-up window, as shown in the screenshot on the right
-
Schedule Import
-
Schedule Export
-
Select Flights
Schedules can be published for only one version at a time.
IMPORT
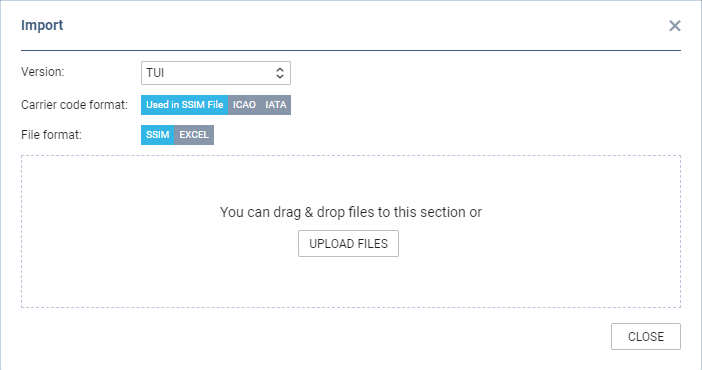
If a schedule file has been provided, you can upload it to Leon using the following button: 
Schedules can be imported from SSIM and XLS files. The XLS file must use the same format as a file exported from Leon, including the same columns and correctly formatted data.
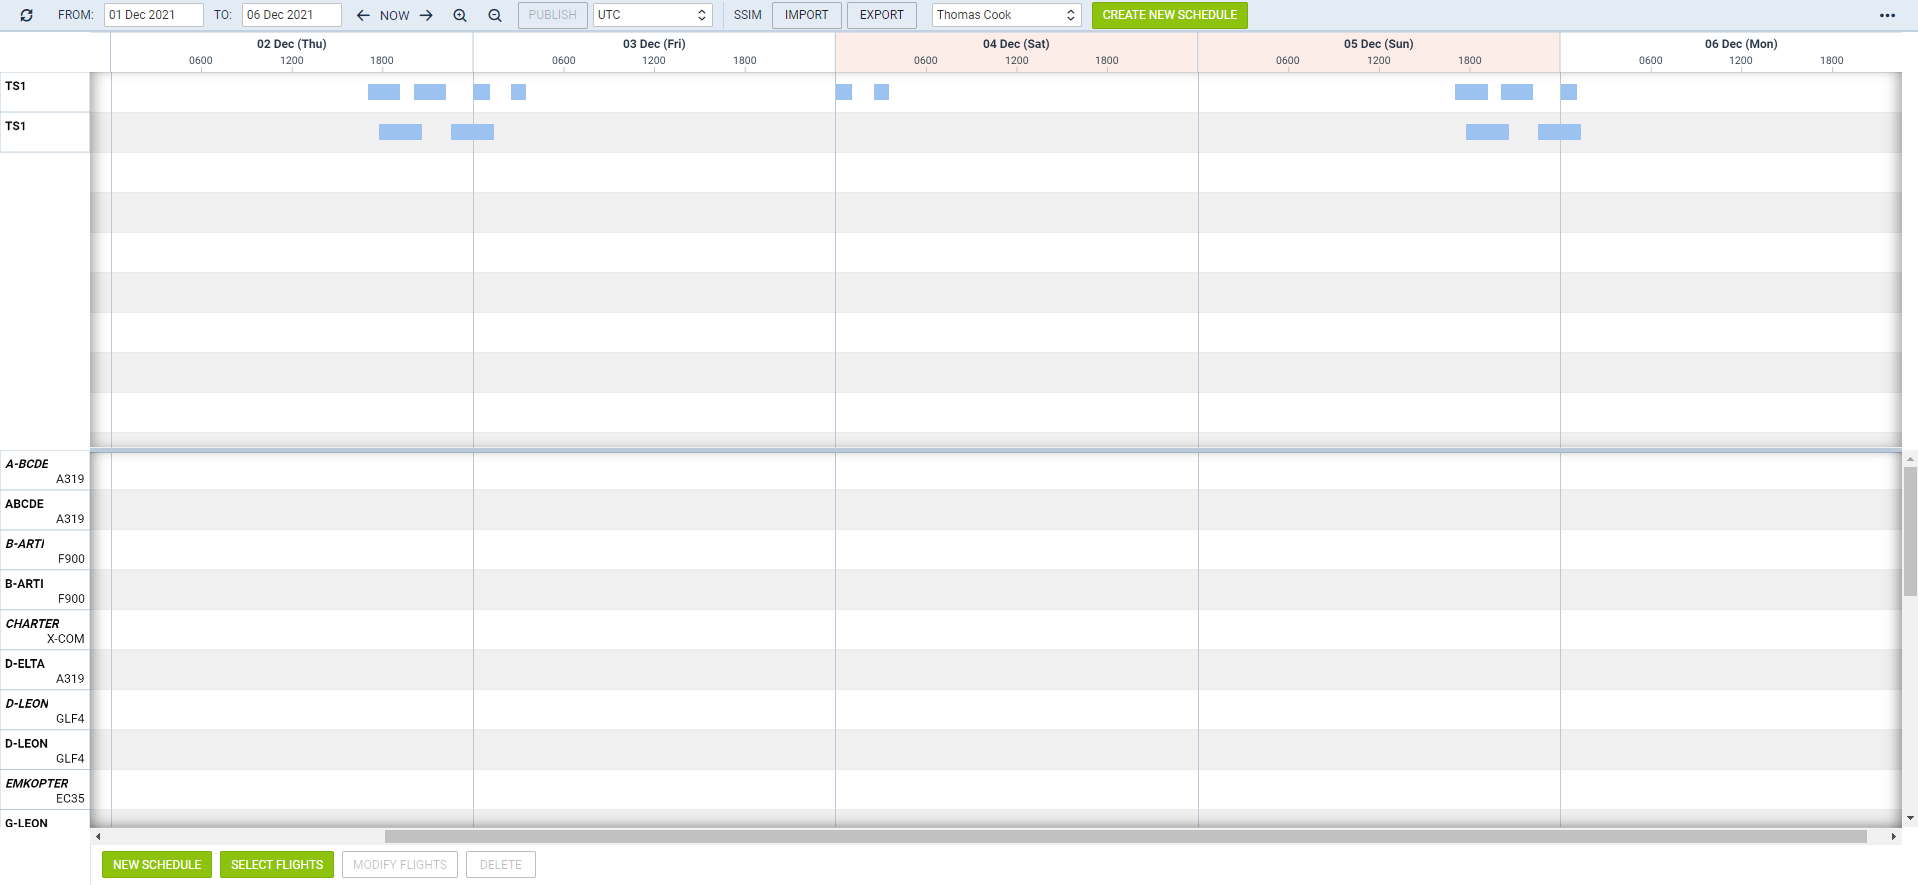
Select the schedule version to which you want to upload the file, then click the
In the Import pop-up window:
-
Select the version to which the file should be uploaded.
-
Select the airport-code format.
-
Select the file format.
Once the file has been uploaded, its flights will appear in the upper section of the screen under the selected schedule version, as shown in the screenshot on the right.
If changes are made to a previously uploaded schedule, uploading the file again will replace the existing schedule. You can then modify the uploaded schedule using the options described later in this section of the manual.
EXPORT
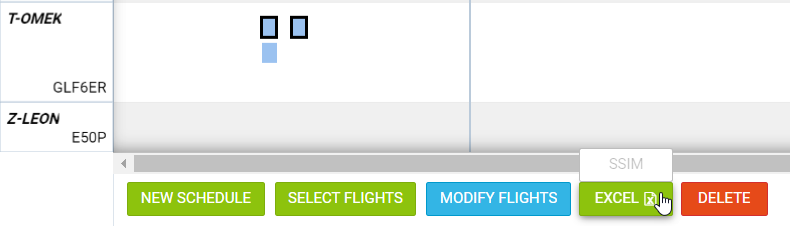
To export the schedule to a file click on the button: 
The schedule can be exported as an SSIM or XLS file.
For SSIM exports, make sure:
-
the operator IATA code is set in Settings → General Settings,
-
the aircraft configuration fields Passenger Reservation Booking Designator and Configuration/Version are entered in Settings → Fleet.
To export a schedule, hover over the
Leon saves SSIM exports as .txt files and XLS exports as .xls files.
NEW SCHEDULE
Use this option when an SSIM or Excel file has not been provided and the schedule needs to be created manually.
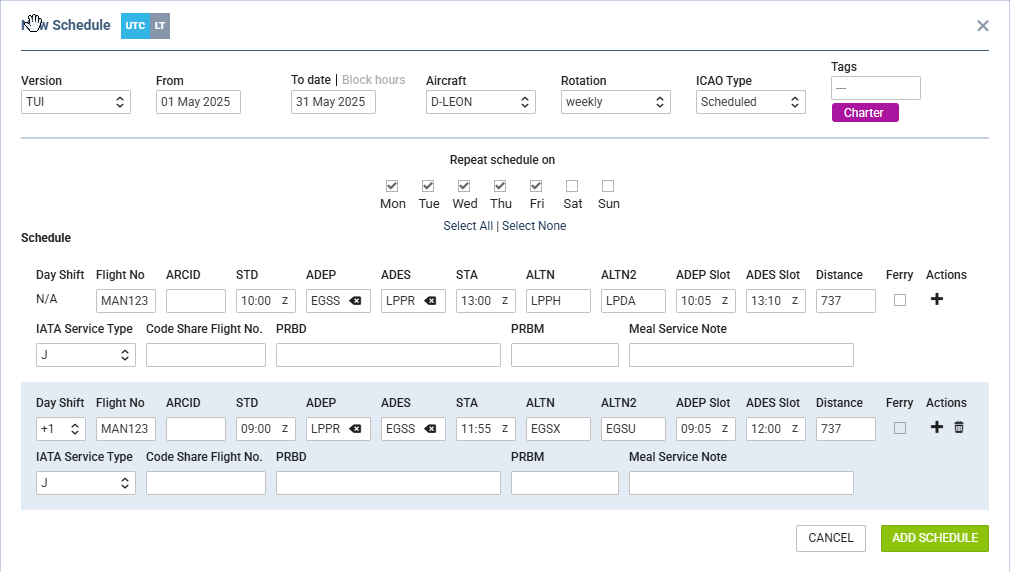
You can build a schedule in two ways:
-
Using the To date mode – create a schedule based on a selected From and To date range.
-
Using the Block hours mode – create a schedule based on the number of block hours available within the schedule.
To build a new schedule, follow these steps:
-
Click the button:
-
Select the schedule version to which the flights should be added.
-
Configure the schedule:
-
Select the mode you want to use: To date or Block hours.
-
Select the aircraft, if known. If no aircraft is selected, the schedule will appear in the upper section of the screen with the TBA label. Schedules can be assigned to both virtual and actual aircraft.
-
Select the schedule rotation (weekly, biweekly, or triweekly) and the ICAO type.
-
Select the days on which the schedule should operate (Mon for Monday, Tue for Tuesday, etc.).
-
In the Schedule section, enter the flight details. To add another flight to the same schedule, click + to add a new line.
-
On the second and subsequent lines, you can select a Day Shift value to move the flight sequence forward by the specified number of days. For example, if the schedule is due to start on Wednesday and you select +1, it will start on Thursday.
-
Optionally, select existing Tags or create new ones. Once the schedule is published, these tags will appear in the TRIP tab in the OPS section. If you later amend tags in SCHED, they will overwrite the existing tags in the TRIP tab in OPS.
-
Click MORE to display additional optional fields: IATA Service Type, Code Share Flight No., PRBD, PRBM, Meal Service Note, Traffic Restriction (DEI 8), departure and arrival terminals, and handling information for ADEP and ADES. These fields are included in SSM/ASM messages.
-
-
-
Click Add Schedule to save the new schedule.
You can switch between UTC and Base Time, provided that Base Time has been configured in the General Settings section.
If the schedule is built using the Block hours mode, specify the number of hours the aircraft is allowed to operate. Leon will then limit the schedule and the number of rotations accordingly.
Example
As shown in the screenshot, the schedule is limited to 30 block hours. Each rotation has 6 hours 25 minutes of block time, so Leon can build only four rotations within the allowed limit:4 x 06:25 = 25:40

In the General Settings panel, you can define Bases and then assign aircraft and crew to a specific base.
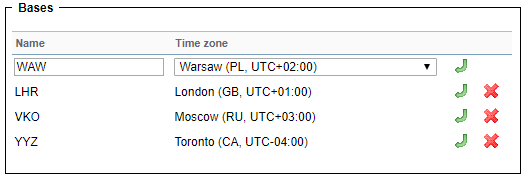
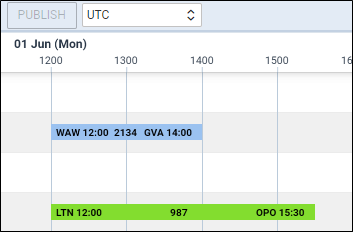
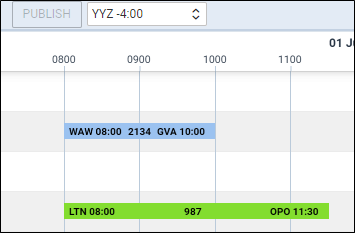
On the main SCHED page, next to the Publish button, you can find a drop-down menu containing the predefined bases and UTC, which is shown by default.
When you switch between bases, Leon displays the corresponding ADEP and ADES times on the flight belt, as shown in the example below.
|
UTC |
Base time |
|
|
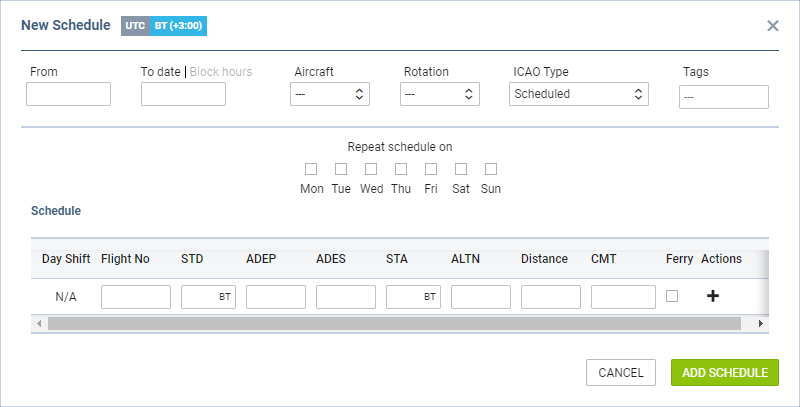
An option to select between UTC & chosen BT also appears when creating a
Once the schedule is saved, the flights are displayed as blue squares.
You can click on the flight and perform further actions, such as modifying the schedule or deleting it. You can select more than one flight by holding the Shift/Ctrl buttons on the keyboard and clicking on the flights or by using
Adding schedule in LT
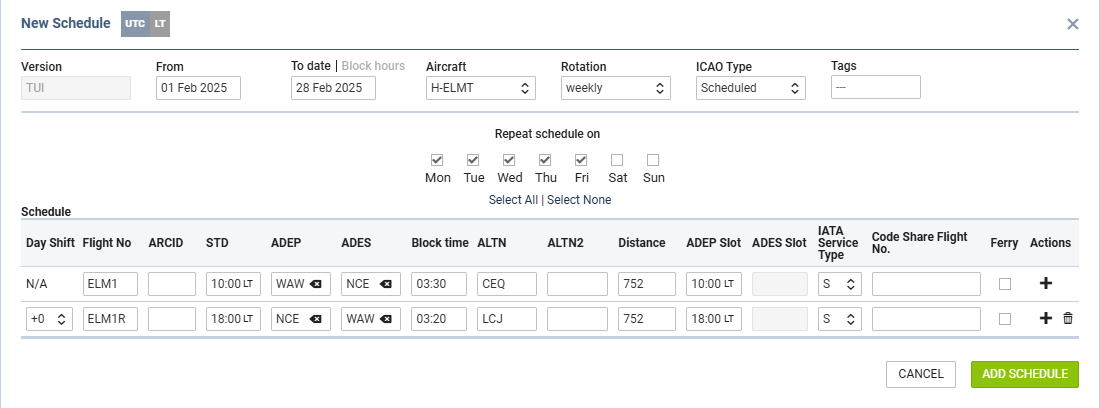
It is also possible to add schedules in Local Time (LT) by switching to LT in the ‘New Schedule’ pop-up window.
The process of adding such a schedule is very similar to adding a schedule in UTC with the following exceptions:
-
once the option is switched to ‘LT’ and the details are being inserted, the timezone cannot be switched back to ‘UTC’
-
‘STD’field is replaced with ’Block time’ field
-
‘ADES Slot’ field is unavailable
-
if the new schedule in LT falls into the Daylight Saving Time change window, adding the schedule will not be possible and the warning will be populated
New schedule is not visible to OPS teams in the OPS section until the flights are published
SELECTING FLIGHTS
This function allows for selecting a flight or several flights for further action.
It is possible to select flights in 2 ways:
-
Holding Shift/Ctrl key on the keyboard and clicking on the flights
-
Using button
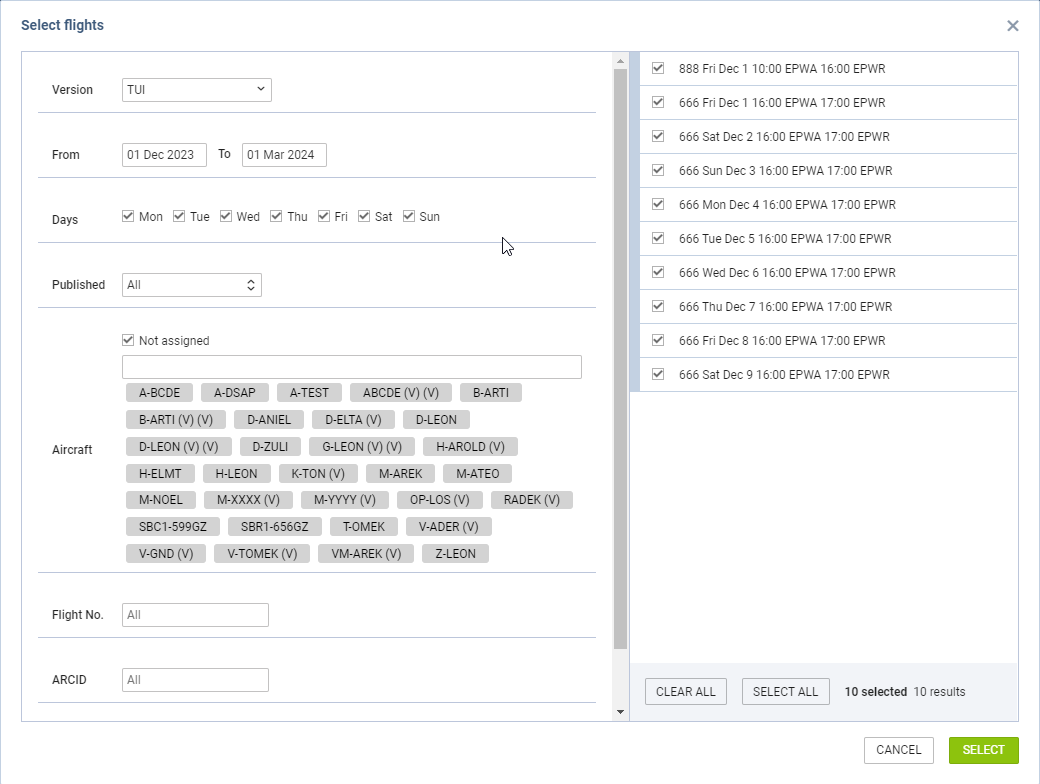
The ‘SELECT FLIGHTS’ option allows you to select several flights from the already added schedules.
The ‘Select Flights’ window is divided into two sections:
-
Filter
-
Schedule
In the Filter section, you can filter by the following:
-
Version - option to select version/versions of the schedule
-
Date range - selecting ‘From’ and ‘To’ dates
-
Days - selecting the days within the schedule
-
Aircraft - selecting flights on a specific aircraft(s). Flights can be assigned to both real aircraft as well as the virtual aircraft
-
Flight number - filtering by the specific flight number or numbers (insert multiple flight numbers separated by a space)
-
Airport - search for flights where either the ADEP or the ADES matches at least one of the selected airports. You can add more than one airport here.
-
ADEP and ADES - searching for flights from or to a specific airport or routing
-
Tags - filtering by tags assigned to the flights
The Schedule section displays the results of the filtering. There, you can select the flights that require further action.
Once the flights are selected, they‘re marked by the frame in the ’Sched Overview’ - 
PUBLISHING FLIGHTS
Option
The publishing process is as follow:
-
Select flights
-
Click on the ‘Publish’ button
-
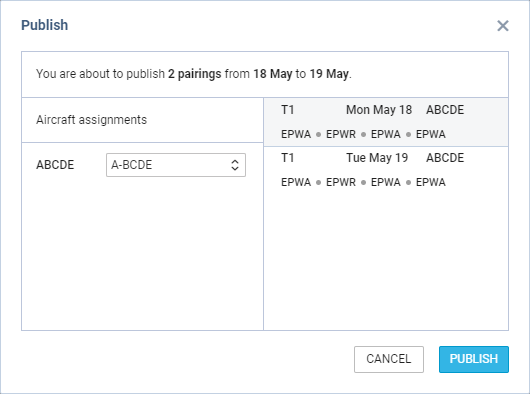
In the ‘Publish’ window Leon displays the ‘Aircraft assignments’ section in the left column and selected flights and pairings in the right column.
Once the schedule has been added to the SCHED panel, you can select whether it should be published with the initially assigned aircraft (either virtual or the real one), or with the existing one.
Select flights (use Shift or Ctrl to mark multiple legs) and click the icon
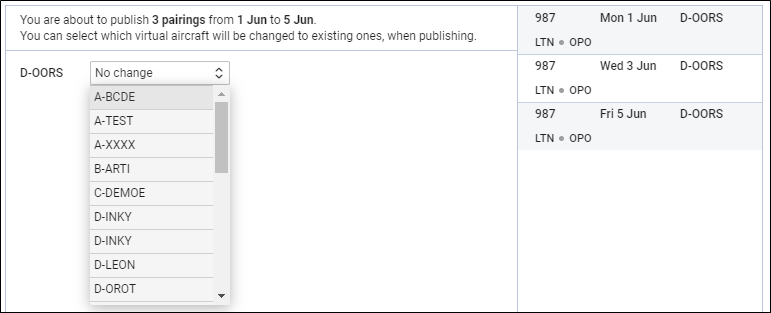
Once the schedule has been published with an existing aircraft, you will find it in the OPS panel.

When a flight is published, Leon fills in its Flight time in the OPS FLIGHT tab. The value is derived from the block time minus the taxi out and taxi in times defined for the departure and destination airports in Airport Directory. This value is used wherever Leon needs the flight time rather than the block time - for example by the Calculated ETA tag in MVT messages.
If the block time of an already published flight is later changed in SCHED, the Flight time is updated accordingly:
-
if the flight already had a Flight time, Leon keeps the taxi time it was using - the difference between the original block time and the original flight time
-
if the flight had no Flight time, the taxi times are taken from the airports
There is a following color coding to the flights in ‘Sched Overview’:
-
- flight not published
-

- flight being published
-

- flight published
IMPORTANT!!! This option is for publishing pairings and NOT single selected flights. If one flight is selected, the whole pairing for this flight will be published
For published flights, the trip status is indicated as below:
-

- confirmed
-

- option
-

- opportunity
MODIFYING FLIGHTS
It is possible to modify selected flights or a number of flights, or modify pairings.
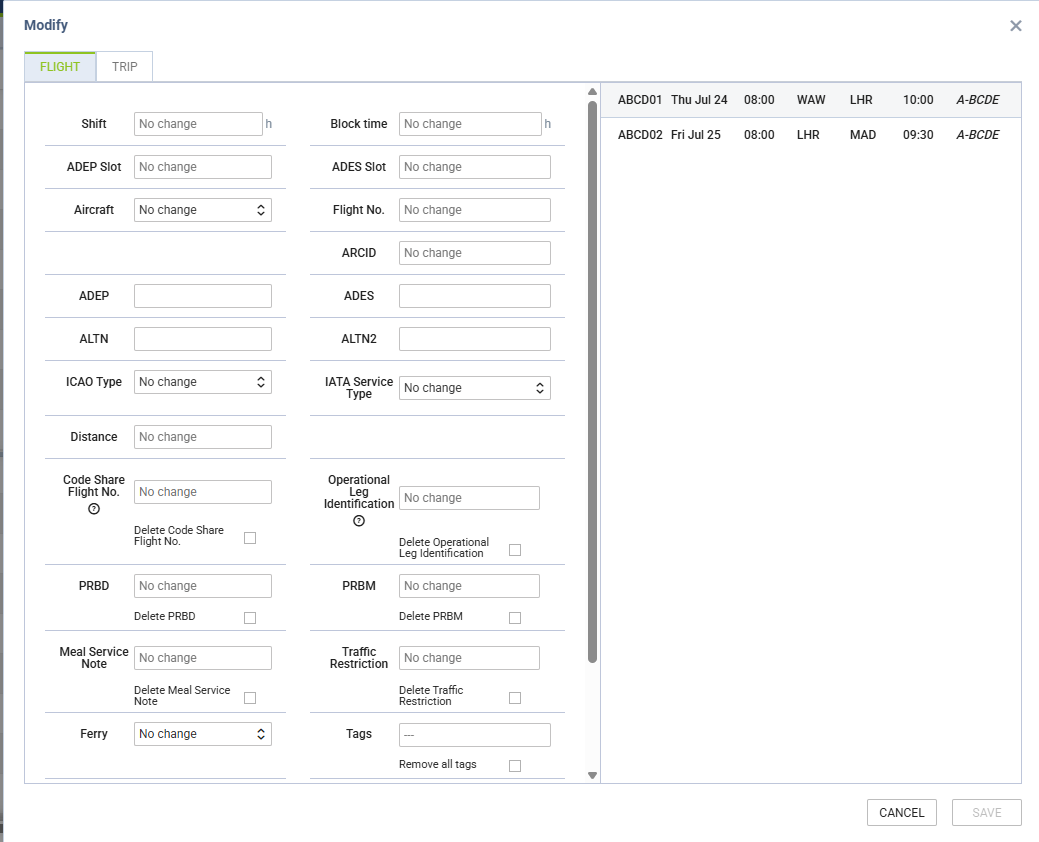
To modify flights, you need to:
-
Select the flights to modify
-
Select
option
-
Remain on ‘FLIGHTS’ tab
-
Perform relevant modifications in the ‘FLIGHTS’ window
-
Press the ‘SAVE’ button to save the changes
‘Modify flights’ window is divided into 2 sections:
-
Modification options
-
Selected flights
In the Modification options section, you can change the following, amongst others:
-
Shift - shifting the whole schedule by a number of hours/minutes
-
Block time - changing block time to the number of hours/minutes
-
ADEP/ADES Slot - option to modify planned slots timeframes. They will apply to the ‘Slot ADEP/ADES’ items in the OPS Checklist
-
Aircraft - allows changing the aircraft
-
Flight No. - changing the Flight number
-
ADEP and ADES - changing airports of departure and arrival respectively
-
ALTN - choosing the alternative airport
-
Ferry - switching between ‘Ferry’ and ‘Not ferry’
-
Tags - option to modify tags and to remove all tags altogether
If you want to change the schedule of multiple sectors, in the MODIFY FLIGHTS panel, you need to move times in the fields ‘Shift’ or/and ‘Block times’. Below you can find some examples.
-
If the schedule is 12:00-14:00 and you want to change it to 11:00-13:00 you need to insert -01:00 in the field ‘Shift’.
-
If the schedule is 12:00-14:00 and you want to change it to 13:00-15:00 you need to insert 01:00 in the field ‘Shift’.
-
If you have the schedule 1200-1400 and you want to change to 1500-1715 (so STD by 0200 and STA by 0215), you need to insert 03:00 in a ‘Shift’ field and in a ‘Block time’ field, you add 00:15.
SWAPPING AIRCRAFT
SWAP AIRCRAFT functionality allows easily swapping the aircraft on two or more flights.
The option is available in the menu upon clicking with the right click of a mouse on one of the selected flights:
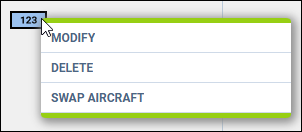
The following conditions have to be met:
-
dates of flights and the number of selected aircraft do not have to be the same
-
flights on two aircraft of the same type have to be selected
If the abovementioned conditions are not met, the functionality is not available
How it works
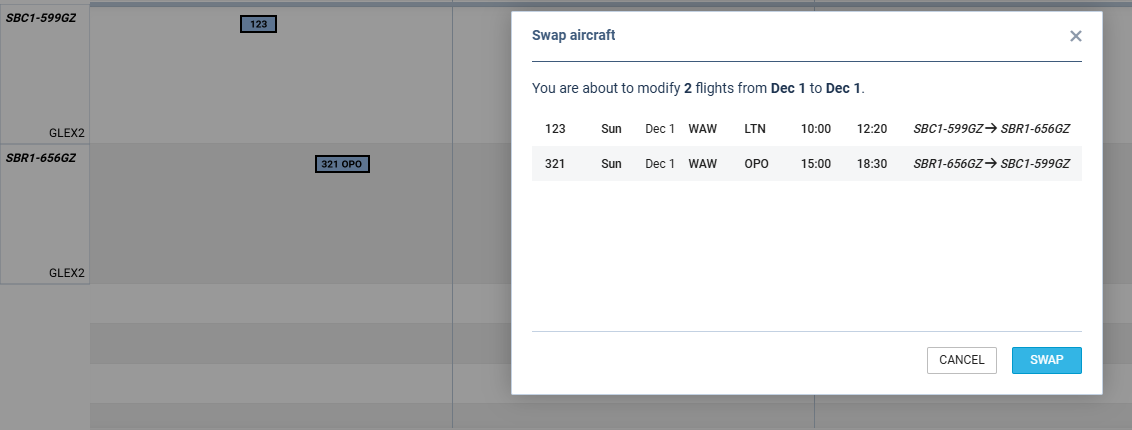
The functionality works as follows:
-
Select flights in two different aircraft of the same type
-
Select the ‘SWAP AIRCRAFT’ option in the menu
-
Review the flights
-
Press ‘SWAP’
At this stage, flights on Aircraft A will be swapped to Aircraft B, and flights on Aircraft B will be swapped to Aircraft A.
TRIP MODIFICATION
Under tab Trip it is possible to make the following changes on selected trips:
-
Client - add client
-
Trip type - change trip type
-
Option - mark the trip as an option
-
Commercial - indicates the commercial or non-commercial type of trip
DELETE
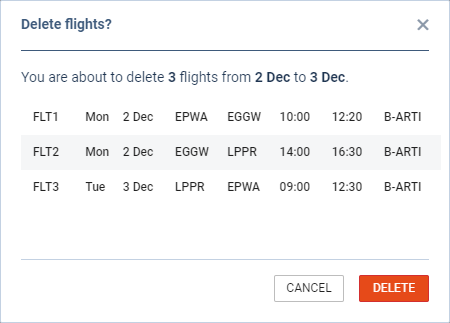
In order to delete flights or schedule you need to:
-
Select the flights you want to delete
-
Click on the
button
-
Review the flights in the ‘Delete flights’ window
-
Press the ‘Delete’ button to confirm
It is possible to delete the planned flights as well as the published flights.
IMPORTANT!!! If the published flight is deleted in the SCHED section, it will also get deleted from the OPS section.
SHOW IN OPS
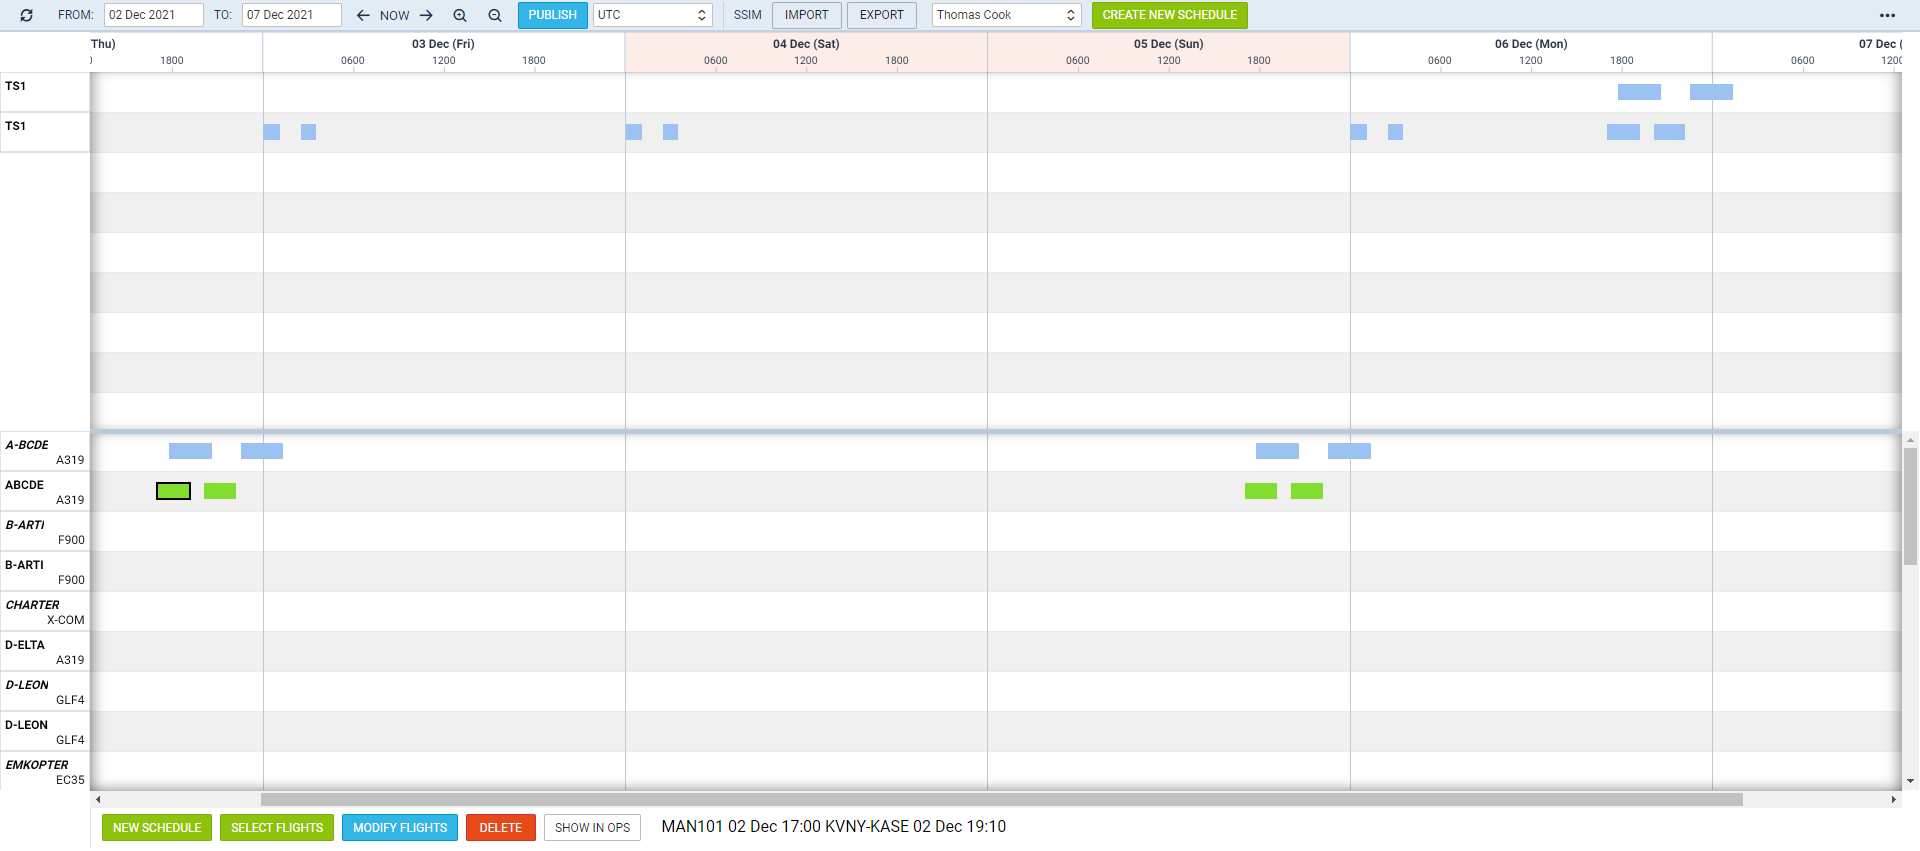
Once you selected the flight(s) and clicked on the
It also is possible to move back from the OPS view to SCHED as long as the flight selected in OPS views was added in SCHED.
Simply select the flight originally added in SCHED.