This is an old revision of the document!
Table of Contents
Requests/Quotes
On the main page of the Requests/Quotes panel you can see the list of Quotes downloaded from Avinode as well as those created in Leon.

New Quote


To add a new quote you need to perform the following steps:
1. Click on NEW QUOTE option in the 'Requests/Quotes' screen
2. Fill in the information in the 'Add new quote request' window:
- 'UTC/LT' - option allowing to select whether the quote is to be added in UTC or LT:
- option is always set to LT by default
- times in the Schedule section are not recalculated upon changing the timezone
- 'Requested by' - name of the Client requesting the trip
- 'Min. category' - a category of the aircraft on which the trip is requested, e.g. Heavy jet, Midsize jet, Piston, etc. This will allow searching for the subcharter flights in Avinode if needed. If the aircraft registration is selected, Leon will automatically select the lowest aircraft category
- 'Aircraft' - selecting aircraft on which the request should be performed. Only operator aircraft available in the dropdown list
- 'Add positionings automatically:' - ticking the checkbox will automatically add the positioning legs
- 'Schedule section' - ADEP, ADES, option to select 'Departure'/'Arrival' date and time (in LT) and the number of PAX
 New request editing window
. 'GCD(NM)' will be calculated automatically. Leon will display the itinerary in the Calendar view as well as on the map (Tab 'MAP'). If the aircraft is selected, the 'CALENDAR' tab will also display the positioning legs. You can also select 'TBA' checkbox which will allow inserting the schedule without having to indicate 'Departure'/'Arrival Time'. In this case, the itinerary will display on the Calendar underneath the flight date
- 'Flight time' - select the flight time calculation method. Methods are explained further down in this section. Once the method is selected, it will be remembered by the system when the next request is created

3. Press 'CREATE' to add the request
4. Request editing section will open, where:
- if 'Add positionings automatically:' checkbox has been ticked, the positioning legs should be added automatically and should be marked as 'Ferry'
- the schedule timeframes should be built based on the aircraft performance and the minimum ground time required (Positioning flights)
- the quote should be added and calculated based on the 'Fees' assigned in the aircraft settings > 'SALES' tab. If there are no fees assigned to the requested aircraft, then no quote will be created automatically. If there is an 'AIRPORT CHARGES' integration in place, there is a possibility to automatically recalculate airport fees based on 'AIRPORT CHARGES' (more information in the 'AIRPORT CHARGES' subsection

It is possible to add a request without selecting the aircraft.
In this case, the editing window would suggest creating a quote ('CREATE A QUOTE' button) or finding subcharter in Avinode ('FIND SUBCHARER/COMPARE PRICE' button).
If we choose to create a quote, the standard edition window will appear with the schedule that we inserted initially but with no aircraft selected and no times calculated.
The request with no aircraft assigned will present on the list of requests as per below:

Managing the RFQ

The main page of the RFQ - Request For Quote page is divided into 2 sections, which show all details in a transparent way:
- RFQ details with options of adding & managing the quote.
- Displaying the quote in Calendar, managing the Checklist, PAX and other options.
Details of the Request
The top-left part of the page shows details, such as:
- Marketplace - Avinode, HelloJet, Victor or Leon.
- Quote request ID - ID of the quote generated by Marketplace. Additionally, two icons available:
- Show changes history - displays the history of changes within the quote
- EDIT REQUEST - option to edit the initially requested schedule and apply changes so that they reflect in the main Requests/Quotes view
- Requested by - client or company name.
- Representative - client's representative (defined in Leon or imported from Marketplace).
- Assignee - a person who is designated to work the quote.
- T/O & LDG emails - client representative's email address to which Leon should send MVT emails (or client's if Representative is not selected). Can be deleted or overridden by manual entry.
Adding a new client/representative

It is now possible to add a new client (a company or a person) straight from REQUESTS/QUOTES panel, as well as adding a client's representative.
When creating a new quote, click a + icon right next to the 'Requested by' field.

Leon will show slightly different windows if a new client is a company and a different one if a new client is a person (see screenshot on the right).
Once a new client has been added it will be stored in Leon for future usage and its profile is also created in the Phonebook


It is also possible to edit a Requester or Representative by clicking on ![]() icon located next to Requester/Representative box.
icon located next to Requester/Representative box.

The changes applied in the 'Edit requester/representative' pop-up window will apply instantaneously.
'EDIT REQUEST' option
It is possible to edit the originally requested schedule and reflect it in the main 'Requests/Quotes' view.
EDIT REQUEST button is available by the quote number in the quote details section:


Clicking on the 'EDIT REQUEST' button will open the 'Edit quote request' pop-up window (quote editing part presented on the right). This window is identical to the 'Add new quote request' window.
In the 'Edit quote request' window, the initially requested schedule can be amended.
The changes can include:
- schedule - routing as well as the number of PAX
- aircraft - change of aircraft or additional aircraft
- option to include positioning legs

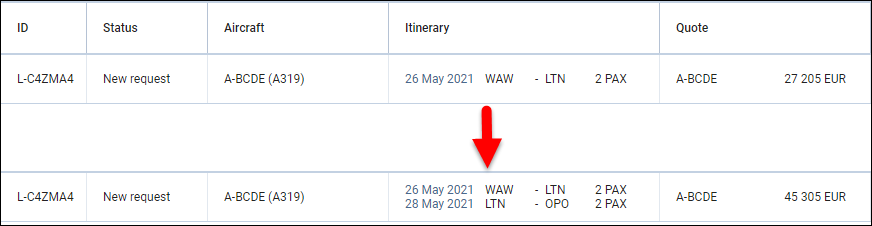
After the changes are performed and applied ('UPDATE' button), the yellow strip will appear in the request edit section with the following options:
- IGNORE - does not apply any changes
- APPLY - the update will be accepted and reflected in the updated itinerary
- CREATE NEW - new itinerary on the same aircraft will be created within the same request (the second tab with the updated itinerary)
- SHOW CHANGES - displays the history of changes of the request
The screenshot on the right presents the usage of the REGENERATE button.
If the changes are applied to the schedule, the quotation will recalculate automatically.
Additionally, the changes applied will reflect in the main 'Requests/Quotes' view:
Statuses of the Quote
In this section, you can find available options for the quote status change. Changing statuses are correlated with actions, among which are: sending emails, documents, etc…
- NEW - highlighted when adding a new quote into Requests/Quotes or as a new quote from Avinode.
- QUOTE - send a quote proposition details with Flight Quotation document - when dealing with Avinode quote, clicking SEND means accepting the quote.
- OPTION - click to add the trip to OPS page with the status 'Option'.
- CONTRACT - shows a new window for Charter Agreement document sending. It is possible to include the positioning FERRY flights in the Charter Agreement document by selecting the FERRY flights in the CONTRACT message window. Flights with PAX cannot be de-selected
- BOOK - click to add the trip to OPS page with the status 'Confirmed'.
- BRIEF - shows a window for Flight Brief document sending. It is possible to send the Flight Brief document for selected flights by selecting a specific flight in the BRIEF email window
- INVOICE - an option to send an invoice to the client.
- DONE - closing the transaction.
- REJECT - reject the client's offer (the quote will show as 'rejected' on client's side in Avinode).

Independent from the status change actions you can always print sales document or send it via email using options:

- DOCUMENT - Flight Quotation, Charter Agreement & Flight Brief.
- SEND EMAIL - for sending sales documents via email or sending custom emails.
Itinerary details

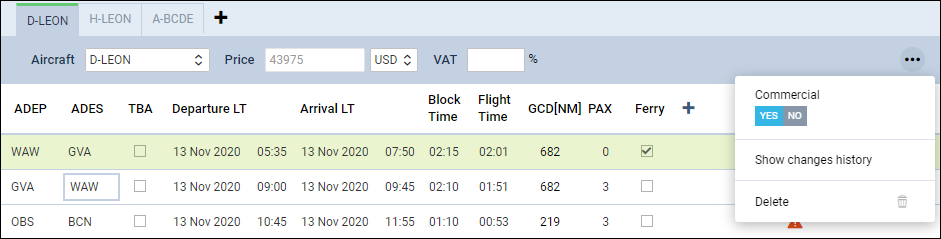
Right below request details & quoting options you can find Trip details: Aircraft registration, Price, ADEP, ADES, TBA checkbox, Departure time LT, Arrival time LT, Block Time, Flight Time, PAX number and Ferry flight indication.
By clicking the + icon you can add a new leg into the existing trip - you can do it also in-between existing flights.
It is possible to change the Currency and Leon will recalculate the price in the new currency. The new currency will also apply to the quote's fees (catering, hotel, flight plan, etc…).
If there is a discontinuity in the itinerary, and the warning is marked in the 3-dot filter, it is indicated with 
If there is no aircraft performance data inserted in 'Fleet' section, Leon will display the following information:

It is also possible to schedule a Fuel Stop. More information in the subsection below.


In the top-right corner of the itinerary, there is a  icon where the following options are available:
- Commercial - selection whether the quote should be for a commercial flight or not by using the switch
- Show changes history - access to the history of changes of the quote. More information in section below
- Delete - option to delete the itinerary
- Warnings - selecting the types of warnings in the feasibility check window
- Cautions - selecting the types of cautions in the feasibility check window
- Notices - selecting the types of notices in the feasibility check window
With regards to filtering Warnings, Cautions and Notices, only the selected options will trigger the feasibility check icon.
Once the new filtering options have been selected you need to refresh the 'Feasibility Check' column in order to apply new settings.
Only the selected options will trigger the feasibility check icon.
Items that are not selected in the filter will not appear in the feasibility check information window.
Selected elements of the feasibility check filter will be remembered per user.
When sending documents to the client, Leon also shows red triangle (alerting feasibility check) next to 'SEND' button - hover the mouse over the triangle to see information.

You can also remove the leg from the itinerary by clicking on ![]() icon. Leon will display the
icon. Leon will display the  validator where you can perform the relevant action.
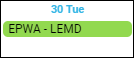
By clicking on the TBA checkbox Leon will allow you to save the quote/trip without specifying Arrival and Departure times. Such a trip will be displayed in the 'CALENDAR' tab as an “All day” operation (just underneath the date).
Below trip details you can find 3 options to:
 - click to add a positioning flight (Leon will match last flight's ADES and next flight's ADEP in actual confirmed aircraft schedule).
 - adds price list to current quote - this action can be undone to
  which deletes the price list from the quote.
If you click on this icon Leon will display Feasibility check information window which provides specific warning details as presented in the screenshot - all warnings, cautions and notices enabled in Leon, plus the information if on the day of the quote (departure day) no minimum crew (defined in the aircraft profile for cockpit & cabin) have been assigned with the Duty on the aircraft (registration or type - depending on Duties Setup configuration). Also, a caution FTL close to limit for Cockpit/Cabin crew member: warning FDP length exceeded will show up if defined in FTL Settings (by Leon Support Team) FDP threshold has been exceeded.
Modifying timeframes in schedule
1. When changing Block time of the flight, Leon will NOT change Flight time and will also show a tooltip with a question, whether it should be the departure or arrival time that should be updated. Block time cannot be shorter than the flight time.
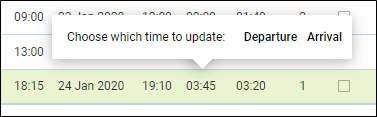
2. When changing Flight time of the flight, Leon will change Block time automatically and will keep initial Taxi times. Leon will ask whether to change 'Departure' time or 'Arrival' time
3. When changing STA, Leon will change the STD by the block time value. The same scenario applies to change of the STD. Leon will NOT require validation.
4. When changing ADEP/ADES Leon will automatically recalculate the Block time and the Flight time value based on the aircraft performance and will ask whether to change 'Departure' time or 'Arrival' time
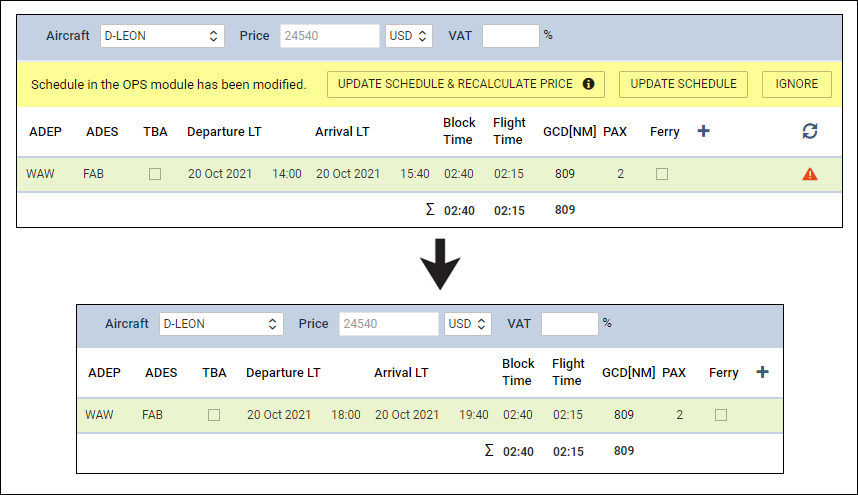
Updating booked quote
We have improved a functionality of updating quote's schedule after its modification in the OPS panel.
If the quote's schedule gets changed in the OPS panel, when editing it in the Sales panel, Leon will show now options such as:
 &
& 
When selecting Leon will change the quote's schedule & will recalculate its price based on the changed details.
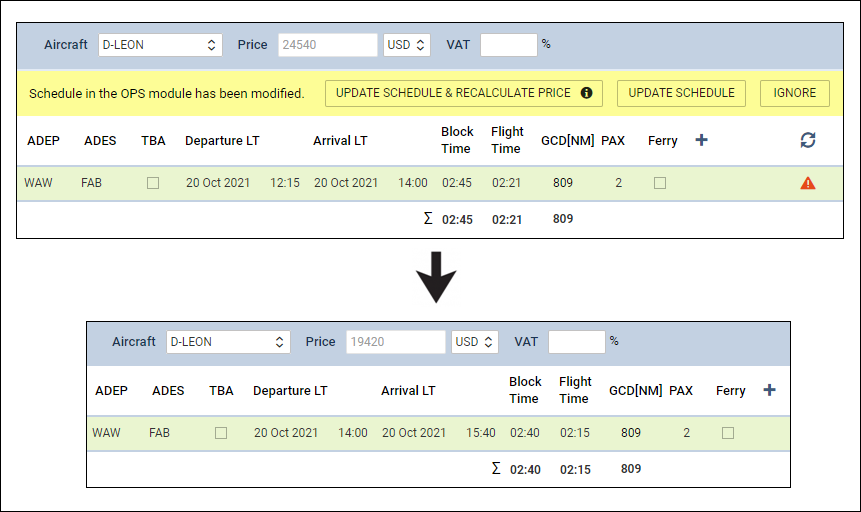
When selecting Leon will change only the quote's schedule and will leave the price unchanged.
Invoice


Before using this option you need to set up in Documents Manager a new template QUOTE INVOICE - you can set up multiple different templates and re-arrange them the way you want (using HTML & CSS). You can also use Leon default template pdf.

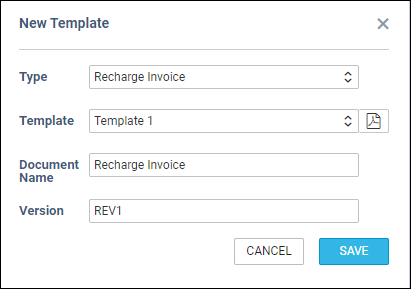
You can also configure EMAIL TEMPLATES for the Invoice in a section Settings > Email Templates - click ADD TEMPLATE, select Quote Invoice and set it up. You can define as many email templates for as necessary.

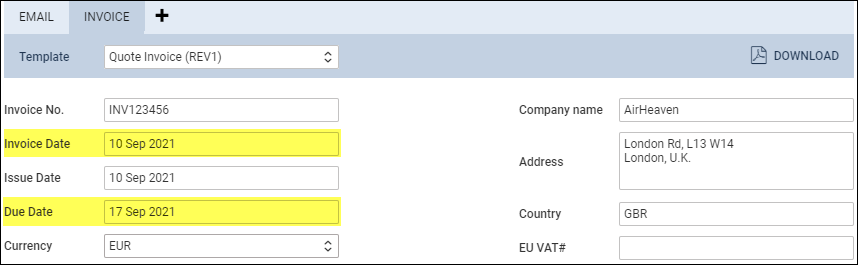
Once it's all set up, edit the Quote that has already been BOOKED, click button INVOICE and Leon will show a pop-up window where you can select an appropriate Email and Invoice template. Then Invoice details & items should be defined with their Net price and VAT. Below the items list, Leon will show Total price.
Three fields with dates are available in the document:
- Invoice Date - date of invoicing
- Issue Date - date of issuing the Invoice
- Due Date - due date of the payment. If this field is left blank, Leon will assume 10 days in advance from the 'Invoice Date'
Click DOWNLOAD icon to preview the template before sending it out.
 function makes it easier to recalculate the amount on the 'Invoice'.
It is very useful when after sending the invoice to the Client, the amount of the quotation changes, be it due to change in the number of items or the calculated price of the items.
In such a scenario, it is sufficient to go to the 'INVOICE' tab in the 'INVOICE' section, press button and Leon will update the amount on the invoice to the actual one.
If the quote is created for more than one aircraft, Invoice pop-up will allow to switch between tails and define Invoice items accordingly.

In case you wish to upload your own template and send it to the client without creating it in Documents Manager, you can use 'Upload files' button in a tab 'EMAIL' of the Invoice pop-up window.
TAX
It is possible to set up a default VAT rate per Country in the 'Sales Module' tab in the 'General Settings'. More information can be found here.
Apart from the abovementioned, the 'VAT rate' can be set up in the main Quotation view in the 'VAT' box:

This rate will automatically apply to the default items in the Invoice section, including PAX taxes (UK, German, Swedish or Italian) and will increase the total amount by this rate.

It is possible to exclude the VAT rate from the calculations in the Invoice by simply deleting it.

The VAT rate, gross amount, as well as taxes amounts, are included in the available data for Sales documents (including Suncharter) in 'Documents Manager'.
Once the invoice has been paid, you can edit the quote again and in Invoice tab mark a checkbox Paid - then you can generate a report (in a scope 'Invoice') in a report Wizard panel and add a column 'Paid' to the report.
'Invoices & Credit notes' settings
It is now possible to set up a default 'Due date' for the Quote Invoice in 'Settings' > 'General settings' > 'Sales Module' tab.
The setting consists of 2 fields:

- Input with the number of days
- Dropdown with the following options:
- after issue date - number of days after the invoice issue date
- after invoice date - number of days after the invoice date
- before flight - number of days before the first flight within the request
As you can see in the example below, the Invoice due date was set to 7 days after the invoice date:
Tagging Invoice

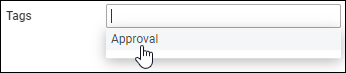
It is possible to tag an Invoice.
The option is available on the 'Invoice'/'Recharge invoice'/'Credit note'.
In order to add a new tag you need to:
- Insert the new tag name in the 'Tags' box and press 'Enter'. A new tag will appear underneath the 'Tags' box
- Click on the color square and select the color using the available palette
- Sending / Saving without sending the Invoice will save the tag
Once the tag is saved, it will be available in the dropdown list in the 'Tags' box.
Tags added to the Invoice are available in the Report Wizard > Scope 'Invoices & Credit Notes', column 'Invoice Tags'.
Recharge Invoice & Credit Note
We have added 2 new documents, which can be sent to a client from the Invoice section:
- Recharge Invoice - sent if there was an extra cost for a service not included in an initial trip cost, i.e. deicing or limo.
- Credit Note - sent to a client, if some part of the agreed cost should be returned to client, due to i.e. cancellation of the flight by a client or if the cost of the trip turned out to be lower than the agreed cost and the difference must be returned to a client.
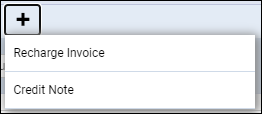
First step to issue these documents is adding it in Documents Manager. Here, click ![]() and select Recharge Invoice and/or Credit Note. Added documents need to be published (set filter to 'No' and click the white dot). You can define multiple templates of these documents.
and select Recharge Invoice and/or Credit Note. Added documents need to be published (set filter to 'No' and click the white dot). You can define multiple templates of these documents.


Second step is adding these document in the 'Invoice' section of the quote's edition panel. Click a button + placed right next to the 'Invoice' button and select documents from the list.
It is possible to add more than one 'Recharge Invoice' & 'Credit Note' document when sending Invoice documents to a client, however, each document needs to be sent out separately.
Flight Brief

'Flight Brief' is the document that presents the summary of the trip.
When sending the Flight Brief document it is possible to select the flights that should be presented on the document.
This is quite useful when the trip consists of numerous flights spread across a number of days and separated by longer periods.
It allows sending the document to the client in stages, based on the itinerary, and include the flights nearest to each other.
As presented in the screenshot on the right, the trip consists of 5 flights between 28th May and 11th June. The functionality allows selecting the nearest flights (28th May) and sending these initially. The remaining ones can be selected and sent closer to the planned departure date.
Ferry flights are not presented on the list.
Request changes history
It is now possible to access Changes History of the Quote in the quote's edition panel, under the 3-dot filter.

Clicking on 'Show changes history' option will generate a pop-up window with details regarding any quote changes such as:
- aircraft changes
- quotation status changes
- price changes
- trip schedule changes
In the changes history window, Leon shows a chronological list of all changes (the latest on top). The colors indication shows added data in green, changed data in yellow and removed data in red.
When you click on the changed detail, Leon highlights previous entrances of the same detail.
Additional options
The right side of the page shows additional panels, which will allow seeing the quote in the Calendar, view the route on the Map, view & manage Sales checklist items and see OPS checklist items, manage PAX, add Notes or Comments.
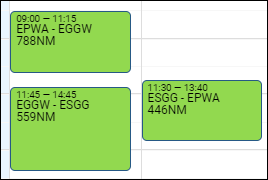
CALENDAR

The quote itinerary/trip is imposed on actual confirmed schedule of the selected aircraft. The information displayed shows departure-arrival times & ADEP-ADES.
The current day is always displayed in light-blue and the thin, green line shows actual UTC time.

The view shows the 7-days period. Click ← or → buttons to move for another 7 days backwards or forward, or click TODAY to get back to the current day view. You can also switch between UTC & LT.
Aircraft selection dropdown allows you to view a different aircraft activity vs the aircraft used in the RFQ. If you choose a different aircraft in the 'CALENDAR' tab, the activity for this aircraft will be displayed in grey and the RFQ will be highlighted green. This is presented in the main screenshot of this section.
Switching the aircraft registration in the 'Itinerary' section will reset the aircraft registration in the 'CALENDAR' tab to the same one.
MAP
The Map shows the route of the trip. You can navigate with the map by clicking + or - in the top-left corner.
Selected flight shows the arrow in green. Ferry leg shows the arrow in the light-blue.

CHECKLIST

Sales checklist on the trips/quotations added in the Requests/Quotes can be managed in the Checklist section of Requests/Quotes only.
Sales checklist becomes available when the request is created, whether it is a regular fleet or subcharter.
It is possible to add extra items of the checklist by using 'ADD ITEM' button. It is also possible to delete the items by clicking on the bin icon.
It is possible to service the Sales Checklist from the OPS view if the trip/quotation has been added in the Requests/Quotes.
OPS Checklist appears only once the trip is booked.
It is also not possible to service OPS checklist in the Requests/Quotes. This can only be serviced in the OPS view.
Elements of the Sales Checklist can be set by default in the Flight editing section. Any changes to the Sales Checklist items will only apply to the newly added flights. If you wish to add or remove the Sales Checklist item, you can do it in the OPS view by using “+ADD ITEM” button.
PAX

In this tab, you can add passengers on a flight.
You can choose either the PAX you already have in your Phonebook and add them in the “DATABASE” section or add Passengers as a free text in the “TEXT” section.
In order to activate the PAX boxes in the “DATABASE' section, you need to insert the number of passengers in the route section of the quotation.

The PAX selection dropdown is divided into two sections:
- CUSTOMER CONTACTS - these are the passengers who belong to the company/Client requesting the trip
- OTHER - other passengers available in the phonebook
In this section, it is also possible to add new passengers to the Phonebook or edit existing passengers that are already in the database. The process is exactly the same as described here.
If the trip is added in the Requests/Quotes it is possible to add passengers or edit the data in the OPS section, tab PAX.
If a passenger has more than 1 passport you can select which one should be used as default (in PAX profile mark a checkbox 'Default'), but it is also possible to select a different passport for departure & arrival - when adding PAX, click + icon and select appropriate passport. This feature is for PAX selected from Leon database and not available when adding PAX from text.

It is possible to change the order of passengers by drag&dropping the name on the list.
Simply click on the name line you'd like to move, hold the left button of the mouse and move it up/down the PAX list.
The change of order on the PAX list will be reflected in the documents as well as the handling request.
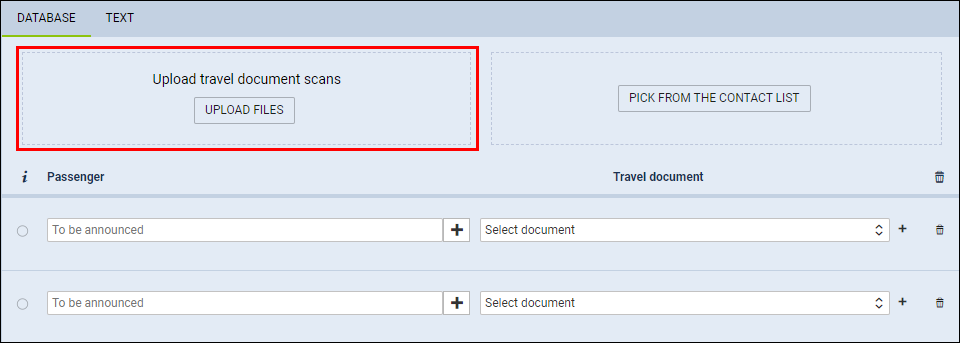
Assigning PAX to the flight by scanning Passport or a National ID
A new possibility of assigning PAX to the flight, by scanning the passport/National ID, has been introduced.
In the quote's edition page, tab PAX, click Upload files and select a scan of the passenger's travel document (in the below example Passport has been used). The following file formats are recognized .jpg, .png, and .pdf.
Once the scan has been uploaded, Leon will show a new window with the scan attached. In this new window, it is also possible to select the flights, to which the person should be assigned ('Legs' part above the scan).
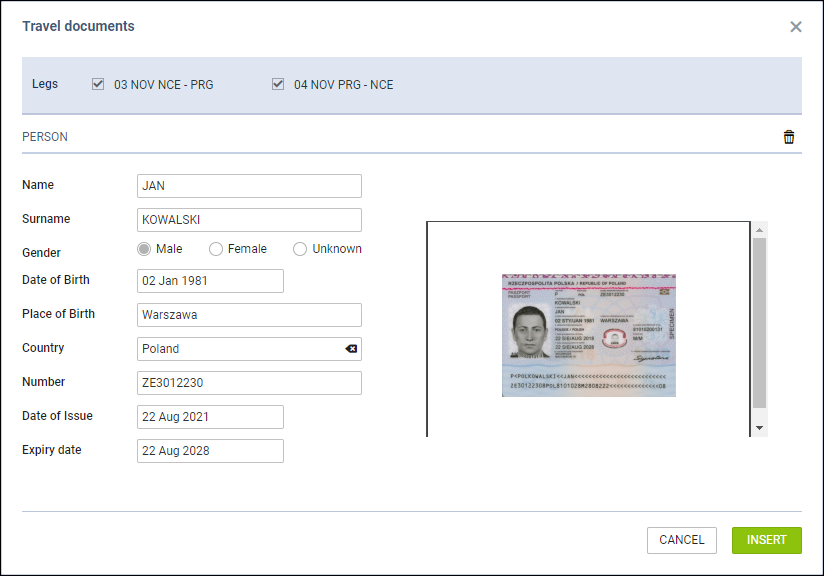
Almost all the details are inserted automatically apart from the Place of Birth. Gender is recognized subject to the availability in the document.
To add passenger's details to the database (so that it can be used again when the same passenger travels) click a button  and save changes.

If the quote's requester is a company, then passengers added through this functionality will get added to that company's contacts.
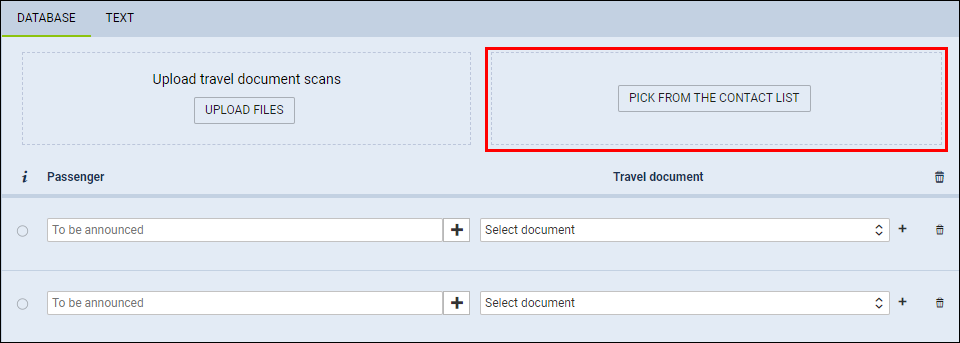
Picking PAX from the contact list
It is now possible to select the PAX on the flights using the PICK FROM THE CONTACT LIST option.
This option allows to quickly select and add the PAX to multiple legs.
Click on the PICK FROM THE CONTACT LIST option to open the Select PAX pop-up window.
'Select PAX' window
The Select PAX window is divided into the following sections:

- Legs - allows selecting the flights upon which the action will be taken. Only flights with PAX are listed. Ferry and 0 PAX flights are omitted
- Search passenger - option to search for PAX. If the 'Requester' is selected, the 'Search passenger' option is looking for the PAX only assigned to this specific Requester
- Requester - automatically selected from the quote
- Available passengers - list of PAX assigned to the Requester Company and containing the basic details (Name, DoB, Companies one is assigned to). If the requester company is not selected the list is empty. In this case 'Search passenger' option needs to be used. Clicking on the + next to the PAX name will move the PAX to the Selected passengers section
- Selected passengers - PAX selected in the 'Available passengers' section. Press - to remove the passenger from the list
- Action buttons:
 - option to cancel PAX selection procedure
 - option to clear the list of selected PAX
 - option to add PAX to selected flights:
- if there are more PAX names selected than the PAX number, the number of PAX will increase accordingly, i.e. PAX number is 2 but 4 names selected and added - PAX number will increase to 4
- adding further PAX to the list will not overwrite already added PAX, i.e. adding 2 new PAX to 2 already assigned PAX will increase the PAX number to 4
 - option to replace already added PAX with the new ones
NOTES

In this section, you can add notes for trips on the regular aircraft as well as the subcharter.
Notes added in this section can be then embedded in Sales documents as all of them have the items available in the Available data.
Once the notes are added, click the SAVE button in order to save the changes.
There are the following 'Note' fields available:
- LEGAL NOTE
- It should contain any legal regulations applying to the contract
- Note that applies to and can be sent to end-customer
- It can be inserted per quote individually, or
- It can be set up as a default note in Settings > General Settings > 'Sales' tab
- Applies per the whole request (or trip - if the request is booked)
- It can be used on Sales Documents (included in the available data in the Documents Manager)
- CUSTOMER NOTE
- Inserted by the Sales team and can contain any important information regarding Client's requirements, such as catering
- Apply per the whole request (or trip - if the request is booked)
- It can be used on Sales Documents (included in the available data in the Documents Manager)
- CANCELLATION POLICY
- It should contain the Operator Cancellation policy regulations
- Note that applies to and can be sent to end-customer
- It can be inserted per quote individually, or
- It can be set up as a default note in Settings > General Settings > 'Sales' tab
- Applies per the whole request (or trip - if the request is booked)
- It can be used on Sales Documents (included in the available data in the Documents Manager)
- ADDITIONAL NOTE
- It can include notes with any additional important information
- Applies per the whole request (or trip - if the request is booked)
- It can be used on Sales Documents (included in the available data in the Documents Manager)
- SALES NOTES
- Important notes by Sales Team
- Apply per flight on which it is inserted
- Once the quote is booked and the trip created, the notes can be included in the following documents: Flight Brief (Sales), Charter Agreement (Sales), Crew Tripsheet (OPS), PAX Tripsheet (OPS)
- AIRCRAFT
- Inserted by the Sales team and can contain any important information regarding quoted aircraft, such as Client requirements regarding the aircraft
- Applies per the whole request (or trip - if the request is booked)
- It can be used on Sales Documents (included in the available data in the Documents Manager)
- OPS NOTES
- Notes are available only when the trip is booked
- Apply per flight on which it is inserted
- It can be used to communicate any issues to the OPS Team
- It can also be updated by OPS Team and the update will appear in the Sales Panel on the flight
- Once the quote is booked and the trip created, the notes can be included in the following documents: Flight Brief (Sales), Charter Agreement (Sales), Crew Tripsheet (OPS), PAX Tripsheet (OPS
Additionally, there is CANCELLATION NOTES section available in the Subcharter section that:
- apply to the contractual agreement between the operator performing the trip and the subcharter aircraft provider
- they can be inserted manually if the subcharter details are added on a subcharter aircraft in Leon, or
- if the subcharter is requested via Avinode, the 'Cancellation policy' details are fed from Avinode, as long as they're available in the subcharter operator settings
- it can be used on Sales Documents for subcharter (included in the available data in the Documents Manager)
MESSAGES
In this section, you can add any messages regarding this particular trip/quotation. If the request was sent from Avinode, you can also reply to the customer from this section.
There are 2 buttons available in this section:
- ADD INTERNAL MESSAGE - this will allow adding an internal message visible only to Leon users. This option is always available
- REPLY TO CUSTOMER - contains 2 options:
- Avinode - allows replying to messages and quotations sent from Avinode
- Email - allows sending emails and receive emails, as long as it is synchronised with a mailbox
ADD INTERNAL MESSAGE

+ADD INTERNAL MESSAGE function is there to allow communicating the stages of the process to the team.
There are 3 options available:
- ADD - option to add an internal message as a person servicing the request
- ADD AS REQUESTER - adding a message and indicating that this message was added by the requested. Such a message is highlighted green
- CANCEL - allows cancelling the message input process
REPLY TO CUSTOMER
There are 2 options available:
- AVINODE - if the quote comes from Avinode, this button is selected by default. Allows messaging with the Avinode broker
- EMAIL - allows communication directly via email by configuring Leon with an external Mailbox
AVINODE

Messages inserted in Avinode when sending a request to Leon will also show in this section and will be highlighted green.
When the request is received from Avinode, you can click on REPLY TO CUSTOMER button and the message will be sent to the Client in Avinode.
In Avinode, the reply will be available in the 'Trips' > 'Buying' section, as per screenshot.
Once the message is added you will be able to see who added a message and what day at what time. The times presented in the messages history are in LT.
This functionality allows you to send and receive emails directly into Leon and keep the track of your emails in one place.
Before you start using the functionality you need to:
- Contact support@leonsoftware.com in order to configure generic mailbox with Leon
- Create additional 'Sales Panel Message' email template in 'Email Templates' section, subsection 'Other'. This will allow you to send an email directly from 'MESSAGES' section
Once you have your mailbox configured, you can go to Settings > Email Templates > Other and create the 'Sales Panel Message' template.
It is important that the email address provided to Leon is inserted in 'RECIPIENTS' tab > 'Reply to' box. This email address can also be inserted in another email templates 'Reply to' boxes which will automatically synchronise the emails with the messages section.

Once you have everything configured, you can start using the functionality:
- any correctly configured types of emails such as Flight Quotation, Charter contract or Sales Panel Message, amongst others, will show in the 'MESSAGES' section upon sending.
- any replies from the Clients to the configured messages will also show in the 'MESSAGES' section. Replies are indicated by green background of the bar
- both sent and received emails will be synchronised with the Mailbox and will be available to view in 'Outbox' and 'Inbox' respectively
- address 'To' is automatically generated from Client or Client Representative email address
- it is possible to attach and send files
- files sent by the Client will be received and available to preview in 'MESSAGES' section
- new message will move the request to the top of the 'Requests/Quotes' list
- 'MESSAGES' section will now refresh automatically
It is also possible to edit or delete the message (apart from 'EMAILS'). In order to do that, click on … on the right-hand side of the existing message box and click on the relevant option.

Subcharter
When you use occasionally subcharter aircraft from another operator, our panel REQUESTS/QUOTES allows supporting quoting for external aircraft types with Subcharter option.
In order to use subcharter option create a quote (or edit existing one) and in the Aircraft drop-down box select 'Subcharter' - insert the price, add schedule details (or mark times as 'TBA').
The subcharter details edit window is divided into 2 tabs:
- BASIC - contains subcharter details such as aircraft details, crew details, contact details (email and phone no.) and aircraft photos, as long as available in Avinode
- MESSAGES - possibility to reply directly to the Operator email (as long as it is available in 'BASIC' tab)
- AMENITIES - possibility to select the amenities available on the aircraft as well as the cabin basic measurements and noise levels
Price

The 'Price' section is located above the tabs with the subcharter details.
It allows inserting more detailed price that includes:
- Operator price - the amount charged by the operator (subcharter price)
- Margin - income margin calculated on top of the total cost
- Third party commission - commission paid to the third-party broker
Based on the above elements, the total price is calculated as:
Price = 'Operator price' /(100% - 'Margin'%) + 'Third Party Commission'
The total price is not editable and keeps the same currency as the price breakdown.

If VAT value is inserted, Leon additionally will display Gross price value, including VAT.
Hovering the mouse over 'Gross price' amount will display VAT value.
Basic

In a subcharter 'BASIC' section (underneath the itinerary), select an AC type (it is mandatory to save the quote if you don't select the type Leon will show a warning). Other details, such as Registration, CPT, FO and FA are not mandatory.
Cancellation policy in the subcharter details section is the policy that applies to the contractual agreement between the operator performing the trip and the subcharter aircraft provider.
It can be inserted manually if the subcharter details are added on a subcharter aircraft in Leon.
If the subcharter is requested via Avinode, the 'Cancellation policy' details are fed from Avinode, as long as they're available in the subcharter operator settings.
It is also possible to select Handling agents for Subcharters. Handlers can be selected from the drop-down list.
If we already used subcharter functionality in the past, Leon will search for an aircraft that was previously used. The dropdown list will display both aircraft registration and the operator name in the format Registration, Operator name. The aircraft is suggested based on the date of the last request created on this particular aircraft.
Once we select the aircraft, all the data is copied from the previous request, including type, crew, aircraft details and photos. The only input that is not copied is the subcharter price.
Once the subcharter quote is saved you can manage it just like a standard quote. There is one exception - you cannot physically book subcharter quote as option / confirmed flight into OPS module. However, you can still change the status to 'option' and book, but the quote will not be booked.
You can send Flight Quotations containing normal and subcharter quotes. You can send subcharter Contract and Flight Brief for subchaters using documents templates which can be customized from Documents Manager and Email Templates from Email Templates panel. In both of these panels, you have access to fields values provided in 'Subcharter' tab of the right panel.


You can also upload the photos of the Subcharter aircraft.
Uploading photos
In order to do it, click on 'EDIT PICTURES' button.
A pop-up window will appear with the 'UPLOAD FILES' button which will allow you to upload photos from your computer.
Once you selected the photos, in 'Edit pictures' pop-up window, you have to assign title to each of uploaded photos (example in the screenshot).
Clicking 'SAVE' will upload the photos.
It is possible to embed the uploaded photos within subcharter sales documents. When naming uploaded photos you need to make sure that the title matches the title used in the HTML.
If the subcharter flight is requested by using the 'FIND SUBCHARTER' button, the photos, if available, will download automatically to the subcharter section.
Messages tab

In this tab, it is possible to reply directly to the Operator.
In order to reply directly to the Operator, Operator's email has to be inserted in Contact email box in 'BASIC' tab.
In order to reply to Operator press REPLY TO OPERATOR link and select EMAIL option. Operator's email will be picked from Contact email in the 'BASIC' tab.
Select 'Subcharter message' template in the dropdown. 'Subcharter message' email template needs to be created in 'Settings' > 'Email templates'
Currently, replies from all the brokers will display under one 'Messages' window.
Amenities
It is possible to add Amenities when creating a quote on Subcharter aircracft. In the quote's edition for Subcharter there is a dedicated new tab 'Amenities' where it's possible to add a several amenities, such as:
- Smoking & Wifi - mark checkboxes to enable them.
- Wifi type - select between: Internat via Satcom, KA band, KU band, SBB (Swift Broadband) and Iridium.
- Cabin details - width, height, lenght and volume.
- Baggage capacity - add number of items.

Amenities can be added to 'Flight Quotation' document, by using item: 'quote > aircraft > aircraftAmenities' from 'Available data' of the Documents Manager panel.
Leon will also show 'Wifi' & 'Smoking' amenities for Subcharters downloaded from Avinode, which are defined in Avinode's section: Aircraft > Fleet edition > Update amenities.