

User profile
Table of Contents
Main page

In the top-right corner of the application window, where your name is displayed, you can click on it to access your personal application settings.

If this is your first time logging in, we highly recommend changing your password. To do so, click the Change password link, enter your current password in the Old password field, and then choose and confirm a new one. After you click Update, Leon will send the new credentials to your current work email address.
In your profile page you can access few tabs - the number of tabs and the possibility of editing them depends on privileges set by admins for the privilege group that you have been assigned to. In other words, i.e. group ‘crew’ has an access to the tabs that group ‘maintenance’ has not. Still, there are tabs available to all groups, such as:

-
Basic Information - on this page, you can set your personal details, such as name, gender, title, and date & place of birth. You can also add your contact details: work and/or private phone number, fax, email address, or Skype ID. To upload your photo, use the Upload button in Photo section. You can also change your password here. Paste the old password, then create and confirm a new password. Once it is saved, Leon will send a notification confirming password change to the email address specified under section Email → Work. Leon will NOT send any messages to your personal email address. Only the work email can be used for each user.

If you want to add an additional email address where Leon should send flight notifications emails, click 

-
Personal certificates - with access to this section you will be able to view and update details of each endorsement assigned to you, including uploading documents and managing validity. Your admin can also add you to notification emails that remind you about upcoming expiry dates of your documents. For more information, please follow the link. Crew Certificates.
-
Ratings - this section is available only to users assigned to a privilege group with Operational Admin access. Here, you can check the ratings you hold, that is, the positions you have been assigned and the aircraft types you are qualified for, e.g., CPT, FO, or FA1 (see also Ratings for more details).
-
User settings – in this tab you define your personal preferences for working in Leon. These settings apply only to your own account and do not affect what other users see. The following options are available:
-
Airport codes – select the default airport code format (ICAO or IATA) to be used across the system. This will be your personal default in most flight-related views.
-
Time display (UTC / LT) – choose the default time format for your account: either UTC or local time (LT). This preference is used globally in your profile, but many views (especially flight views) have their own time switcher, which lets you temporarily change time format only in that specific view.
-
Show operator names – tick the checkbox if you want operator names to be displayed in selected operational views in addition to aircraft details.
-
Roster change notifications – decide whether you want to receive email notifications about changes in your duty roster. Messages are sent to the email address defined as Work in your profile.
-
Integrations – you can provide login details for selected personal integrations, such as Avinode and EuroFPL, so that you can, for example, send flight plans or exchange data directly from Leon using your own credentials.
-
Home page – choose your default post‑login page from the drop‑down list. Depending on your access level, this may include views such as Ops – Table, Crew Calendar, Request Quotes, and others. After you log in, Leon will open this page first.
-
-
Calendars - you can view your roster in the calendar of your choice. Simply copy one of the available links on the page, such as “My flights”, “My trips”, “My duty roster”, “Subcharters”, or calendar for particular aircraft you’re assigned to and paste it into your Google or Outlook calendar in the URL field. This way, your flights will also appear when viewing your calendar.

-
The “Subcharters” calendar contains the data from -7 days to 31 days ahead from now.
-
-
Login history - you can track all your logins to Leon here, with details such as login time, browser, IP address, and logout time.
Leon does not monitor the expiry date of endorsements for the freelancers - no warnings will appear in the OPS panel when assigning freelancers to new flights.
HOME BASE
Crew members often change their home base. To update it in Leon, enter the new home base airport code in Home base field on Basic information tab and click Update. Once this is done, edit the crew profile again and by clicking the history button next to newly home base, you can enter the exact date & time when the change took place.

You can also remove previous home base changes, if necessary, by clicking the 
Two-factor Authentication
Additional authentication options can be managed in the Two factor authentication → Manage two factor authentication window. To be able to edit the section, you need to provide your password and click the UNLOCK EDITING button.
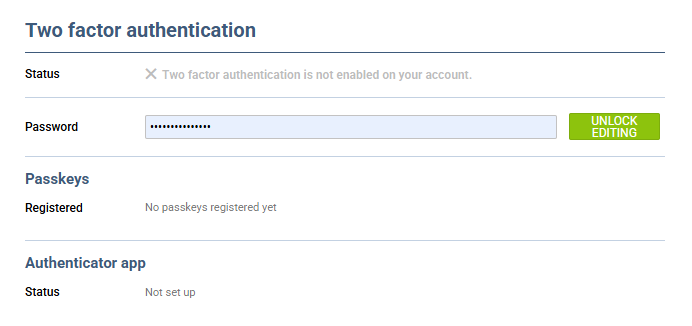
In the Manage two factor authentication window, you will be able to see:
-
Status → information on whether the Two factor authentication option is enabled or disabled
-
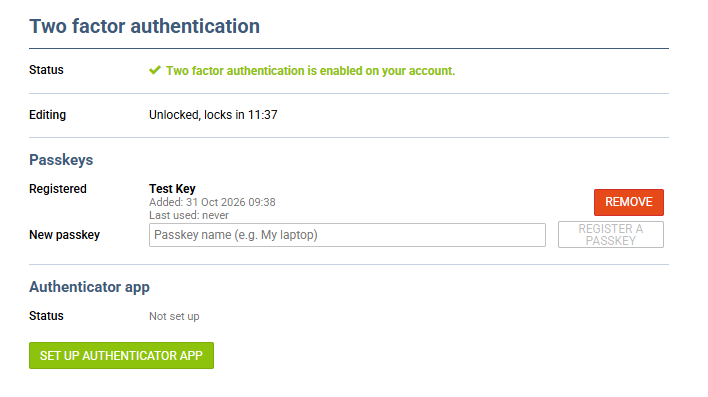
Editing → time period in which the editing option is enabled
-
Passkeys → information about already registered passkeys and the possibility to add new ones
-
Authenticator app → status of the connected authenticator app to generate 2FA code
Passkeys
Passkeys let you confirm the second step of your Leon login with your device's fingerprint, face recognition or PIN, instead of typing a 6-digit code from an authenticator app.
A passkey is a cryptographic key stored on your device, based on the WebAuthn standard. It can live in Windows Hello, Touch ID / Face ID, a password manager (for example iCloud Keychain or Google Password Manager, or Bitwarden) or a hardware security key such as a YubiKey.
A passkey does not replace your password. You still log in with your username and password. The passkey is used only as the second factor (2FA), as an alternative to the authenticator app code (TOTP). You can use a passkey, an authenticator app, or both.
Requirements
-
Passkeys enabled for your operator. The feature is switched on per operator by Leon Support. If it is not enabled, the passkey section does not appear in user profiles. Contact Leon Support to request it.
-
A supported browser and device. Your browser must support WebAuthn (current versions of Chrome, Edge, Safari and Firefox do), and your device needs a passkey provider: built-in biometrics/PIN, a password manager or a hardware security key.
-
Your own profile. Each user adds passkeys only in their own profile. Nobody can add a passkey on behalf of another user.
Adding a passkey
-
Open your own user profile in edit mode.
-
Go to the Manage two factor authentication section.
-
Enter EDITING mode.
-
Enter a name that helps you recognise the device later, for example "Work laptop" or "iPhone" and select REGISTER A PASSKEY.
-
Follow your browser or device prompt: confirm with fingerprint, face, device PIN or by touching your security key.
-
The new passkey appears on the list in your profile.
You can add more than one passkey, for example one per computer or phone you use.
Tip: keep the authenticator app (TOTP) set up as well. If you lose the device with your passkey, the app code still lets you log in.
Logging in with a passkey
-
Enter your username and password as usual.
-
Click on the SIGN IN WITH A PASSKEY button
-
Confirm on your device with fingerprint, face, PIN or security key.
If you have both an authenticator app and a passkey, the screen shows both options and you can pick either one. The passkey option appears only when your browser supports passkeys.
Managing passkeys
All your passkeys are listed by name in the Passkeys for two factor authentication section of your profile.
To remove a passkey, click REMOVE next to it. Remove a passkey when you replace or lose a device, so that the old key can no longer be used.
Only the profile owner can add or remove their passkeys. If a user has lost access to all their second factors, an administrator or Leon Support must reset their two-factor authentication [admin reset steps to confirm].
Authenticator app
An additional factor authentication is an option available to each user, enabling a feature that requires two separate factors of identification to log into the system. Besides regular login credentials (operator code or login, and password), the user must also obtain a 6-digit authentication code to access Leon. This provides an additional layer of security for the user account.
Enabling the two-factor authentication mechanism:
-
Open your own user profile in edit mode.
-
Go to the Manage two factor authentication section.
-
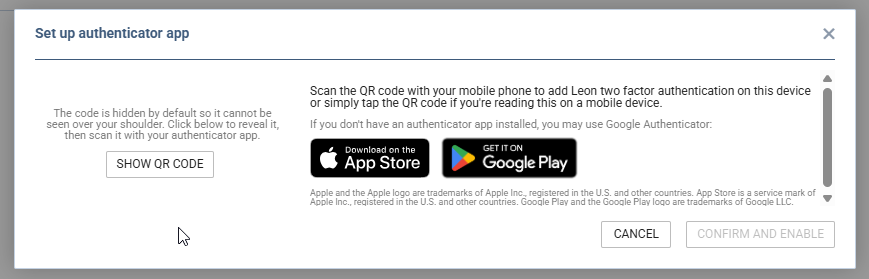
Click on the SET UP AUTHENTICATOR APP.
-
Download the mobile app Google Authenticator (available for iOS and Android) or a similar application.
-
Scan the QR code from Leon to connect your authentication app with the system.
-
Log into Leon as usual. When the pop-up window requesting an authentication code appears, enter the code generated by the app.
Each code is valid for 60 seconds only. After this time, a new code will be generated. Make sure to enter and confirm the code before the 60-second period expires.