Table of Contents
Checklist

Once the flight is created, both OPS and Sales departments can start preparing the flight for dispatch by working on particular sectors of the Checklist.
To access the checklist you have to either open right-hand filter, tab 'Checklist', or, click on the dot in the relevant Checklist column in the OPS view. You can also just hover the mouse over the dot to see its items in a pop-up window.

Checklist tab is devided to 2 sections depending on the department preparing the flight:
- Ops
- Sales
It is possible to roll up the sub-section of a checklist. Each sub-section has a coloured dot indicating summarised status of items in the sub-section:
- Green - all checklist items in the sub-section are green
- Orange - at least one item in the sub-section has orange status with all others either on green or white ('Not Applicable')
- Red - at least one item in the sub-section has red status
- Grey - all checklist items in the sub-section are on 'Not Applicable' status
If the flight has more than one sector, you can edit each one of them and switch between them in the OPS view. It is important to remember to save the changes made to the checklist, otherwise they will be lost. It is possible to add a note and upload a file to each item of the checklist. An alternative way of uploading files is to drag & drop it into the checklist item. In order to do that you have to click on the name of the checklist item, for example CARGO. You will see space for notes and ![]() button that will allow you to add files.
button that will allow you to add files.

After a file is uploaded it will show with underlined name and the tickbox i.e. ![]() . To remove the file you have to untick the checkbox which will cross-out the title. Clicking on “Save” will save changes to the checklist.
. To remove the file you have to untick the checkbox which will cross-out the title. Clicking on “Save” will save changes to the checklist.
By clicking the icon ![]() you will get an access to 2 functionalities:
you will get an access to 2 functionalities:
- RESET STATUSES - all items which have been set up to yellow or green statuses will turn back to

- DOWNLOAD ALL FILES - all files attached to the particular flight will be downloaded in the ZIP format.
IMPORTANT!
Automatic adding/removing items of the checklist
There is an automatic algorithm for adding or removing items in the checklist when they are required or not. This algorithm is run each time the flight is saved (created or changed).
Adding items automatically:
An item will be automatically added to the checklist when both conditions are met:
- The item is enabled in Settings → Flight Editing
- The activity meets the rule set for this item
For example, the item “PPR” will only be added when the item is enabled, and the checkbox “PPR” is ticked in the Airport Directory for ADEP or ADES.
The default status for the items added automatically is Untouched. If you don't change it, the item can be automatically deleted from the checklist if any changes to the flight are made, as described below.
Removing items automatically:
An item will be automatically removed from the checklist when the item's status is Untouched, and any of the below conditions is met:
- The item is disabled in Settings → Flight Editing
- The activity doesn't meet the rule set for this item
For example, the item “PPR” has the status set to “Untouched”, and the item is disabled in Flight Editing, or the checkbox “PPR” in the Airport Directory is not ticked both for ADEP and ADES.
Manual adding/removing items of the checklist
It is possible to add additional items and remove not-needed ones while preparing the flight.

To add a checklist item you simply need to click on the + ADD ITEM button located on the top-right part of the filter. You will get a list of items that are not ticked in the Operator Settings section but are still available. Click on the item that you need and this item will be added to this particular leg of the trip. Finally, press the “Save” button to save the changes.
If after pressing + ADD ITEM bottom you see “No items left to add” message, it simply means that all available items are added to the checklist.
If there are items that you do not need in your checklist, you can remove them. Removing items is as simple as adding one. You just need to click on ![]() icon. A window will pop up asking to confirm (Yes) or reject (No) the request. If you click YES, please remember to press “Save” to confirm the changes to the checklist.
icon. A window will pop up asking to confirm (Yes) or reject (No) the request. If you click YES, please remember to press “Save” to confirm the changes to the checklist.
Ops checklist
The items which should get displayed inside the 'Checklist' window can be selected directly within the checklist.
Some of the available sections include:
- ATC Flight Plan - all information relevant to the specific planned flight.


- Operational Flight Plan - which is prepared for the crew with fuel details, point names, winds, etc.
- Landing permission - you can simply add permit information by clicking on the “Edit” button. A new pop-up window will open where you can add permit/permits details, such as Country, Supplier, Validity, Entry point, Exit point, Revalidation, Short Notice, Notes, and Status. Clicking on “+” allows you to add another Permission. You can also add notes and optionally upload a file. Information added in the notes section will show in the Trip Sheet. Once the permit is added you can hover the mouse over the “Edit” button or
 to see permit(s) details in a tooltip.
 - Overflight permission - it can be added and requested in a similar way as landing permissions. The list of the countries can be inserted manually or uploaded through the 'Get Country List' button from:
- ForeFlight - imported from ForeFlight for the Clients that have the integration activated
- RouteFinder - imported from RouteFinder as long as the aircraft type on the flight is available in RouteFinder
- Crew aware of trip - once the crew is assigned to the trip you can set the status to 'Acknowledged'. If you make any changes in crew assignment for that flight, the 'Crew aware of trip' status in 'Legs Info' will turn from 'Acknowledged” to '?'
- Airport slots - split into 2 sections: ADEP & ADES. Times inserted in the slots change in accordance with changes of the schedule if the status of the Slot is set to red ('Undecided' or '?'). Any other status will not change the slot timeframes and status.
- PPR - Prior Permit Required.
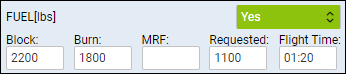
- Fuel - divided into 4 sections: Block, Burn, MRF (Minimum Required Fuel), Requested, and Flight Time. It is possible to include value inserted in the 'Requested' field in the 'Fuel Order' email by editing the 'Fuel Order email template' and using available data located under the fuelOrder.flights.checklist. Specific fuel suppliers and prices can be added in Fuel section.
- Handling - described further down in this section

- Crew transport - here you can specify the way of transportation details for your crew. Notes added to these items will show in the Trip Sheet.
- Hotel - in the Hotel section of Airport Directory you can specify your favorite hotel for a specific location. Once this has been done, it will show automatically when flying to this location. Notes added in the Hotel section will show in the Trip Sheet.
- Pax catering - in the notes section you can add some extra information regarding Passengers. This information will show in the Trip Sheet. For more specific information on Passengers see section PAX. We are integrated with DeliSky. To activate the integration you need to contact Customer Support Team via Customer Portal. Once the integration is in place a link will be available next to the CATERING item. Clicking on the link will transfer you to DeliSky's ordering page.
- Pax transport - divided into 2 sections: ADEP & ADES transport. Notes added here will show in the Trip Sheet.
- Sanctions List - allows searching for sanctioned PAX. More information can be found in the Add-ons section > PAXFILES
- Sponsor - this item will allow indicating whether there is a person or organization that pays for or contributes to the costs involved in the visit. The element can be selected by default in the 'Flight editing' settings > 'OPS Checklist items' and it will apply automatically if ADES is located in one of the countries from the list: Afghanistan, Algeria, Argentina, Armenia, Azerbaijan, Belarus, Chile, China, Congo (DRC), Ivory Coast, Cuba, Ghana, Guinea, India, Indonesia, Iran, Israel, Kazakhstan, Kenya, Kyrgyzstan, Liberia, Mali, Mongolia, Myanmar, Oman, Pakistan, Rwanda, Saudi Arabia, Senegal, Serbia, Tajikistan, Tanzania, Togo, Uzbekistan, Venezuela
- GAR sent - applies to UK destinations only. Located in the Customs section of the checklist allows sending GAR emails to the relevant authorities. Clicking on “Send GAR” opens an email window. It is possible to insert two GAR emails separated by a comma in the 'Airport Directory' > 'GAR emails' and they will be available from the dropdown in this section. Here you can see “Preview GAR” where you can see the document itself and check the details. Email in the “To” section is taken from chosen Handler email. If the handler has not been assigned to the flight Leon uses the relevant HMRC email. “CC” and “Bcc” emails are taken from GAR emails. Content of an email and GAR format between FDP & excel can be defined in GAR emails. After sending GAR status changes to “Requested”.
- Cargo - a section where you can insert the cargo value.Cargo value input is only available for Non-Cargo Operators. Cargo Operators will only be able to insert the cargo values in the 'EDIT TRIP' section as Cargo value input has been removed from the 'CARGO' item in the checklist. It is dictated by the technical aspect of the application and keeping the inserted data in one place in the database rather than 2 separate places.
- ACC3 - the item can be selected in the 'Flight editing' section > ' OPS checklist items' and it applies to cargo flights scheduled from outside EU to EU. Item appears on the checklist when cargo value is greater than '0' with the checklist status '?'. If the value is reverted to '0' the checklist status changes to 'Not Applicable'
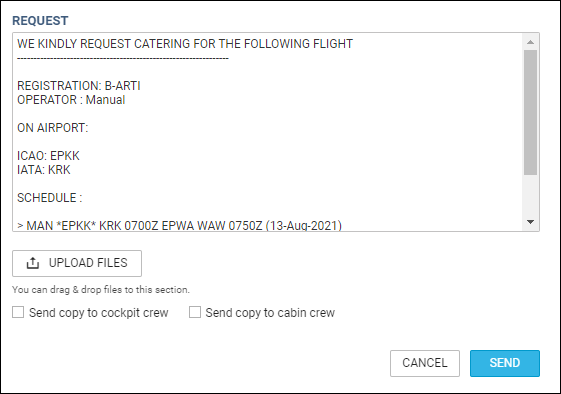
When sending Requests for 'Catering' or 'Fuel', it is possible to send a copy of the email to the crew: there are separate checkboxes for the cockpit & cabin.
Changes history
To check the history of changes done in a particular item you need to click on the item name and then click on the ![]() icon below the notes section. Leon will show a pop-up window with history changes details. The history changes window will include changes to both checklist item status as well as the notes.
icon below the notes section. Leon will show a pop-up window with history changes details. The history changes window will include changes to both checklist item status as well as the notes.
In the changes history window, Leon shows the chronological list of all changes (the latest on top). The colours indication shows added data in green, changed data in yellow and removed data in red.
You can also trace a history of one item changes by clicking on the status. Leon will then highlight the initial entrance of the details as well as all the changes that applied. Below you can see it by example of the Handling Request status changes:

You can also click the icon ![]() and check details of the schedule changes in the pop-up window displayed.
and check details of the schedule changes in the pop-up window displayed.
Get Country List in Overflight Permits

It is now possible to search for the list of countries for Overflight permit purposes using alternatively Route Finder calculated route, or your actual FPL routing.
In order to search for the countries, the following steps need to be performed:
- Go to 'OPS Checklist' and click on the 'REQUEST' button next to the 'Overflight permit(s)' option
- In the “Routing” text box copy-paste items 13-16 (from ADEP to ALTNs), or leave it empty
- Click on the 'GET COUNTRY LIST' button within the 'PERMITS' pop-up window
- If FPL routing is entered, it will be used to generate the country list
- If the routing was empty, the route and country list will be generated using Route Finder
- When the list of countries appears, check if all the necessary countries are listed, and remove unnecessary ones. Additionally, it is possible to sort the list of the countries using drag-drop
- 'SAVE' the selection
Additionally, based on the Routing, Leon will automatically fill in the 'Entry point' and 'Exit point' fields.
Permits requesting

It is possible to request directly from Leon Landing permit and Overflight permit.
In order to make this work, follow these steps.
1. Defining email templates
In a section Settings > Email Templates click ![]() and select either 'Landing Permits' or 'Overflight Permits'. You will also need to add name of the template (it can be country or revision).
and select either 'Landing Permits' or 'Overflight Permits'. You will also need to add name of the template (it can be country or revision).
On the new page you can insert email Subject and below you can re-arrange the default Body, by using Available Data items from the right filter. Another tab Recipients allows to define default email addresses: From, Reply to, CC and BCC. Once it's all set up you can use sending permits requests from the section OPS.
2. Adding permits details

In the Checklist panel click button ![]() next to 'Landing permit' or 'Overflight permit' items (if items don't appear as default ones, click + ADD ITEM button).
next to 'Landing permit' or 'Overflight permit' items (if items don't appear as default ones, click + ADD ITEM button).
Once a new pop-up window got displayed (see screenshot on the right), fill it in with details, such as:
- Country
- Supplier
- Number
- Validity
- Revalidation
- Note
- Status (select from the drop-down box)
You can also mark a checkbox 'Short notice 72h', if necessary. Clicking + button allows adding another permit's details.

3. Requesting permits
The last step is sending a permit email. Click a button ![]() and Leon will show a window for sending permit request email with previously set up data, apart from an email address 'TO', which needs to be added manually.
and Leon will show a window for sending permit request email with previously set up data, apart from an email address 'TO', which needs to be added manually.
There, you can also request permits for multiple countries, by selecting the checkboxes by the country names. The names on of the countries can be automatically included in the email content, depending on the Overflight Permit email template setting.
Additionally, the email pop-up window contains the 'MESSAGES' tab.
Once the correspondence is triggered from Leon, and the 'Reply to' email address is connected to the mailboxes, the history of emails is kept in this tab.
When requesting for landing or overflight permit, there will be an option to attach aircraft documents to the message.
In the requesting permit window Leon will show documents to be attached at the bottom, however, only documents defined in the Fleet Documents section with uploaded files will be visible in the attachments list.
Handling


Handling Requests section of the checklist is split into 2 parts, same as 'Airport slots'. For each particular airport you can choose a handling agent you wish to use (also see section Airport Directory for more information as to how to set default handling agents).
Here is the explanation for the icons showing in HANDLING section:
 - clicking on HANDLING(AIRPORT CODE) allows you to add extra notes as well as upload files. Once the file is added and saved, it will show as
  .
. - this icon displays after some notes are added to HANDLING section. Hovering the mouse over this icon will display notes in a tooltip.
 - this icon displays after uploading and saving a file in HANDLING section. Hovering the mouse over this icon will display a tooltip with the name(s) of files uploaded.
 - by clicking on this icon you will be able to add Requested handling items on ADEP/ADES, and Hotel details information on ADES. It is possible set up default Items on Departure/Arrival as well as HOTAC information can be added in Handling requests section of Leon, which then will populate here automatically. If there are some extra items required they can be typed in in the Request window. Requesting Hotel via handling function is optional and available at ADES only. If this checkbox is ticked Handling Request email will include HOTAC details, if it is unticked - this part will not be included in Handling Request email. Below you can see an example of Requested handling items at ADES window.
 - hover the mouse over to get an information regarding a handling agent: email address, phone number, fax, WWW, SITA, etc…
Handlers can also be assigned automatically when creating a trip, in the following order:
- Requester - applies when the trip is created from the 'Requests/Quotes' part of Leon. Preferred Handler selected in the Requester profile
- Fleet - Handler selected in the Admin Panel > Fleet > SALES tab section
- Airport Directory - Favourite - Handler marked as 'Favourite' in the Airport Directory
- Airport Directory - Approved - Approved date selected in the Airport Directory
In HANDLING section you can also check what changes have been made to the flight that affected handling request status. To check it simply hover the mouse over the HR status and the information will be displayed in a tooltip.
Notes added in this section will also show in the Trip Sheet document. More information on Handling Request functionality can be found here.
Attaching extra documents to HR email
GenDec and/or PAX Manifest can be attached to a Handling Requests email by marking a checkboxes: 'Attach GenDec' and 'Attach Pax Manifest' at the bottom of the HR sheet.
It is now also possible to attach an additional document when sending out Handling Requests email. By default this document is named 'Handling Request Manifest' and the layout of this document is the same as 'PAX Manifest' document, however, it can be re-named and re-arranged in Documents Manager panel into a custom document, if needed.
Go to Settings > Documents Manager panel, click ![]() and select Handling Request Manifest. When a pop-up window appears insert document's name (or leave as Handling Requests Manifest) and add document's version.
and select Handling Request Manifest. When a pop-up window appears insert document's name (or leave as Handling Requests Manifest) and add document's version.

Below you can find an example of a custom document 'Custom PAX Manifest' added to HR panel.

Once it's saved you will find this document as unpublished (indicated with the white dot, if you change in the upper filter from YES to NO).

Edit the document and re-arrange it in Documents Manager panel according to your needs by using 'Available Data' items and HTML/CSS panels. Once it's all adjusted, publish the document (click the white dot which will become green).
In a section OPS > Checklist > Handling, when sending a new Handling Requests email, it will be possible to attach new document along with GenDec (see screenshot on the right).
Tagging Handling agents
We have added a new option of tagging Handling agents/FBOs. Sometimes it is required to inform the crew whether the standard of the chosen handling agent is high (and no crew oversight is needed), or if crew should be present for the majority of services, or if crew need full oversight to check everything that handlers do.
The first step that needs to be taken in order to set it up is creating tags for a particular handler. Go to Airport Directory, edit an airport and in a tab 'Handling/FBO' edit a handler and in the field Tags insert tag's name, then select a colour and save. You can create multiple tags for each airport (see example below).

When assigning handlers in the checklist, Leon will show the tag right below handling's name:

The next step is connecting already added tags to Crew Trip Sheet document, in Documents Manager panel by using the item 'tags' in the 'Available Data' filter.

GAR


Sending GAR documents is very similar to sending Handling Requests. When the PAX list is ready you should click Send GAR button in the Checklist tab (right-hand filter).
You will find two 'Send GAR' buttons which allow you to send this document to handling agent at selected airport separately.
After clicking the proper button a new window will appear on the screen. It allows you to edit default email content and preview GAR document by clicking Preview GAR –> link.
A default email content for GAR can be defined in section Settings > Handling Requests, field 'Default GAR email content', as well as 'From' and 'Cc' email addresses.
It is possible to add information such as: Visit reason and Visit address into the editable screen, which will get exported onto the GAR sheet.
Visit reason can also be selected from the drop-down box, where options are: Short-term visit, Based, Maintenance, Permanent Import.
An option to select between XLS and PDF formats when sending GAR is also available. In a section Settings > Handling Requests you can define a default GAR format.
As for the Channel Islands' GAR form, the visiting address will be automatically filled in in the following order:
- Crew Hotel selected in the Checklist
- Crew home address if crew Home Base is either Jersey or Guernsey. As for PAX, the home address will appear if the country is selected as Jersey or Guernsey
- 'Visiting Address' in the GAR mail window. For PAX, it will be the 'Visiting address'
Channel Islands GAR's are only available in the PDF format.
Sales checklist
Sections directly related to Sales are separately divided in Flight editing page where you can select the sales checklist status to be included in overall trip status. Items selected in a section Settings > Flight Editing will automatically apply to each flight. Similarily to Ops checklist, you can add and remove items as you work on the flight. Here you can also add notes and upload files.
2 items are particularly important in SALES checklist:

| Invoice | Payments |
|---|---|
| The applicable statuses and their colours in this item are as below | This item has been added to separate typical 'Invoice' statuses from those related to 'Payments' |
 |  |
Each section has its own drop-down menu where the status ![]() is selected by default. 'Untouched' means that nothing was done about this item. Various sections have different status options with different colours assigned.
is selected by default. 'Untouched' means that nothing was done about this item. Various sections have different status options with different colours assigned.
The colour of the dot on the 'Flights list' page gives you quick information about flight preparation status.
 - flight is ready - everything has been prepared.
 - flight is not ready - some items are waiting to be confirmed.
 - flight is not ready - some items require work done.
If an item concerns the entire trip (not a single leg) Leon will show TRIP right below the item's name.
Payments
If you use an item Payments in your Sales checklist, Leon will show in the CALENDAR section an additional icon $ in the flight's rectangle (right next to the checklist dots) in 3 colours: red, yellow & green.
The colour of the icon $ corresponds with the colour of the 'Payments' item's status (see examples below).

 –>
–> ![]()
 –>
–> ![]()
 –>
–> ![]()
Positioning checklist

By clicking on a Positioning checklist dot in a section OPS (right-hand filter), Leon shows 3 default items of which statuses can be set up.
A button +ADD ITEM allows adding more items (previously defined in a section Settings > Flight Editing) in the same way as with OPS or sales checklist.
RESET STATUSES button turns all items statuses back to 'Untouched'.