

This is a quick guide for Leon administrators (users with Admin group assigned). Below you can find described most important functions in Leon.

Logging in
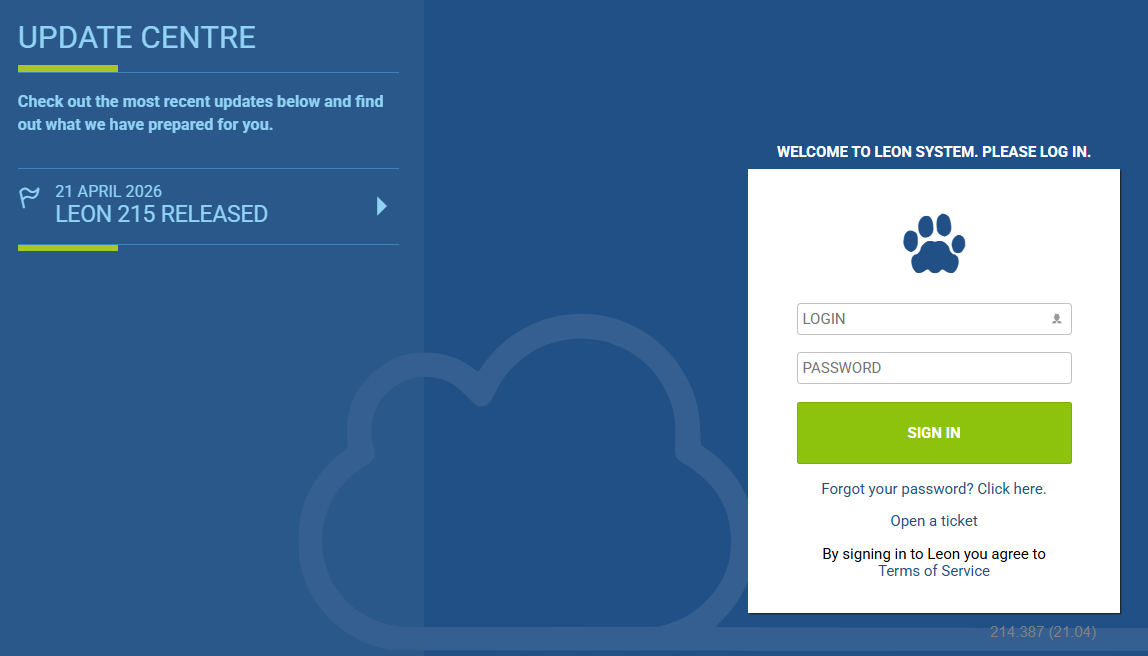
To log in to Leon, enter the web address in the following format: operatorID.leon.aero (e.g., if your operator’s three-letter code is “ABC,” enter abc.leon.aero).
We recommend using Google Chrome, as it is the browser most commonly used during development. Internet Explorer is supported, but not recommended because of potential compatibility issues.
If you experience login issues, please check that your username and password are correct, or clear your browser’s cache.
If you have forgotten your password, follow these steps:
-
On the
operatorID.leon.aerologin page, click “Forgot your password? Click here.” -
Enter your login and click “Email me.” A password-reset link will be sent to the work email address specified in your profile.
-
Click the link in the email to reset your password.
-
Enter new password, confirmation password and apply changes.
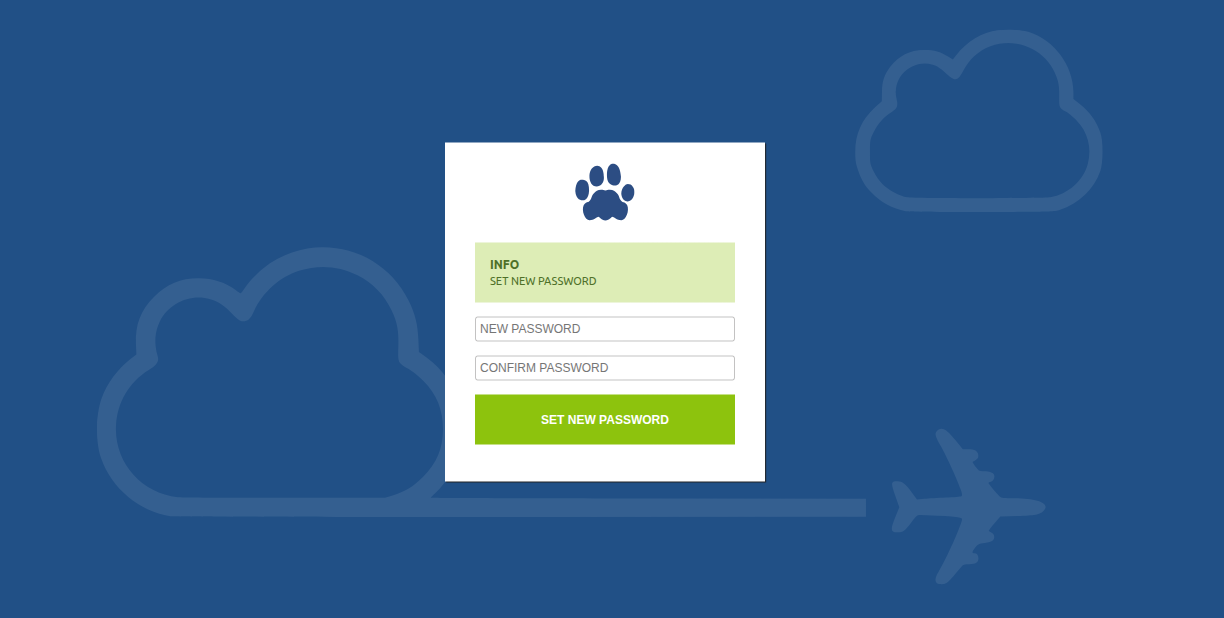
Alternatively, you can submit a ticket through our Customer Portal, which will be forwarded to the Leon Support Team.
On the left-hand side of the login page, you can find information about current Leon releases, published every two weeks. These include links to the latest features and functionalities, as well as details of scheduled system maintenance and other important updates.
Profile
To access your profile, click your name in the top-right corner of the screen.
After logging in for the first time, we strongly recommend changing your password. Enter the password you received in the Old password field, choose a new password, and confirm it.
After you click Update, Leon will send a confirmation email to the address entered in the Work email field in your profile. This address will also be used for Leon notifications about flight and crew changes, roster updates, and upcoming crew endorsement expirations.
User settings tab
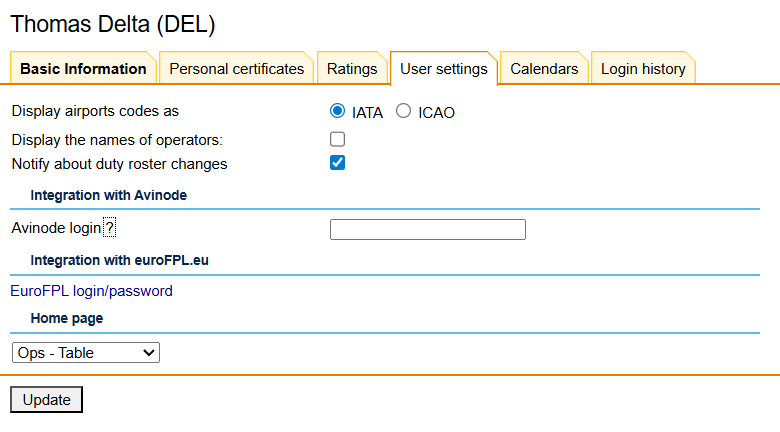
You can define your personal preferences in the User settings tab of your profile. These settings apply only to your Leon account and do not affect other users.
The most important options include:
-
Airport codes – Set your default preferred airport-code format (for example, ICAO or IATA). This controls how airport codes are displayed by default across Leon, including in most flight-related views. Many views, especially flight views, have their own airport-code switcher, allowing you to change the displayed format for that view without modifying your global preference.
-
Notify about duty roster changes – Select this checkbox to receive notifications about roster changes.
-
Avinode login – Enter your personal Avinode login. This connects the two systems, so when you reply to a message from Avinode, the Avinode user’s name will appear as the author of the reply.
-
EuroFPL login/password – Use this link to enter your personal EuroFPL login details. This allows you to submit flight plans to the EuroFPL system directly from Leon. All users can configure the EuroFPL integration, even if they do not have access to the Integrations/Add-ons section.
-
Home page – Set the page that will open automatically each time you log in to Leon.
General settings
By clicking the icon 
This section allows you to configure options and settings that are global for all users. Here you can set up general appearance of the system in a way that some information is displayed as well as default content of some documents, etc…
The whole section contains several separated by the nature of their contents.
General
In this section you can define general settings such as: default fuel & weight units, default airport category, default currencies, Pax list type, bases and more.
Flight Editing
Here you can define items such as: disabling permanent deleting of sectors in Flights List, alternate airports, using Empty Legs, default flight & trip type, crew list suggestion when ading a new trip, Journey Log items, OPS & Sales checklist items or custom delay codes.
GAR emails
In this page you can insert a default ‘Cc’ email address as well as a default email content for sending GAR email & pdf file. Here you can also choose the format of the file itself. Attached file can be sent either as PDF or XLS. The format can be switched to a different one before sending GAR in GAR window.
Documents
In this section you can define Notify Crew functionality default email details (to use this option, go to OPS, right-click with the mouse over the flight, select TRIP or LEG and by clicking ‘Notify Crew’ link Leon will show a pop-up window for sending flight documents to crew). Below you can find some additional settings, i.e. defining default fuel cards to show on Crew Trip Sheet document.
Sales module
The Sales Module section is directly linked to the quotation process carried out in the Requests/Quotes module. Among others:
-
it allows to define default Legal Note and Cancellation Policy texts.
-
allows to configure invoice issuer data for multiple entities (e.g., different companies), each with its own numbering sequence.
-
allows you to specify countries over which the aircraft should not fly.
-
allows to define which currencies are available in requests, subcharters, and invoices/fees.
-
allows you to select and customize the default request statuses visible in the quote edit (e.g., NEW, QUOTE, OPTION, CONTRACT, BOOK, etc.).
-
allows you to configure VAT rates per country and their calculation options.
Fleet
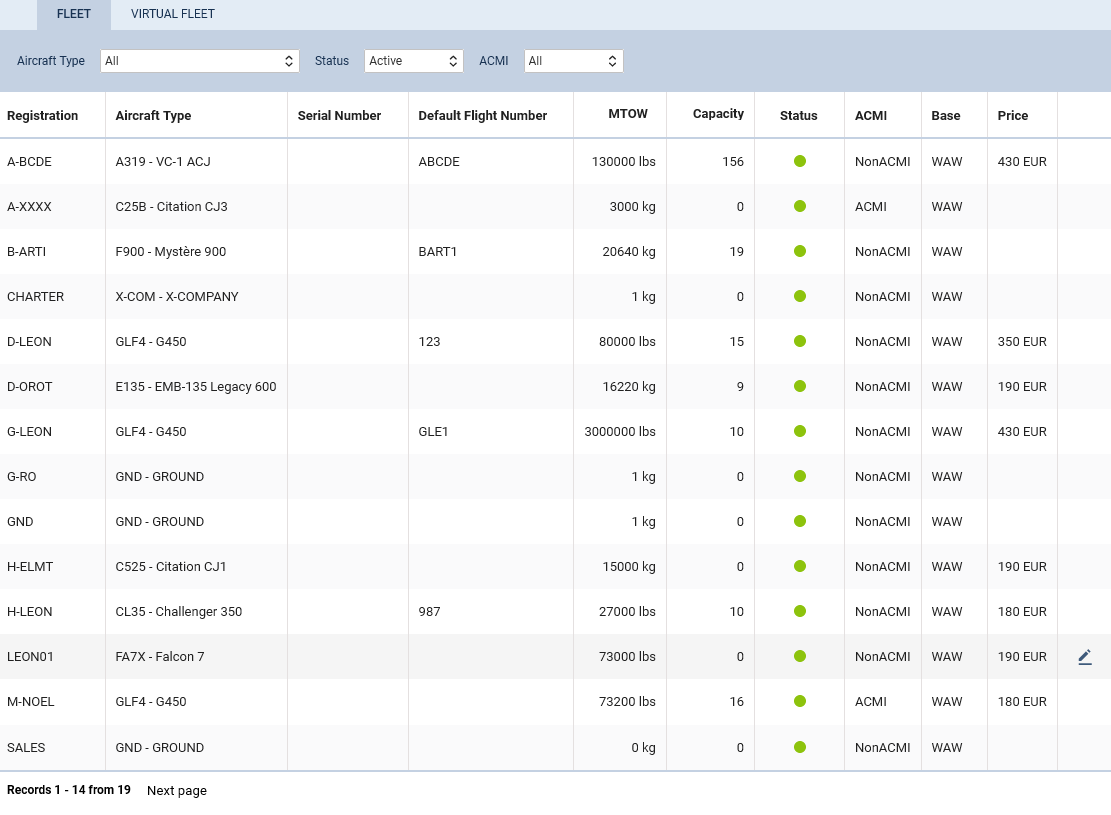
The main FLEET page shows is split in 2 panels: FLEET - showing real tails, and VIRTUAL FLEET - showing virtual tails. You can filter the page by an aircraft type, aircraft status (all, active, not active, deleted) and whether you want to view ACMI or non-ACMI tails.
The aircraft edition section is divided into 4 tabs:
-
BASIC - here you can find most important aircraft information, such as: name, IATA code, registration, PAX capacity, max cargo, weight & fuel units or MTOW.
-
OPS - this tab shows OPS related information of the aircraft, of which the mandatory ones are: Max fuel & Burn fuel on taxi per h.
-
SALES - in this panel you can add Airport Fees & Aircraft Fees (previously set up in a section SALES > FEES). An interesting option is a possibility of uploading pictures for the particular aircraft and then make it displayed in your ‘Requests/Quotes’ panel documents with the help of Documents Manager, where in Available Data > Aircraft you can find an item ‘Pictures’ to be used.
-
PERFORMANCE - here you can add the aircraft performance data which will be used for calculating STA time on all trips on the particular tail. Speed Profiles part of the page allows to define an aircraft speed: either Simple one or Advanced one - this is then used to suggest an Arrival time when adding a new flight (Leon shows STA time based on aircraft speed, GCD and an average winds).
Right below mentioned 4 tabs Leon shows the status of the aircraft:
-
Active - an aircraft used by the operator - charged by Leon accounts.
-
Not used - an aircraft not used and not charged by Leon, but still available in filters (for data reports generating).
-
Deleted - an aircraft deleted, not charged by Leon, not available in any of the sections.
-
ACMI - an aircraft temporarily leased or sub chartered aircraft by your company.
Aircraft crew positions
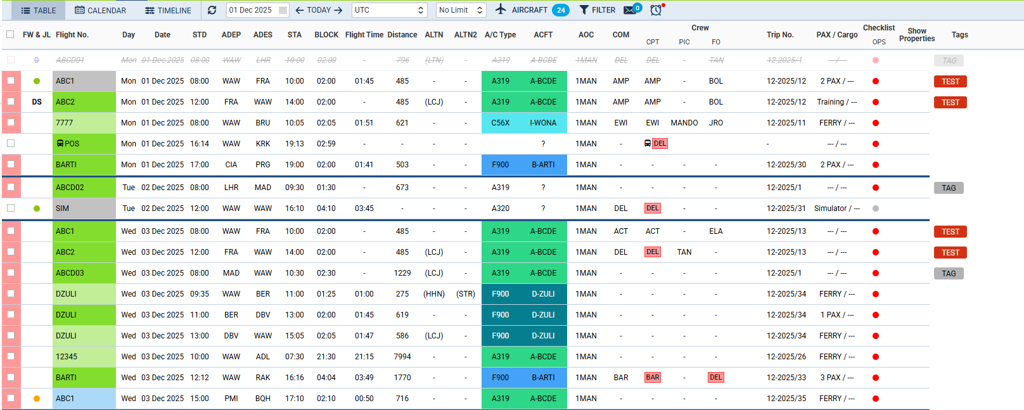
Before you add a new flight you need to define crew positions for a particular aircraft type.
Go to Settings > Aircraft Crew Positions, select an aircraft type in the filter and mark checkboxes (positions) you need for cockpit, cabin, maintenance or ground staff. Positions such as PSN or PAD are available in a tab Positonings.
If you mark a function in a column Use only - it will not be visible as default when adding a new flight. It will be available under a button + ADD POSITION in a tab FLIGHT (right-hand filter of the section OPS).
If you mark a function in a column Use and column Default - it will be visible straight away in a tab FLIGHT, when adding a new flight.
It is also possible to add a custom position by inserting its code into a Operator name.
It is also possible to define aircraft crew positions in the aircraft profile. Check THIS LINK for more details.
Users
Adding a new user to Leon can be done in 2 ways:
-
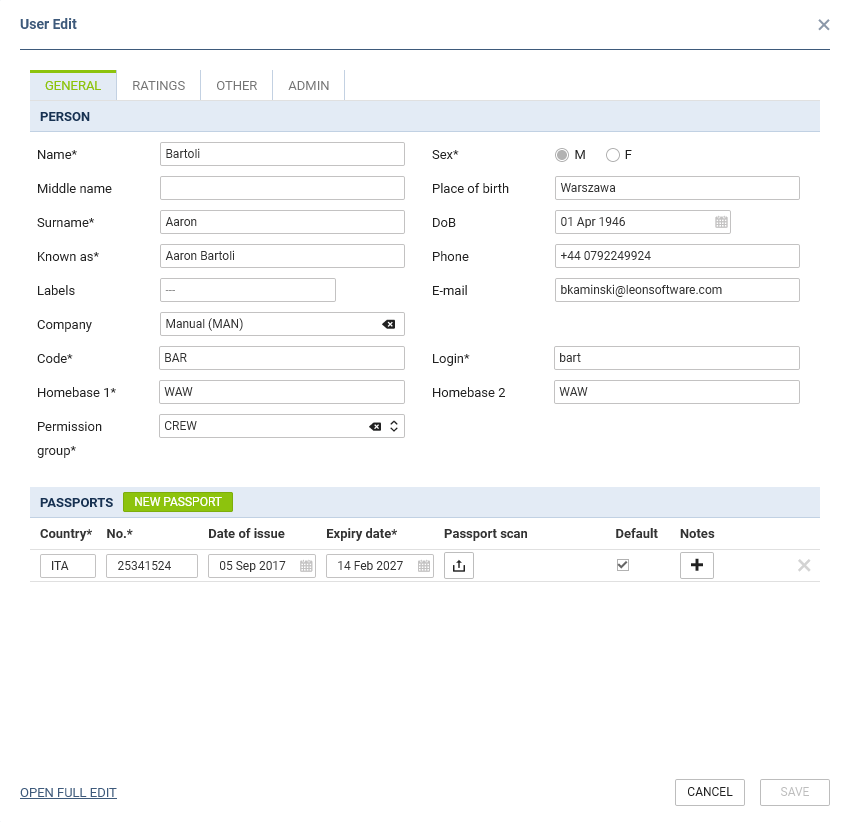
New user - in a section Settings > Users you can add both: new users who are not a part of crew staff as well as crew members. Click link NEW USER and add mandatory details, such as: Name, Surname, Sex, Code, Login and Homebase . You can also add passport details, which are used on some of documents (such as General Declaration). ‘Home base’ is used by Leon to properly calculate crew rest (at home base or away from home base). By using other tabs in upper part of the window you can add Ratings, define with whom crew should not fly with and also add an option so that user won’t be logged out by Leon.
By clicking Open full edit link Leon shows a full user’s profile. Here you can add additional details, such as: Place of birth, phone, or change permission group.
A field Email work is a very important one as this is the main email address to which the password will be sent out as well as notifications or any other messages.
Adding flights
OPS
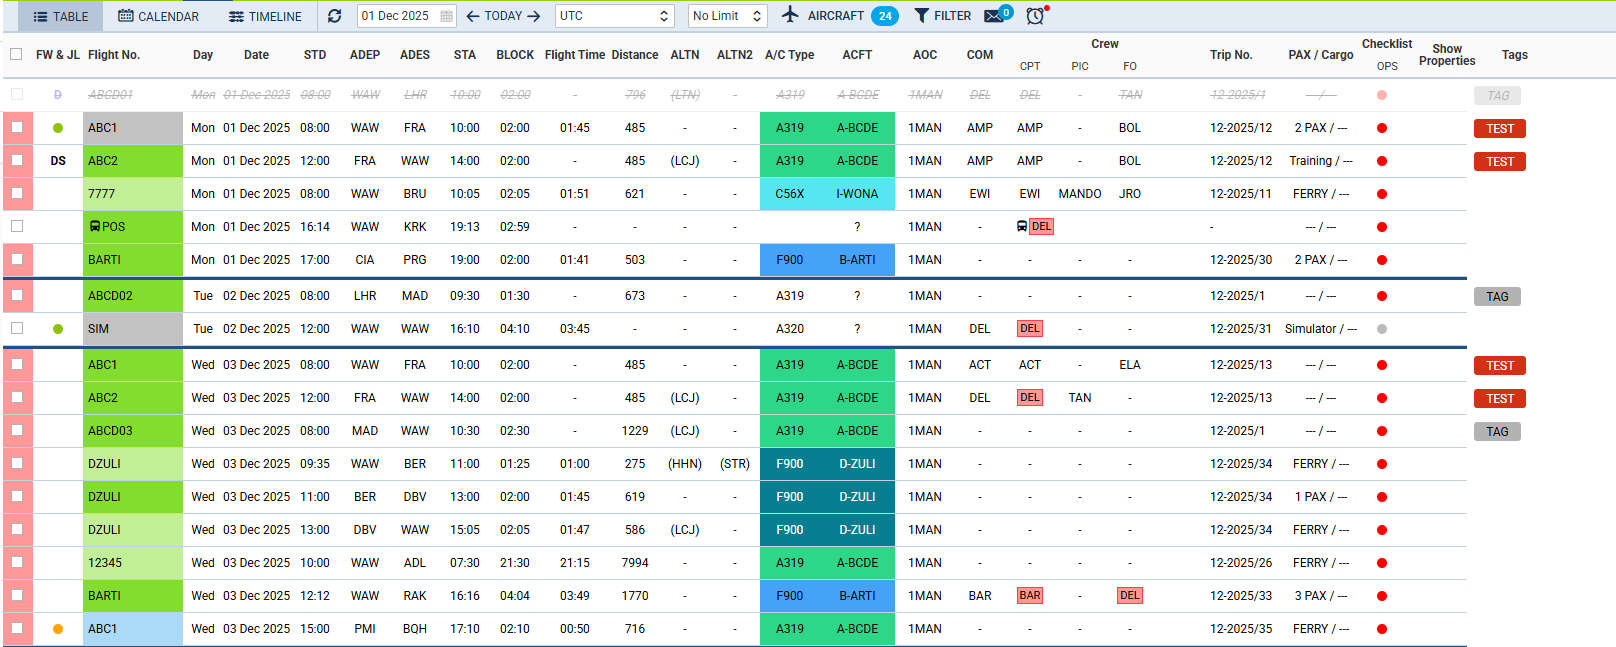
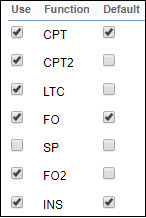
Adding a new flight can be done from a section OPS where it’s possible to add 


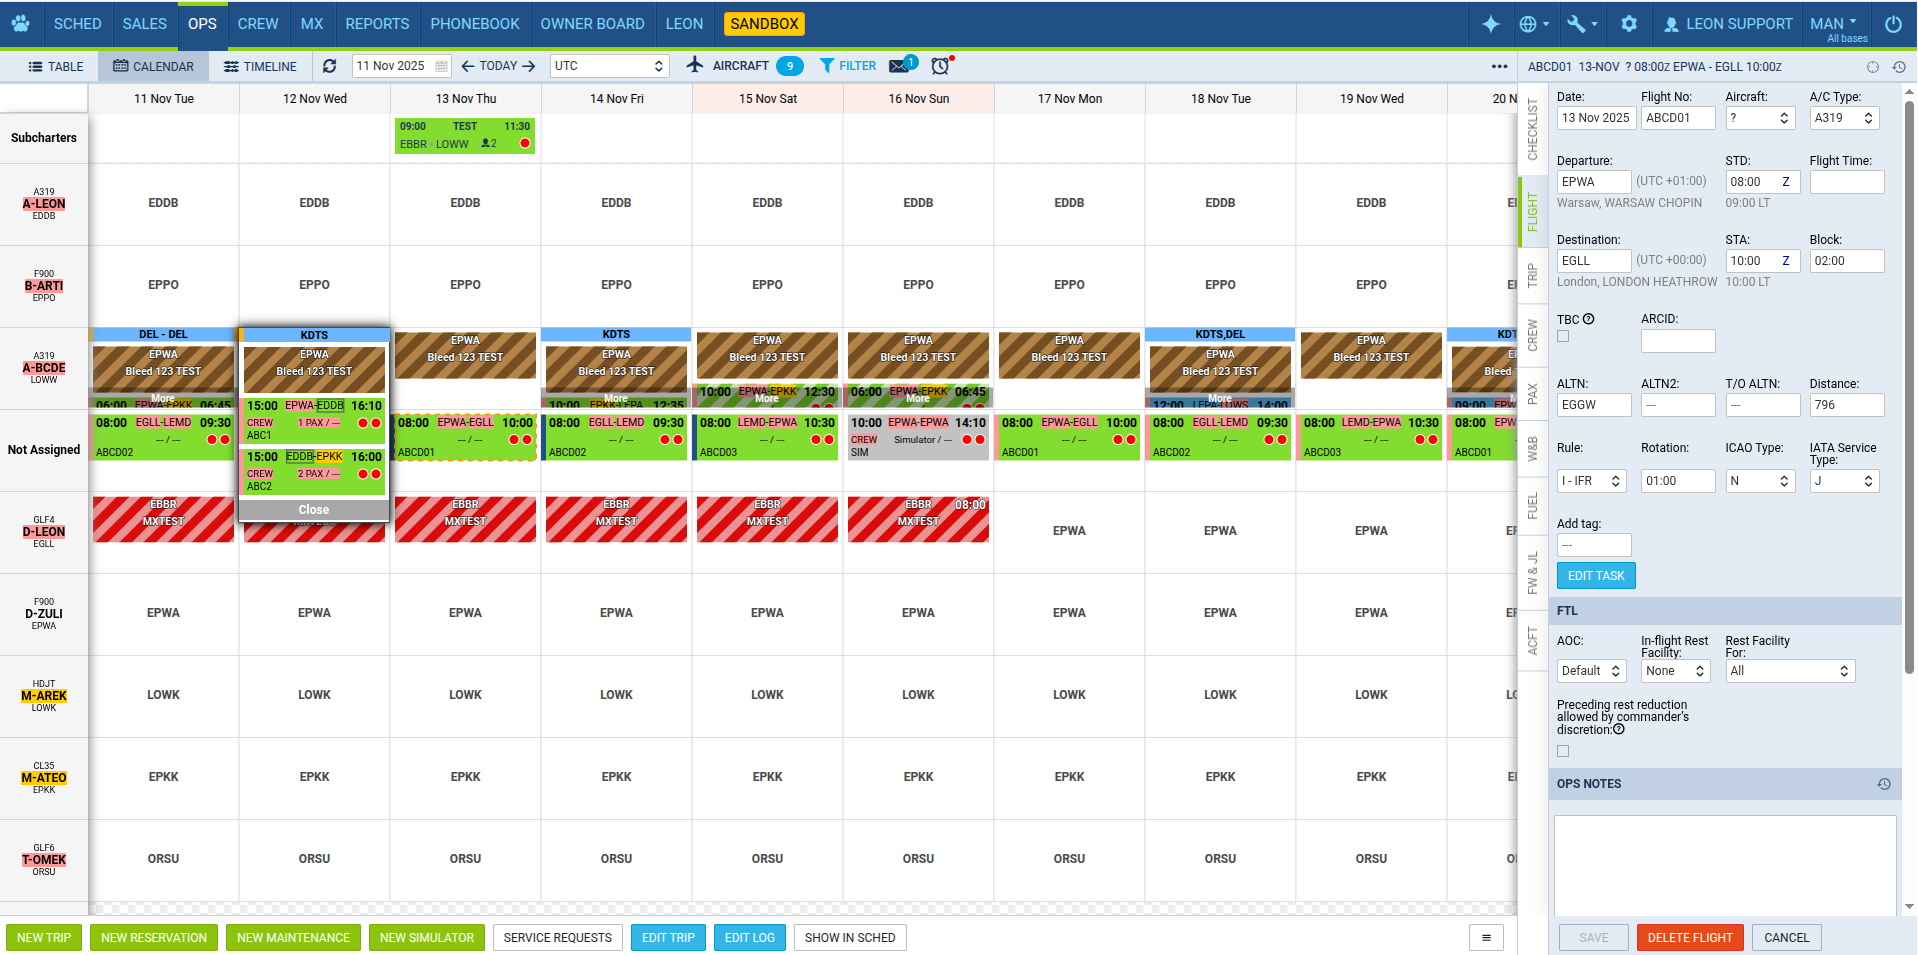
OPS is divided into 3 sections: TABLE, CALENDAR and TIMELINE. Each of them shows flights in a different way to meet your needs. In OPS you can add a new trip regardless section you work with.
Click button NEW TRIP to add 1 or more legs. Select an aircraft, flight number, date, STD, ADEP/ADES, STA. You can also add PAX number or leave trip as ferry. In a section CALENDAR you can also add a new trip by right-clicking the mouse over the square.
Buttons UTC, LT & Base Time allow to switch between times while adding a new trip.
Leon suggests STA if a particular aircraft speed details are added in fleet edition section, using GCD and/or average winds. STA suggestion can also be based on minimum 5 same historical routes.
To add more legs to the trip click + and to delete a leg click 
Sales
Sales can add a new trip from a Calendar section in 2 ways:
-
By using
button located at the bottom of the page
-
By right-clicking the mouse on the square which will bring

button as well as an option of adding a Day Note.
If the user hovers the mouse over CREW assigned crew will show up information such as:
-
Crew name/surname and the aircraft position.
-
Contact details (if inserted into crew profile).
-
Warnings about expired endorsements, airport discontinuity or FTL violations.
In a tab TRIP sales can add a quotation number and its price, then print sales documents by right-clicking with the mouse on the selected flight.
SCHED

SCHED is the functionality allowing you to build and manage the schedules. Functionality is designed with Airlines in mind. However, it still can be used by business and charter operators to build schedules if need be. Currently, the schedules can be created on the Virtual Aircraft only. The aircraft can be switched after the schedule is published.
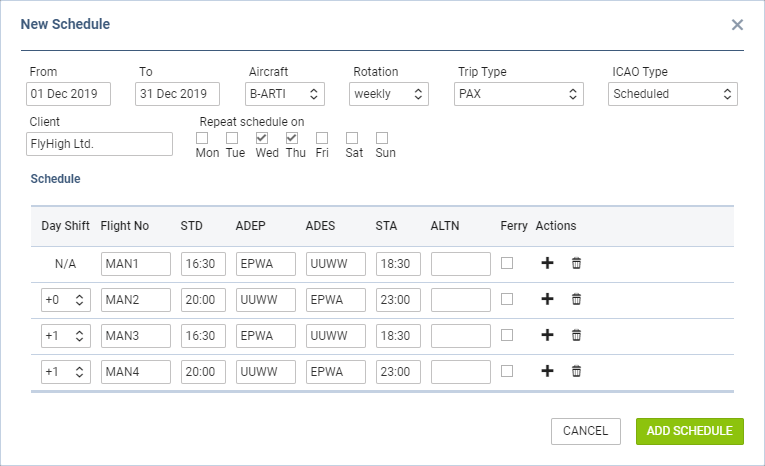
In order to build a new schedule you need to perform the following steps:
-
Click on

-
Insert the timeframe of the schedule (From and To), select the Aircraft, schedule Rotation (weekly, biweekly, triweekly) and the Trip Type.
-
Choose the Client if applicable. In order for the Client to be populated, it needs to be added in the Phonebook and you need to type in the first 2 letters of Client‘s name - Select the days on which the schedule should repeat (Mon-Monday, Tue-Tuesday, etc) - In the Schedule section you can insert the flight details. To add the next flight within the same schedule click on a + and the second line will be available. In the second line, you can also select a ’Day Shift’ number which means shifting your order for the selected number of days forward. I.e. if you select +1 and the order is supposed to start from Wednesday, then the order will start from Thursday. - Click ’Add Schedule’ button to save new Schedule
Once the schedule is saved, the flights are displayed as blue squares - 
You can click on the flight and perform further actions, such as modifying the schedule or deleting it. You can select more than one flight by holding Shift/Ctrl buttons on the keyboard and clicking on the flights or by using 
Clicking on 
New schedule is not visible to OPS teams in OPS section until the flights are published
Option 
It is possible to modify selected flights or a number of flights or modify pairings.
For more information regardint this feature, please check THIS link.
Quotes
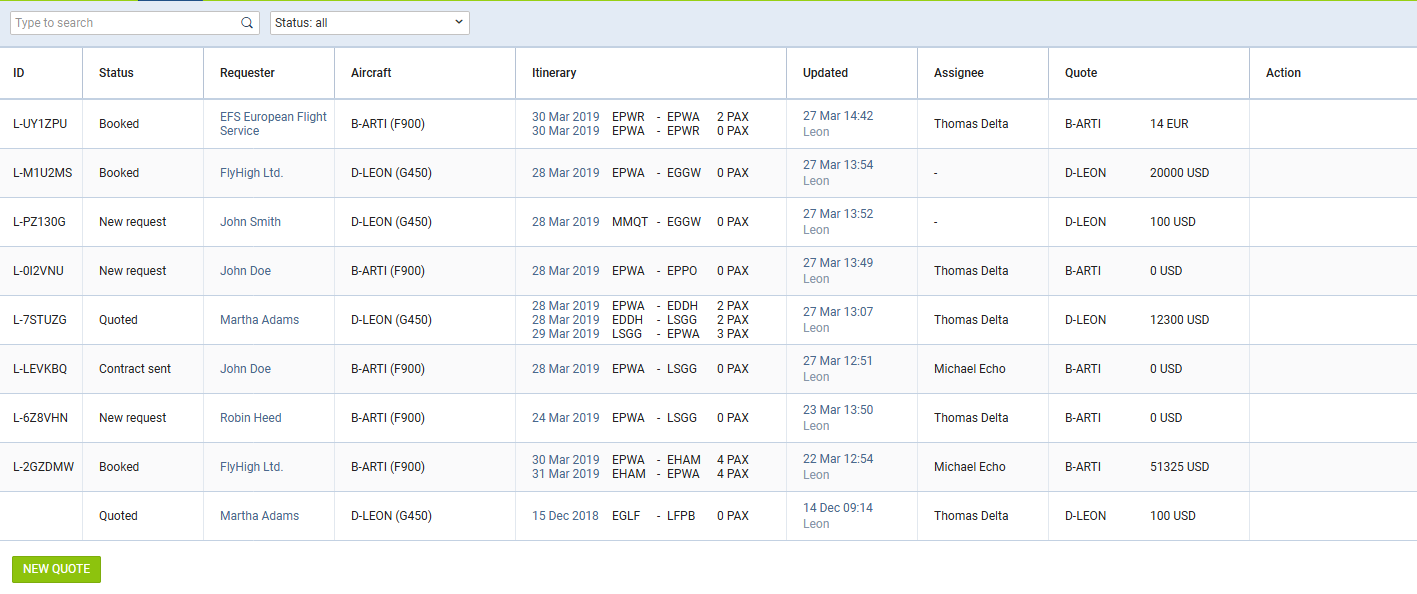
On the main page of the Requests/Quotes panel you can see the list of Quotes downloaded from Avinode as well as those created in Leon.
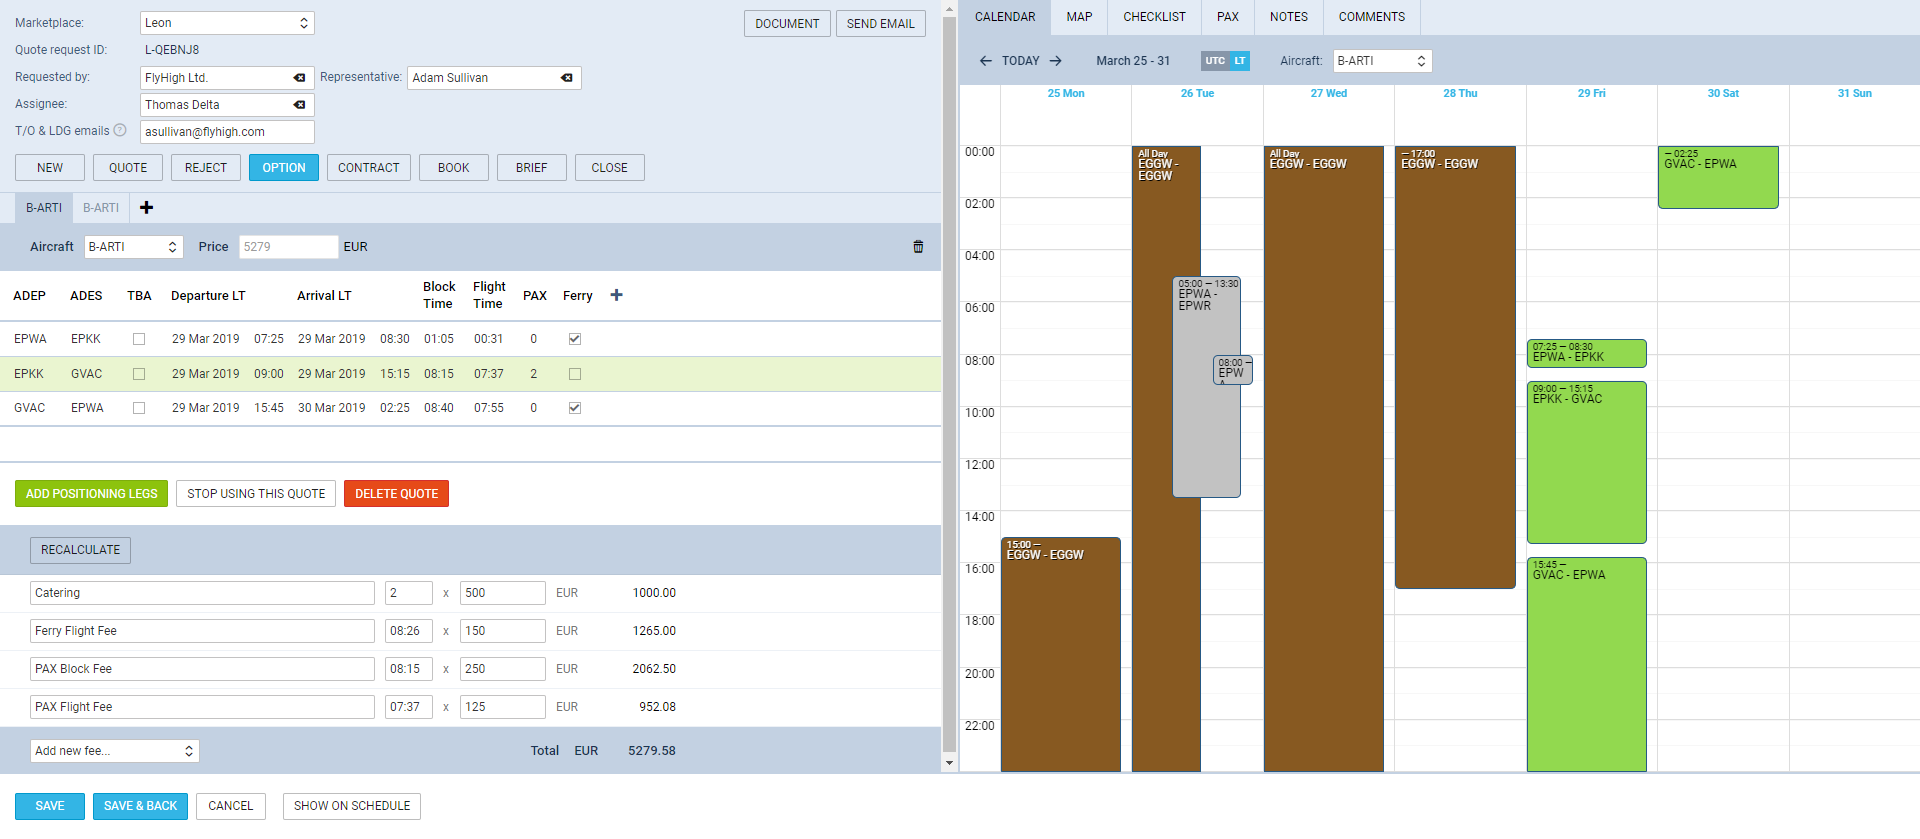
The main page of the RFQ - Request For Quote page is divided into 2 sections, which show all details in a transparent way:
-
RFQ details with options of adding & managing the quote.
-
Displaying the quote in Calendar, managing the Checklist, PAX and other options.
Right below request details & quoting options you can find Trip details: Aircraft registration, Price, ADEP, ADES, TBA checkbox, Departure time LT, Arrival time LT, Block Time, Flight Time, PAX number and Ferry flight indication.
By clicking the + icon you can add a new leg into the existing trip - you can do it also in-between existing flights.
It is possible to change the Currency and Leon will recalculate the price in the new currency. The new currency will also apply to the quote’s fees (catering, hotel, flight plan, etc…).
It is also possible to schedule a Fuel Stop.
You can also set up sending an Invoice from Leon‘s panel ’Requests/Quotes’. Before using this option you need to set up in Documents Manager a new template QUOTE INVOICE - you can set up multiple different templates and re-arrange them the way you want (using HTML & CSS). You can also use Leon default template pdf.
For more information about ‘Requests/Quotes’ panel please check THIS link.
Bookings
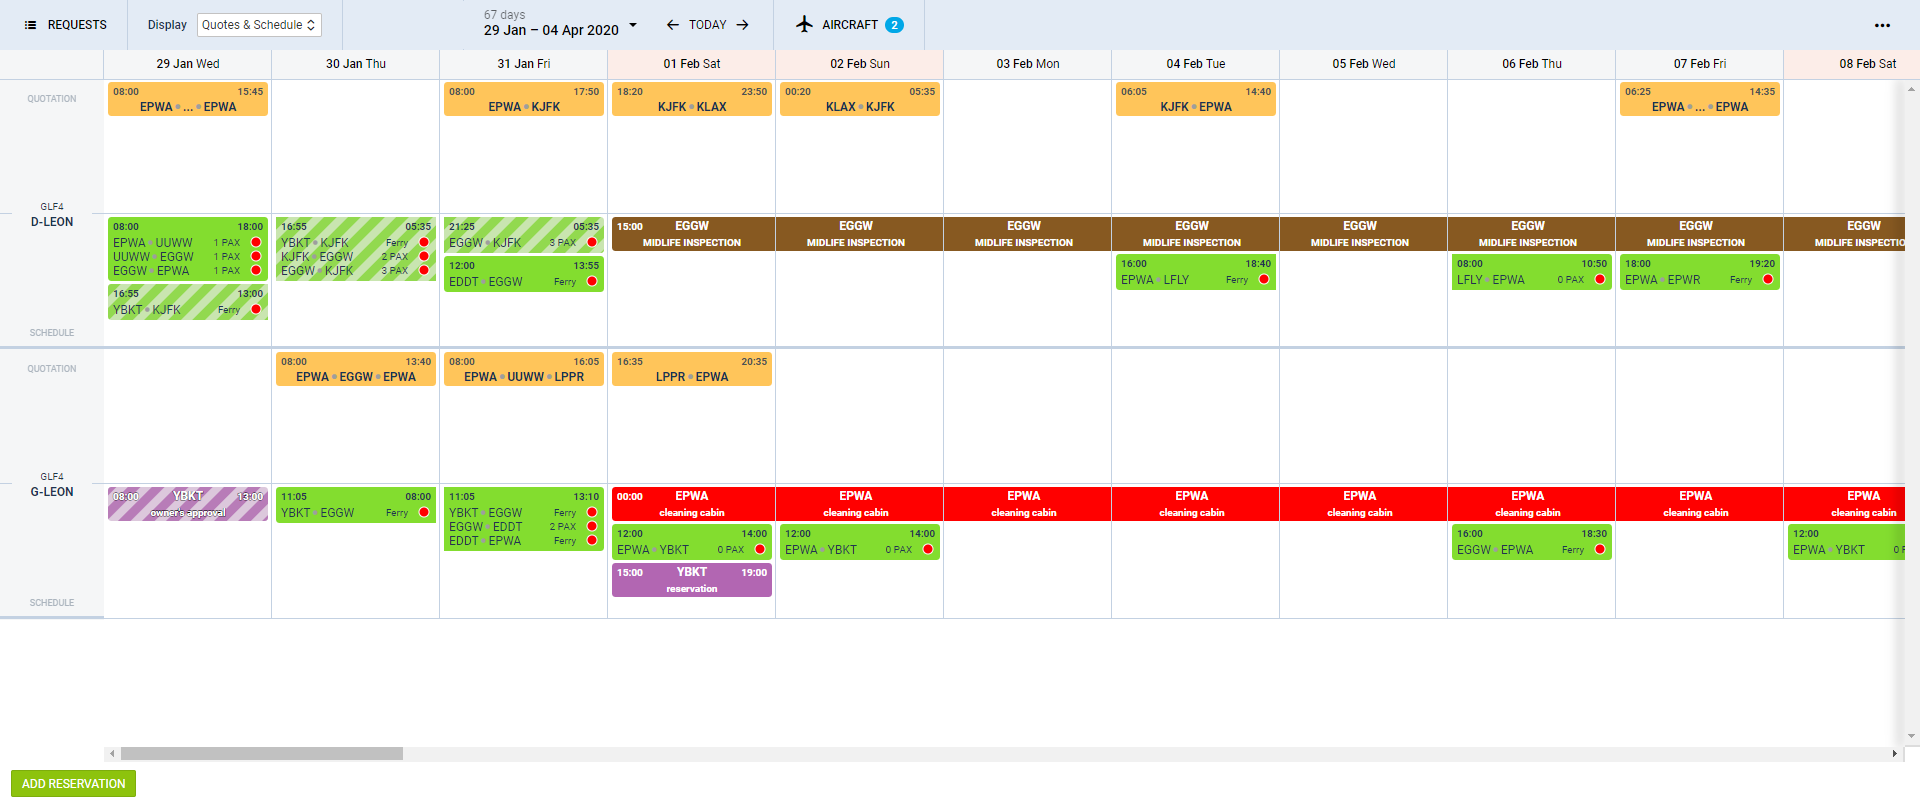
Bookings is the Calendar-like section where it is possible to see all the aircraft tasks in one view. ‘Bookings’ allows viewing all the gaps (availability) in the aircraft schedule and helps the Sales Teams selling the flights.
It is possible to expand the height of the columns if need be. In the aircraft registration column hover the mouse over the line separating 2 differen aircraft. If you see 
The ‘Bookings’ view is divided to filter section at the top and the calendar with the aircraft operations below the filter.
The top filter contains such elements as:
-
- allows switchich view to Requests/Quotes section.
-

- option to choose between ‘Quotes’ only view, ‘Schedule’ only view and both ‘Quotes&Schedule’ view. ‘Quotes&Schedule’ will divide Aircraft row into ‘QUOTATION’ section (at the top) and ‘SCHEDULE’ section (below) separated by the line.
-
- option to choose the date range. You can either do it by choosing from the options available in the dropdown or select the range in the available calendar.
-

- Clicking on TODAY will limit the view to one day only (today). Using arrows will move the schedule forward/backwards by the number of days chosen in the date range starting from the beginning/end of filtered date. For example, if the date range is 29/01 - 29/02, clicking on right arrow will move it to 29/02 - 31/03
-
- option to filter by aircraft
-

- here you can choose preferred airport code (switch between airport ICAO/IATA codes) and the Timezone (UTC/LT).
The indication of the operations within the ‘Bookings’ view is as follow:
-
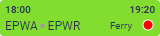
- Confirmed commercial flight
-
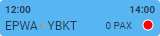
- Non-commercial flight added from OPS section
-
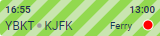
- Option flight
-
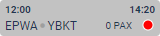
- Flight Completed - Journey Log inserted
-

- Quote Request
-
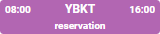
- Reservation
-

- Reservation Option
-

- Maintenance
-

- AOG Maintenance
It is possible to add the Reservation from this screen. To do so, click on ‘ADD RESERVATION’ button, fill in the data in the pop-up window and save the changes.
You can also edit the Flight/Option/Quotation as long as it was added from the ‘Request/Quotes’ section.
It is also possible to edit Maintenance/AOG Maintenance and Reservations. Clicking on Maintenance/AOG Maintenance will edit the particular Maintenance in MX > Scheduled Maintenance section. Clicking on ‘Reservation’ will edit this ‘Reservation’ in a pop-up window in the ‘Bookings’ screen.
Flights added from OPS section are not clickable in ‘Bookings’ section.
Adding crew, PAX, clients
Adding Crew
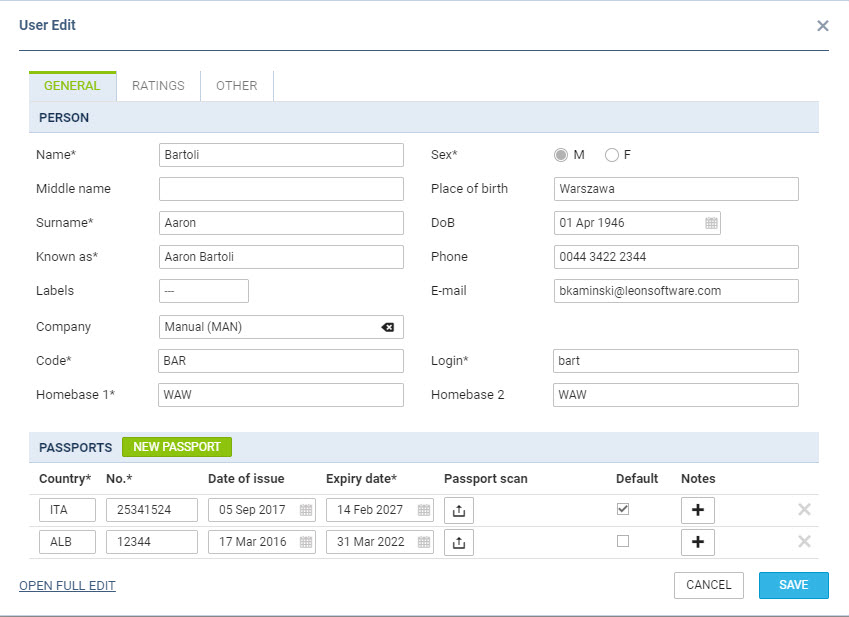
Adding new crew to Leon can be done from a tab CREW by clicking the icon 
In an User Edit screen you need to insert a few mandatory details, such as: Name, Surname, Code, Permission group, Login and Sex. All other details are optional.
You can also add passport details from this screen (1 or more) and attach a pdf scan.
Section Ratings allows to add appropriate aircraft positions to each new crew.
The alternative ways of adding new crew to Leon are explained chapter Users.
Adding PAX
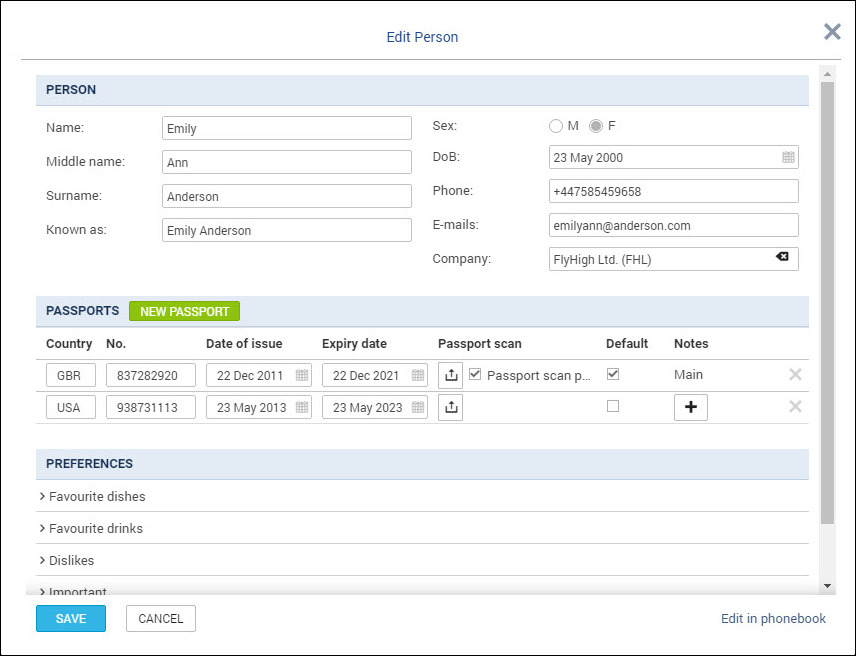
If you want to add a new passenger to database just click 
To add a new passport click a green icon and fill in fields with details. You can also add a scan of a passport and mark which one should be a Default passport.
If a new passenger should be assigned to a certain Company you can do it by typing a 1st letter of a company name.

If a passenger is under 2 years old he/she will appear in the tab PAX as (I). If between 2 and 12 years old - as (C). If you hover the mouse over PAX number in either OPS or Calendar section that information also appears.
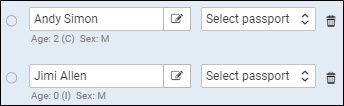
If you need to add some extra information to an existing passenger that is already assigned to a flight you can do it by clicking on ‘Edit in phonebook’ link. This will redirect you to the Phonebook where the data can be filled in.
To mark a Lead Passenger (who can be an aircraft owner or a company president) mark a checkbox right under the 
If you want to remove a passenger from the list just click X on the right.
Adding Clients
If you wish to add a new person/company to the list, use one of the links: New person and New company. Both screens look very alike. There is a small difference in general information data (i.e. you can add SITA or AFTN address to company). All mandatory fields marked with the red asterisk need to be filled in. The other details are optional.
:!: Both: a new person and a new company can be marked as client. Clients can be assigned to a particular trip
when adding a new flight from a section OPS > CALENDAR.
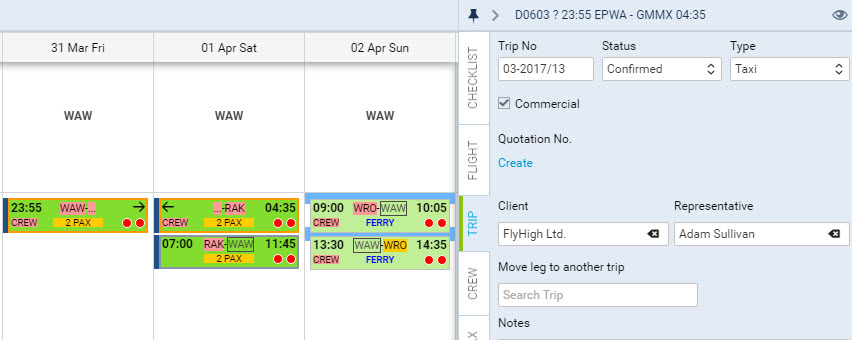
When adding a New Company you can add the company contact / representative at the same time.
In the Phonebook you need to edit previously added Company (or add a new one). At the bottom click Show company contacts and add details: name, surname, email address & phone number.
By clicking 
In a section OPS > CALENDAR edit a trip and in the tab TRIP (right-hand filter) type first letter/letters of the client (company), select it from the drop-down box and then a new field Representative will show up. Click on this new field and Leon will show available names of people marked in the Phonebook as ‘Representative’ - select the name and Leon will show it on sales documents (Flight Brief and Charter Contract).
To delete a person/company from the phonebook, you need to go to Tab “Phonebook” and edit a name you wish to remove. At the bottom of edit profile screen you will see “Delete” button - press it and confirm to complete the process.
Sales can also add a new trip/quote from a section Sales > Calendar. This page allows quick identification where the fleet is on a particular day or within selected period of time.
To add a new trip either click on the blank field with airport code or click ‘Unknown Attachment’ and choose one of two options: add trip or aircraft reservation. In this section there is no option to add crew, so Leon does not show FDP warning as long as the crew is added to the trip by OPS.
Apart from adding trip details you can also set up here sales checklist, take off & landing emails (for reports sent by Leon) and notes. You can also select handling agents, pax and add catering information.
Section ‘Calendar’ also shows scheduled maintenance (brown colour for MX, red for AOG) added by ‘Ground’ staff.
ADD-ONS
Go to a section Settings > Add-Ons to configure Leon integrations with the softwares as below (the list is not full, we’re integrated with over 100 softwares):
-
Airport Charges - calculating landing fees, passenger charges and taxes for a turnaround.
-
Aero CRS - a cloud based system for managing and operating a small-medium airline scheduled or charter based operation.
-
Avinode - world’s largest online Marketplace for buying and selling private air charter.
-
CAMP - maintenance software.
-
Centrik - managing Risk, Safety, Compliance, Manuals, Documents, Meetings, Training and more.
-
Delisky - leading provider of VIP in-flight catering services to private & business jet operators.
-
Eurocontrol - air traffic management.
-
EuroFPL - software to flight planning and navigation.
-
ForeFlight - flight planning software.
-
FRMSc SAFE - managing occupational alertness as well as providing advice and training.
-
FuelerLinx - an aviation fuel planning and tankering software system.
-
MyHandling - software to service Handling Requests.
-
PPS - flight planning software.
-
Q5 - developing quality, security, and environmental, health and safety for the crew.
-
RocketRoute - flight planning & management software.
-
SchedAero - charter sales management system.
-
TRAXXALL - aircraft maintenance tracking and parts inventory management software.
-
UvGO - a program to create and file flight plans for domestic, regional, and intercontinental routes.
-
Videcom - compliant Airline Reservation System providing Inventory Hosting, IATA Eticketing, Internet Booking Engine, GDS Distribution, Codeshare and Interline connections.
OPS TIMELINE
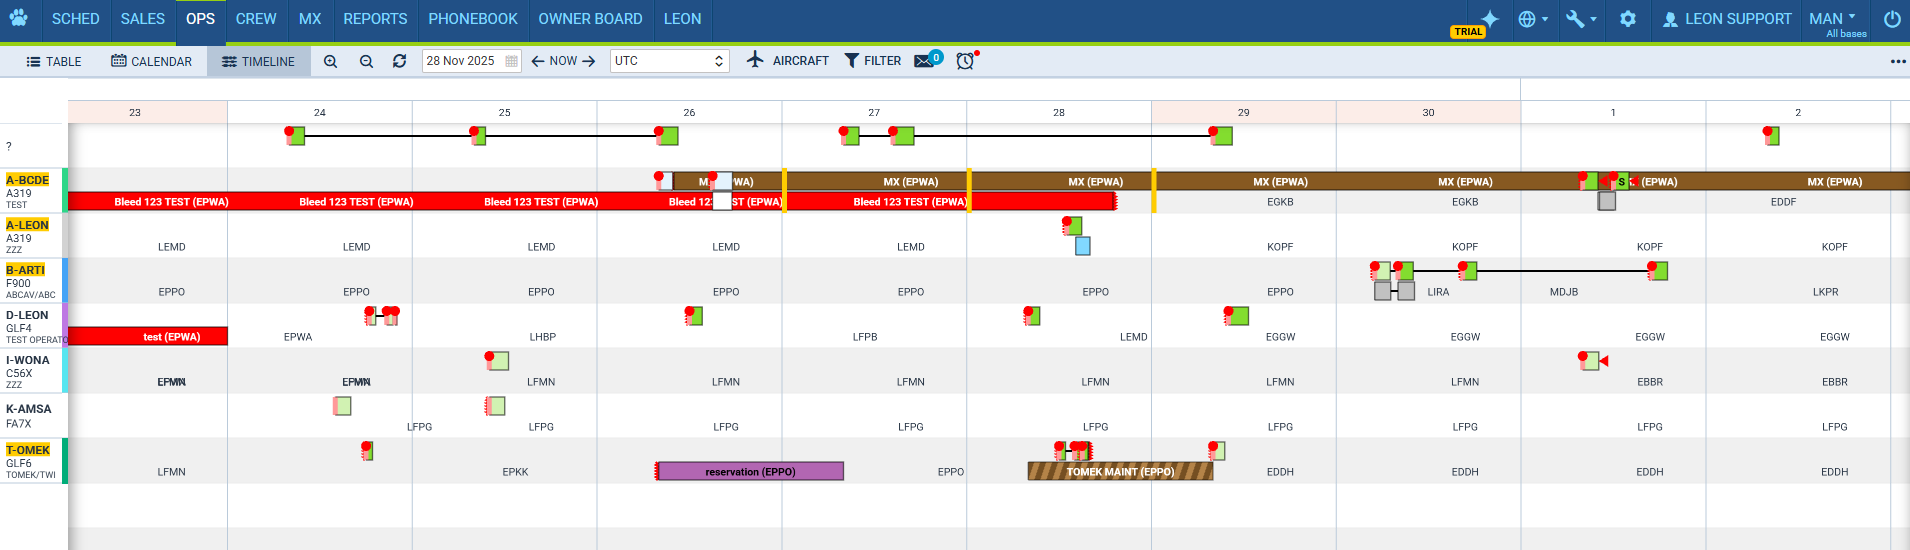
Timeline view allows OPS department to quickly answer the question “what is happening with the fleet right now?”. It is particularly useful for flight-watching. If you either add Flight Watch times to Leon manually or use MVT emails import option - in Timeline you can check your fleet movement.
There are number of time-filtering options, such as: Calendar where you can choose the date, set to current date by default, TODAY button with which you can change the date forward (right arrow) or backward (left arrow), a checkbox ‘Refresh automatically’ - if this checkbox is ticked, the green line will refresh automatically. If it is unticked, manual refresh is needed, ‘Time-range’ view - here you can choose i.e.“6h” to see 6h worth of activities on one screen.
CREW TIMELINE
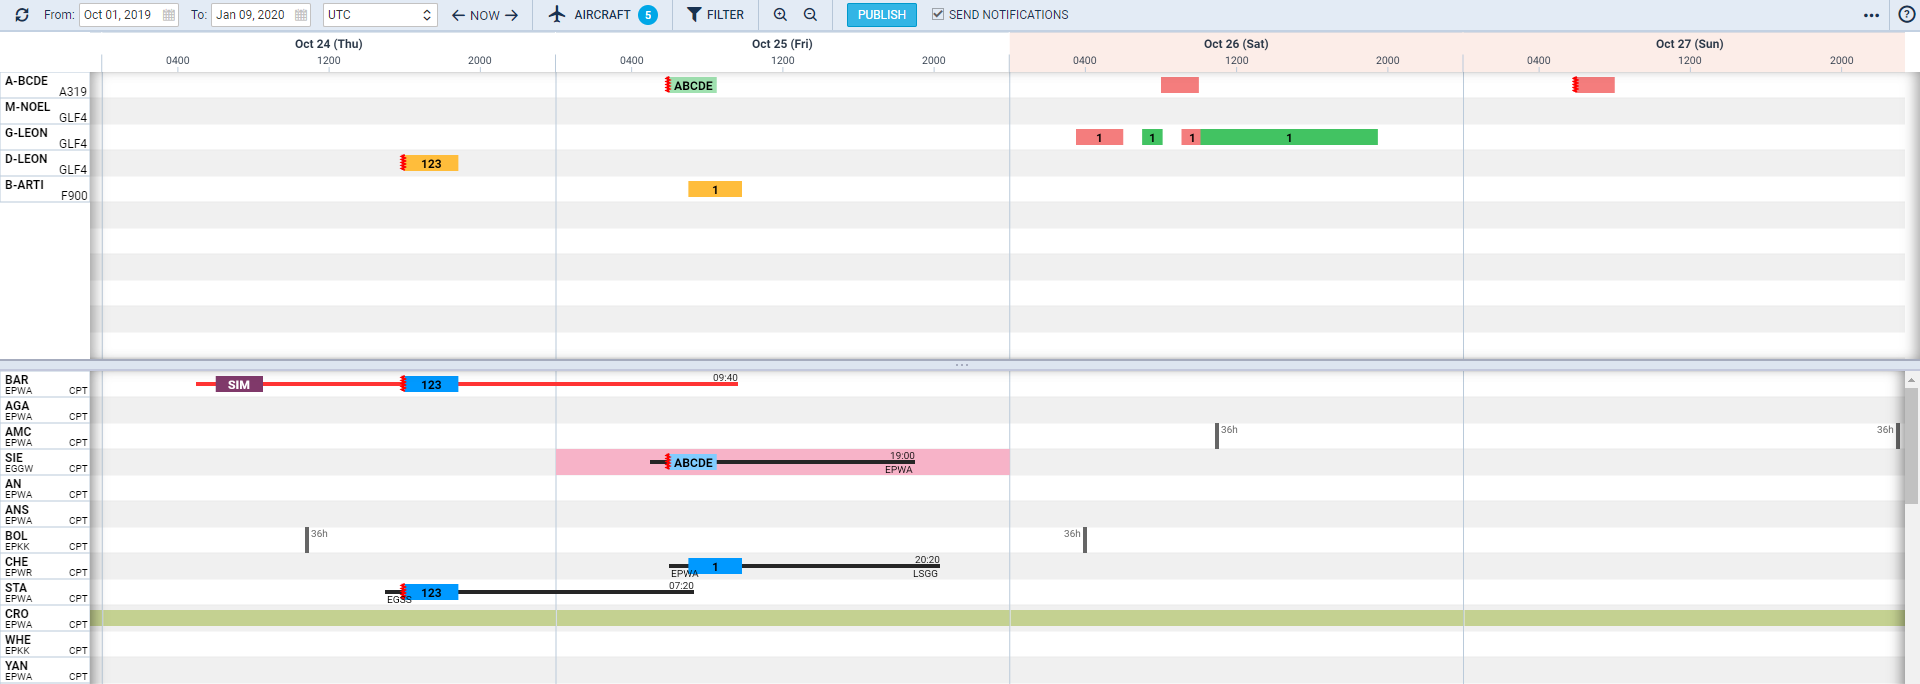
The new Crew Panel has been implemented for fast, legible and intuitive reading & editing of the roster. It displays all the data you need for the perfect planning of duties for the crew. To add a duty mark a day, right-click with the mouse and select either ADD DUTY or QUICK ADD DUTY.
It is possible to add new Crew members or edit existing Crew members directly from the “Crew Panel”. It is also possible to assign crew to flights from this panel.
Leon also will suggest FTL calculations by highlighting the crew tile with the following colours:


Leon displays block times within the crew tile, the top figure being monthly block time and the bottom figure being the yearly block time.
Double-click on a flight will display Crew assigned to this particular sector along with the phone number & email address.
The colour-code in the flights-part of the Crew Panel are as follow:


It is also possible to assign Crew to Option flights. The colour-coding is a per below:




If you wish to assign the same crew to the next sector or series of sectors, it is possible to copy the crew by left clicking on the flight from which the crew should be copied. Then select Copy Crew or use shortcut C and select the next sector/sectors to which the crew should be copied and select Paste Crew or use shortcut V.
In order to copy crew to more than one sector it is necessary to hold Shift or Ctrl key while selecting the sectors to which the crew should be copied.
If the duty is requested by a Crewmember it will be presented as a duty with the red duty label:

To accept or reject the request Crew Planner has to either add this requested duty or override the duty. Crew members can only request the duties via their mobile applications - subject to the privileges provided.
To add a new Simulator duty from the Crew Panel - once it is already performed - select date range, crew member, right-click the mouse and select ‘ADD SIMULATOR’ option.
Draft
Once you have added crew to flights, added all duties, made all changes - Leon will mark it all (duties) with pink background indicating it is not visible to the crew and it needs to be published.
To be able to publish added duties in the draft, you need to set up a drop-down ‘Crew Panel’ to Manual Publish, in General Settings section of Leon. Setting it up to Auto publish will make all added duties will be published to crew automatically.

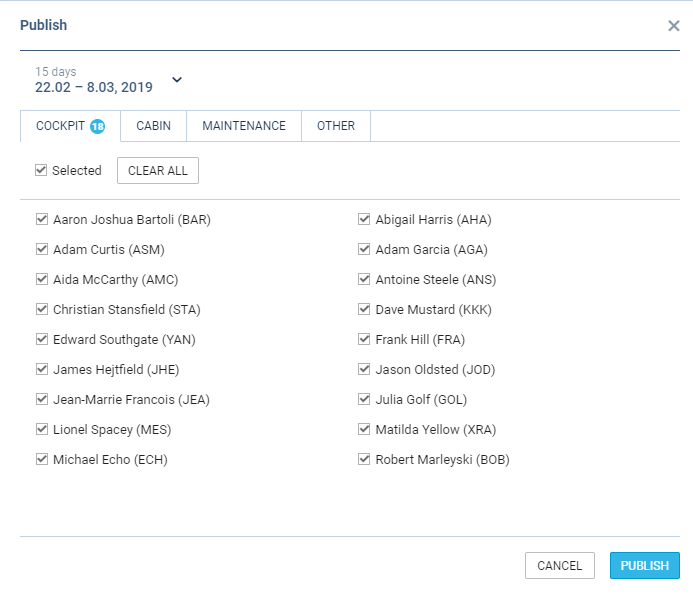
When you are ready to publish changes, click 
After clicking ‘Publish’ you will see the progress bar and after a few seconds publication will be completed.
CREW CALENDAR
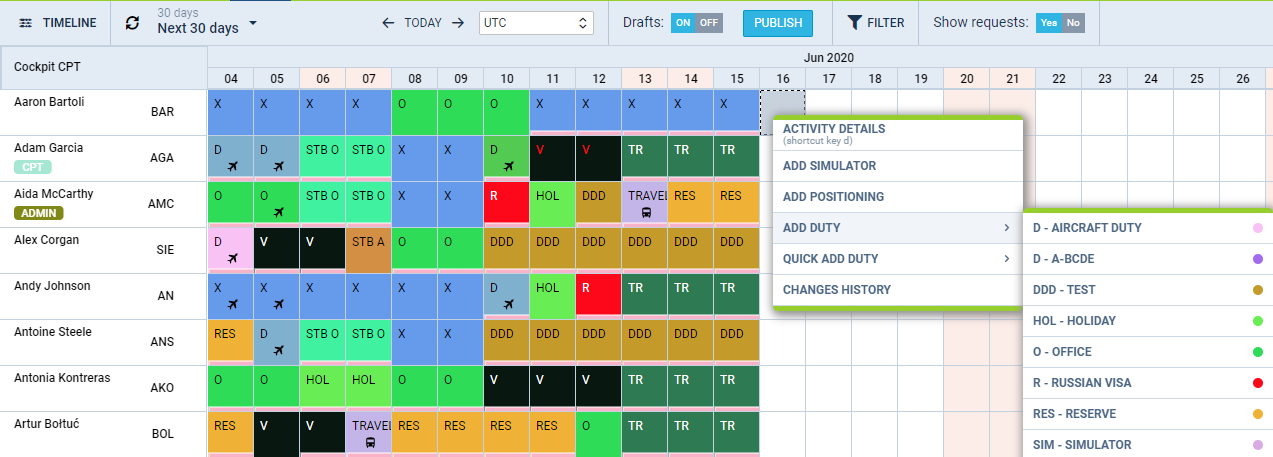
In this calendar-like section of CREW you can schedule crew duties for a selected period of time, for most part, exactly like in the old Crew Duties page; however, the interface has been changed to correspond more with Crew Panel Timeline page. Right clicking on a given day opens up a pop up window with a menu allowing to select an action to do. It is possible to see Activity Details - information on duties performed on a particular day, you can Add Simulator, Positioning or Duty. You can also see Changes History or Delete duty. Unlike in the old Crew Duties panel, here you can add a duty crossing midnight.
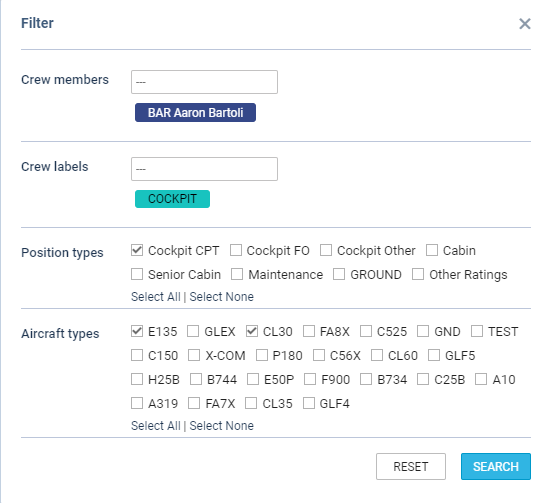
The FILTER is located in the top bar section of the interface, similarly to Crew Panel Timeline view. It allows to filter out crew by crew names, labels, position types and aircraft types. You can select more than one crew member or label.
From the same top bar it is possible to switch between the Crew Calendar and Crew Timeline view, select the time-frame, timezone (old Crew Duties were only available in UTC), switch on or off the draft mode as well as crew requests. Crew Requests, just like in the old Crew Duties and Crew Panel page, appear with the red duty letter code 
If the Drafts toggle is switched to ON the unpublished draft is indicated by a pink line at the bottom of the duty squares.
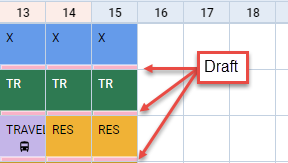
Once the draft of the roster is ready, you can publish it by clicking the 
Certificates
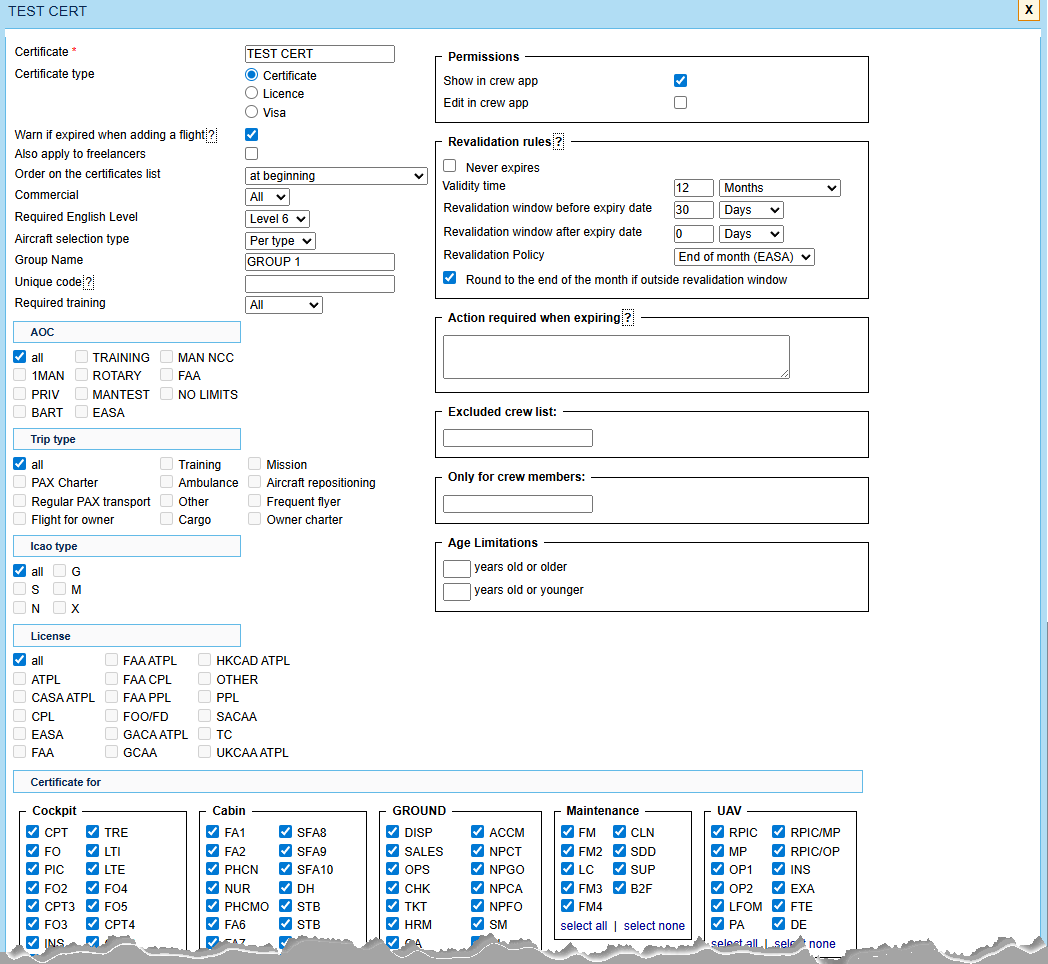
Tracking crew Certificates in Leon is a very helpful function. You can store scanned documents: licences, medicals, visas, etc. You can also specify which documents are required to be valid for dispatch (if invalid, Leon will show a warning when saving a new flight). You can designate a person/persons responsible for managing certificates - they will be notified about upcoming certificates expiration. Your crew can be notified about it as well.
First step is defining an Crtificates List (section Settings > Crew Certificates ), where you add name, type, decide what aircraft type it should apply to , what crew positions it applies and validity date. A tab Mailing Rules allows sending automatic email notifications about certificates expiry date to selected people (Managers or OPS) as well as to certificates owner (a particular crew member) according to defined time intervals.
Maintenance
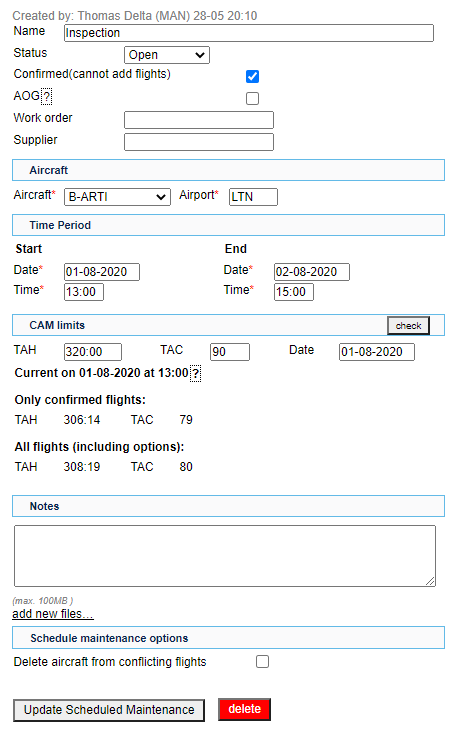
Section MX > Scheduled Maintenance can help you schedule aircraft maintenance, which will be visible to OPS department in Calendar screen. It is also possible to set CAM limits so that Sales department can view available number of flight hours before scheduled maintenance.
If you want to add a new maintenance, click on the icon ‘Add new scheduled maintenance’ to get a new window which needs to be filled in with mandatory details: aircraft type, registration number, airport (where the maintenance will take place), start date & time, end date & time.
Added scheduled maintenance dates are visible in the ‘Calendar’ screen (not visible in ‘Flights List’) as brown squares. If maintenance is not confirmed (option) squares are stripy-brown. Maintenance defined as AOG appears in red colour.
You can also add HIL (Hold Items List) to Leon - this topic is described in more details HERE.
WIZARD Report
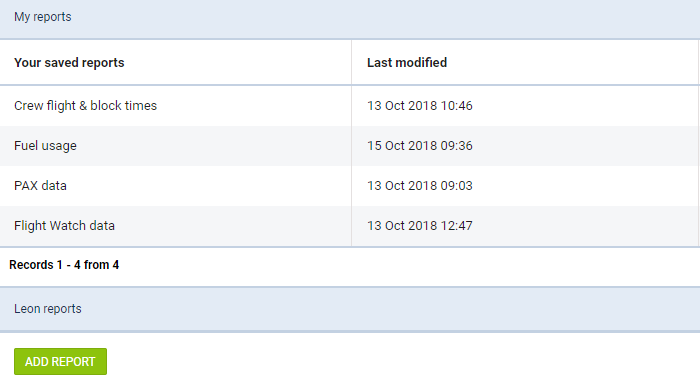
The main aim of creating report Wizard, was to allow quick & easy creating & storing various type of reports in one page (crew flight times, aircraft block hours, fuel usage, PAX data, etc….).
Each created and saved report can be edited and re-arranged in many ways. Leon users can decide what columns should get displayed in the report and in what order, they can choose period of time for each report and name each report the way they want.
Each Leon user who has the access to the Wizard Report is now able to create and save a report to which no other user will have access.
Selection of different Scopes when creating a new report allows generating reports showing all kinds of data: Flights, Positionings, Flights Aggregated Statistics, Trips, FTLs, Invoices or Quotes.
It is possible to generate a long-period reports in Wizard, for more than 90 days. When generating a new report or editing already saved report in Wizard for a period of more than 90 days, Leon will show Time range too long warning, however, you will still be able to generate the report.
In the top-right corner of the report screen, under the sharing icon: 

The functionality is mainly aimed at Customers who wish to export data from Leon to various BI systems including Google Data Studio and Qlik.
Other reports
In Leon there are tens of reports which can be obtained in a section Reports. The section is divided into a few sub-sections. The most useful reports are:
-
Crew Block Time - crew block time is displayed for cockpit crew (cabin crew can be included if marked in the filter) and it appears per aircraft and per functions.
-
Roster Robustness - allows to monitor a number of rostered duty changes which can be a contributory factor to crew fatigue. This report has been added following the EU OPS requirements introduced in February 2016.
-
FTL Sheet - this report generates information about all duties done by crew: flights, repositionings, office or standby duties, as well as days off assigned in the section Crew > Duties. Any FTL violations are displayed in red. Values such as ’Rest before duty - Min’ & ‘FDP - Max’ are explained when you hover the mouse over the value.
-
FTL Violations - shows all FDP, duty or rest violations along with cumulative times violations in a selected period of time in the filter. All violations displayed in this report are also highlighted in red in the Flights List section (crew codes are in red).
-
Aircraft Flights - select a period of time for which you want to see all flights performed by entire fleet. It is also possible to view Flight Order document for each leg. The report also shows used fuel data (taken from journey logs) along with number of kilograms/pounds (fuel unit selected in the filter) per flight hour and block hour.
-
Airport Categories - this report shows all airports available in Leon (imported from ACUKWIK software). In the filter, you can switch from ‘Airport’ to ‘Custom airfield’ to search for airfieds or helipads (usually added to Leon manually upon request).
-
Export to FAA CARI 7 - FAA CARI-7 is a computer program that allows you to precisely calculate the cosmic radiation dose.