Table of Contents
Users

In Leon, you can manage Users in many ways. If you are an admin group member you can decide about user's group, endorsements or ratings. However, everything starts with adding a new user to the system.
Go to a section Settings > Users and there is the list of all Users. The list can be filtered by: All (both active & deleted users are displayed), Active (users with access to Leon only) or Deleted (users with no access to Leon).
You can also use order indicators placed next to: Name, Surname, Code, Login, Email, Status or Last Visit Date to change the order of displaying users.
A field 'Search' allows quick finding of a particular user by either his name, surname or a code.
The User list can be exported to excel by clicking on the  icon. The excel file contains the basic information available in user quick edit pop-up as well as the user status.
Adding Users

To add a user simply click on ![]() icon and the new pop-up window will open, which is divided into 6 tabs:
icon and the new pop-up window will open, which is divided into 6 tabs:
- General
- Documents
- Ratings
- Other
- Experience
- Admin
GENERAL

General tab contains the general user details.
In the 'PERSON' section you can fill in mandatory fields such as Name, Surname, Code, Sex & Login.
Optional fields are Middle name, DoB, Phone, Email, Labels, Company, Homebase, User Base start and end dates of employment. 'Email' is especially useful because all the notifications are sent to this email.
Additionally, there is an option to assign default Salutation which will be applied to Sales Documents and Email templates (salutation item in the available data), where @F will apply the First name and @L will apply the Last name
DOCUMENTS

The DOCUMENTS tab is divided into 4 subsections:
- PASSPORTS
- VISAS
- NATIONAL ID'S
- VACCINATIONS
PASSPORTS
Here, you can preview the list of Passports, as well as add a new passport.
Click ![]() to add one or more passports. You can add a pdf scan and mark which one should be used as a default one.
to add one or more passports. You can add a pdf scan and mark which one should be used as a default one.
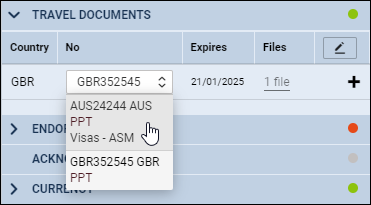
The other section where you can add a passport to a crew member is OPS, tab CREW (in the right-hand filter). Click on the crew code and open a section TRAVEL DOCUMENTS, then click an icon ![]() and add passport/passports details. You can mark a default passport which should be used automatically, however, you can always select a passport by marking the appropriate checkbox in a section 'TRAVEL DOCUMENTS'.
and add passport/passports details. You can mark a default passport which should be used automatically, however, you can always select a passport by marking the appropriate checkbox in a section 'TRAVEL DOCUMENTS'.
VISAS
Here you can add Visas' details and assign them to a specific passport.
First step is editing CREW profile and clicking a button 
Second step is adding details, as displayed on the screenshot:
- Passport - select a passport to which a new visa should be added
- Country - select a country which concerns the visa
- No. - insert visa's number
- Country of issue - country where visa was issued
- Number of entries
- Max number of entries
- Date of issue - insert visa's date of issue
- Expiry date - add visa's expiry date
- Visa scan - option to upload files
- Notes - possibility to insert additional notes

NATIONAL ID
Here you can insert National ID details
First step is editing CREW profile and clicking a button 
Second step is adding details, as displayed on the screenshot:
- Country - select a country that issued an ID
- Type - select National ID type from the dropdown selection that includes 'ID card', 'Military card', 'Residence card', etc
- No. - insert National ID number
- Date of Issue
- Expiry date
- ID scan - click on the 'UPLOAD FILES' button in order to upload the scan of the document

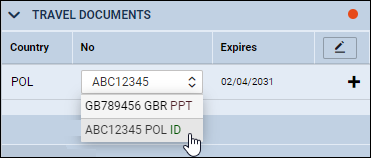
Once the 'National ID' is added it can be selected on a flight in the 'CREW' tab > 'TRAVEL DOCUMENT' section.
VACCINATIONS
Here, you can record the details of the vaccinations including, selecting the disease from the dropdown list, dates of applied doses, uploading the certificate scans and inserting the notes.

In order to add new vaccination details simply click on the  button and record the details of the new vaccination in the additional line.
Once the vaccination details are added, they can also be previewed in the OPS > CREW tab section. Clicking on the ![]() icon will display the uploaded certificate:
icon will display the uploaded certificate:

Clicking on the file will open the uploaded file in a new tab in the browser.
RATINGS
This is a tab where you can assign ratings to a new crew member. Check Ratings & Aircraft Crew Positions chapters for more information.
OTHER

This is a tab that contains the following options:
- 'Do Not Fly With' - this option allows selecting crew members with whom the edited crew member should not fly with (for whatever reasons). Click on the field and select person/persons from the list
- Freelancer - checkbox that indicates if a User is a freelance crew
- US eAPIS Master Crew List - indicates a pilot flying to the US. The following fields are included in API: Name, Surname, Gender, Ratings, Date of Birth, Place of Birth, Nationality, Passport details including Visas, 'Licence' - type endorsements
- Line training in progress - the checkbox marks the user as the crew member during line training. Crew with line training in progress can be excluded from the crew completeness calculations, according to the settings in Crew Planning tab in General Settings
- Planner note - the note added here will show up in the crew member's tooltip in Crew Timeline and Crew Calendar
- Duty Accounts - in this field you can assign duty account to a crew member. It is used for Duty Trading functionality
- Duty Manager - the person set in this field will be the only one able to accept or reject user's duty requests. If no one is set here, duty requests sent by the user can be accepted or rejected by any user with crew panel “edit” privileges
- Temporary assignment - section that allows defining Freelancers' contracts. More information on this feature in the CREW CALENDAR section, 'Freelancers contracts' subsection
EXPERIENCE

Experience is a tab where you can insert the experience before joining the company or record the flights performed outside the company (instead of recording it on the X-COM aircraft).
To add a new experience simply click on the  button. This will add a new line to the list where the details of past experience/flight performed outside of the company can be added.
Extra columns with the approaches types can be added to the table by selecting the relevant ones from the dropdown list:

The data will be included in the cumulative duty.
Dual flights column indicates the number of training flights with the Instructor.
PICUS flights column indicates the number of flights as a commander under the supervision of a qualified pilot.
ADMIN
This tab contains Admin settings. Includes 'Never log out' option. IMPORTANT!!! Activating this functionality will keep this user logged in during the long period of no activity in Leon. Make sure that the user is logged in ONLY on the trusted device with no access from the 3rd parties. It should not be used for the regular user as it may affect system security. It is recommended to enable that function only to users with read-only privileges.
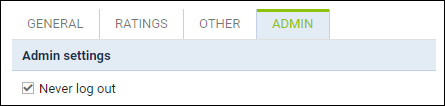
This option is NOT available for the Users with Admin rights due to higher security exposure.
Anonimization of Users

This functionality is created as part of the process of adhering to the Regulation (EU) 2016/679 of the European Parliament and of the Council of 27 April 2016 (General Data Protection Regulation).
It is now possible to permanently anonimize and delete Users from Leon.
The process is as follow:
- Go to Settings > Users.
- Edit an User you wish to permanently delete.
- Mark an User as Deleted by unticking both checkboxes in 'Account restrictions' section of the profile: 'Can log into Leon' and 'Active' and click 'Update' button.
- Edit the same User again. Click on
 which is located at the bottom of Edit User page'
 - You should get a pop-up window with the following message: 'Do you want to permanently delete & anonymize data for this contact? This action is irreversible!'. Clicking 'OK' will permanently delete the User data.
Once the User has been deleted the following areas will be affected:
- User Profile will be permanently deleted from both Settings > Users and the Phonebook.
- If User was assigned to any operation (Flight, Positioning, Office), instead of User Code, there will be a letter -D- and in the Tab CREW you will see Permanently Deleted instead of a Name.
- Deleted User will show as -D- in the reports that show Flights with this Crew Assigned, for example Custom Flights List Report.
To check who permanently deleted user you can use a button CHECK PERMANENTLY DELETED USERS in top-right corner - insert deleted user's code and click 
IMPORTANT!
Full User Profile

In the bottom-right corner of the user's profile there is a link Open Full Edit which allows to add more details into the user's profile, i.e.: Place of Birth, Hire date, User base or add a photo. You can also click an icon ![]() in the users list to open this section.
in the users list to open this section.
USER SIGNATURE
User signatures can be automatically added to the documents (in Documents Manager) and emails (Email Templates).
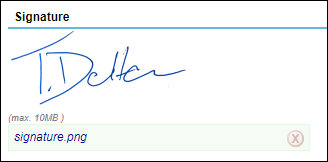
The first step is to upload a scan/photo of the signature to the User profile - Full User Edit > 'Basic Information' tab > 'Signature' subsection.
The signature scan/photo needs to be uploaded in .png format and named signature, i.e. signature.png


Once the signature is uploaded to the profile, it can be applied to the templates:
EMAIL TEMPLATES
The template needs to be switched to HTML version.
The following tag needs to be inserted in the place where the signature of a user is to appear:
{% signature %}
DOCUMENTS MANAGER
Either of the below tags can be used in the place where the signature of a user is to appear:
- <signature />
- {% signature %}
Both examples are presented in the screens on the right-hand side.
Two-Factor Authentication
An additional factor authentication is an option available to each user, which enables functionality that requires a combination of two separate factors of identification in order to log into the system. Besides regular login credentials (operator code, login and password) the user has to obtain 6-digit authentication code to log into Leon. This functionality is a measure of additional security of the user account.
Enabling the two-factor authentication mechanism:
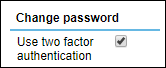
- Mark the checkbox Two-factor authentication in the user's profile and confirm by updating the page.
- Check your work email INBOX for the new email from Leon. The email will include the change of password as well as the link that will allow you to pair the mobile device with Leon via Google Authenticator app.
- Download a mobile app Google Authenticator (available for iOS and Android) or similar and create an account.
- Pair your app with Leon by using the QR code generated via “Pair your mobile device with Leon!” link received in an email.
- Log into Leon as usual - when the pop-up window requiring authentication code comes up, use the code generated by the app.

Please make sure the clock on the mobile device is setup correctly and is synced with the internet time server. Any difference in the internet time and device time will result in authentication failure.
It is possible to mark two-factor authentication for all the users at once. To do that, you need to go to the ' Settings' > 'General Settings' section and mark Force two factor authentication for all users checkbox. The checkbox is unticked by default.

Personal endorsements

This section consists of 3 tabs:
- Endorsements - the list of endorsements specified in Endorsements. Editing of endorsements details (names of endorsements, numbers, dates of issue and expiry date) and adding/removing of the scanned documents is also available after clicking on the selected row (see also Endorsements for more information).
- Online training and Practical Training - if a pilot is planned for a flight to a particular airport where special trainig is required, you can add training documents to Leon by clicking on tab 'Practical Training' or 'Online training' in user's 'Personal endorsements' page. Enter airport's code, update it, and add appropriate details. You can also upload a PDF file. More information here
Ratings
This tab is to choose what ratings are held by a specific person and to assign ratings to your crew. For more information please go to Ratings section of this Manual.
Managing users
To manage User profile, simply click on his/hers name. First thing you will notice is few extra Tabs:
- Personal endorsements - the list of endorsements specified in Endorsements section.
- User settings - defining preferred settings of system appearance.
- Login history - details about user's login attempts
You will also notice that there are fiew extra fields in Basic information screen.
Basics
You can edit each of the existing users in order to:
- Add/remove information - updating personal details, contact details, passport details, endorsements, generating new passwords, etc
- Can log into Leon/Active - Account restriction section. At any time you can delete user's account permanently (if a person is not your employee anymore) or block it temporarily. Unticked “Active” checkbox restrickts a user from logging in but one will not be permanently deleted from Leon's database, to avoid historical data disappearing from the system. Users with “Can log into Leon” status will not be able to log in, however, he will be still present in the system (crew planning or reports).
- Active - Phonebook data section. This checkbox will allow you to delete User from the PHONEBOOK. “Can log into Leon/Active” and “Active” are connected in a way that whenever you want to delete a person from the Phonebook, Leon will ask you (pop-up) if this person's access to the system should be disabled and vice versa.
- OML - Operational Multi-pilot Limitation available in Options section - functionality is further down in this section.
- Flying experience table - this is to record Pilots previous experience on a specific type of an aircraft. This can be activated from General Settings section.
- Freelancer - if this checkbox is marked, Leon does not trace any endorsements for the user (no warnings will appear in OPS panel, when assigning freelancer crew to new flights).
- Manual list - documents uploaded in Privileges - Manual tab will be displayed in this section
- Change password - you can change your password at any time, or if you have forgotten it, your admin can send it to you. To change a password tick the box 'Generate new password' and click 'Update'. After a while you will receive an email with a new password.
OML
An Operational Multi-pilot Limitation allows marking a pilot who does not fully meet the requirements for a Class 1 medical certificate and has been referred to the licensing authority. The Pilot is assessed whether the medical certificate may be issued with an OML ‘valid only as or with qualified co-pilot’. The OML for Class 1 medical certificates may only be imposed and removed by the licensing authority.
When you tick this checkbox, Leon will allow this Pilot to operate an aircraft in multi-pilot operations only, if the following conditions are met:
- Pilot is not flying with another Pilot with OML imposed
- Pilot is not paired with a pilot who has attained age of 60 years
- Pilot is not flying in a single-pilot operations
If one of the conditions is not met, Leon will display a warning:
Crew member (HOT) Mark Hotel on leg no. 1 has OML but does not have a co-pilot fulfilling all the necessary conditions:
- Crew member (PAP) William Papa has attained age limit of 60, or
- Crew member (GOL) Julia Golf has OML as well
User settings

Here each user can define preferred settings of system appearance.
What you can define here is: displayed date format, airport codes (IATA or ICAO - the system will still recognise both formats when other than default is entered), displaying of status of leg info on tool-tip, using Local Time as default time instead of UTC and automatically changing “To” date on the flights list when 'From' date is changed.
In other words, if you shift the starting date of selected time period, ending date will be also shifted to maintain the length of this time period.