Table of Contents
CREW TIMELINE
The CREW TIMELINE panel has been implemented for fast, legible and intuitive reading & editing of the roster. It displays all the data you need for the perfect planning of duties for the crew.
To access a new duties roster hover the mouse over a section CREW and click CREW TIMELINE.

Legend
The Legend, which explains what particular icons or indications mean, can be found by clicking the icon ![]()
- Flights
Flights added in a section OPS appear in Crew Timeline as a blue belt. The line starts with the reporting time, then there is a belt (which lenght means flight's duration), then the line showing the lenght of the minimum rest.
If you click the blue belt at the bottom belt Leon will show flight's details, such as: schedule, airports codes & names, trip no, crew, quotation, who created the trip and when, tags.

If there is FTL violation Leon shows the line in red - click on the flight to get an information at the bottom with FDP & Duty details.

- Simulators
When the Crew is assigned to the Simulator flight in section OPS, this 'Simulator' will appear in 'Crew' part of the 'Crew Timeline'.
The Simulator will display as a purple belt and will indicate the length of the duty as well as the line suggesting the EOBT.

Clicking on the purple belt will display the simulator details in the bottom section.
- Positionings
All positionings added in a section OPS show in a similar way to flights. The belt shows the positioning's duration, then the line shows the lenght of the minimum rest.

- FTL Duties
Duties pre-defined in a section Duties Setup as Included in FTL calculations show as colour belts, which lenght means the duration of a particular duty time.
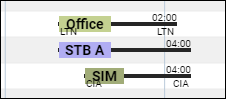
- Non-FTL Duties
All duties pre-defined as Off show as belts throughout the entire day.

- SPLIT DUTY
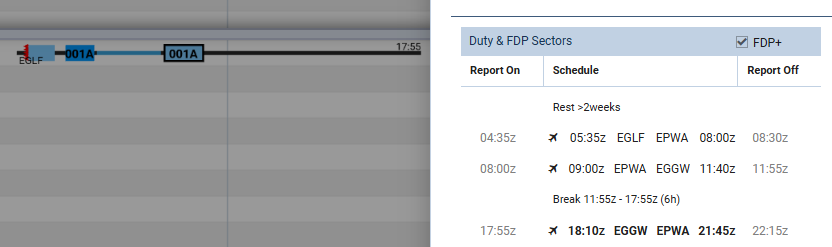
If split duty is used to extend the maximum Flight Duty Period (FDP), Leon will indicate such break with a blue rest bar between the two sectors of the trip.
As you can see in the example below, the break between the two sectors are marked blue to indicate where it was applied. The split duty margins will remain black/red along with the remaining part of the rest bar after the last sector.
- WEEKLY REST
'Weekly Rest' for this purpose is considered as 36h free of duties including two local nights in 168h period. 'Weekly Rest' is marked with 2 vertical lines and the numbers '36' in between.

The period indicated by the lines covers:
- the right section of the cell - part of the day when the weekly rest begins
- full cell - full day included in weekly rest
- the left section of the cell - part of the day when the weekly rest ends
Caution: The weekly rest has a slightly different role in Leon Mobile app than in Crew Timeline. In Crew Timeline it appears at the latest time when it should be applied, while on the Crew mobile application it applies always when conditions are met. That's why indicated weekly rest may not match in both applications.
Filter


The filter in the 'Crew Timeline' section is located in the top bar and it is divided into 3 sections:
 - you can filter duties by using 2 available options:
- Crew members - insert crew code and click the 'Search' button - Leon will show only that person's duties. It is also possible to filter by multiple crew members. Simply choose the crew from the Crew Member search box and once you have the list of crew click 'SEARCH' button.
- Crew labels - click on the field and Leon will show all crew labels defined in a section Phonebook > Labels (then assigned in crew profiles).
- Crew homebase - filters by 'User base' in the User profile
- Crew homebase airport - filters by the 'Home Base' in User profile
 - you can filter the page by the aircraft type or a tail registration. This includes 'Virtual Aircraft'
 - located in the top-right corner of the 'Crew Timeline' and devided into the folloting sections:
- Show - to display scheduled Maintenance and Options in the 'Flights' section and also Requests in 'Crew' section
- Position type - mark/unmark checkboxes: Cockpit, Cabin, Maintenance, Ground & Positioning.
- Crew Completeness - possibility to check the completeness based on the crew group
- Show active aircraft only - switching to 'YES' will display only active aircraft in the 'Flights' section
- Layout - to display 'Crew' section only, or on both: 'Flights & Crew'
- Dim ferry legs - making ferry legs dimmed
- Preferred airport code - selecting between ICAO/IATA airport codes
- Sort by - display the list of crew in order: Rating (CPT, FO, FA), Known as or Code (alphabetically)
- Show currency dots - enable crew currency dot displayed next to crew code
- Revision:Plan/Actual - option to display the flight blocks either with planned timeframes (option 'Plan') or with the timeframes that take FW/JL times into consideration (Actual). 'Actual' option doesn't affect the timeframes in the bottom status bar, Activity details, etc. This option is there to preview completed flights as well as any flight delays
On the options-bar, right between 'TO' date-range and 'NOW' button, you can find a drop-down box where you can select preferred timezone (UTC or Base time - the Base defined in General Settings).
Adding/Editing Crew

It is possible to add new Crewmembers or edit existing Crewmembers directly from the “Crew Timeline”.
In order to do that you simply need to:
- Right-click of the mouse on the Crew code
- Choose the relevant option from the dropdown menu
- Adding/editing window will pop up and you will be able to perform the actions
- Press “SAVE” button to update changes
Replacing crew
To replace crew, mark a flight (or flights) and right-click with the mouse, then select 'REPLACE CREW' option.
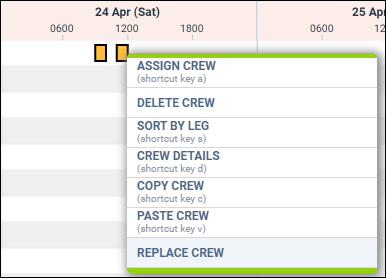
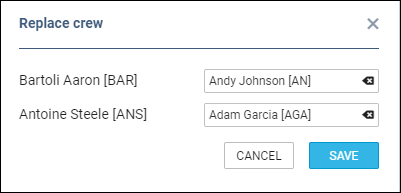
Leon will show a pop-up screen with names & codes of assigned crew - click on a field next to it (showing 'No change') and a drop-down list of available crew will show. Leon shows only crew with ratings for the aircraft assigned to the selected flight.
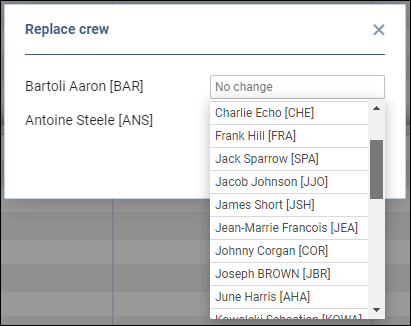
Select crew and click 'SAVE' - a confirmation of replacing crew will show in top-right corner of the page.

Useful options

'Move up' function
This functionality allows you to move a selected Crew member to the top of the Crew List. To use this function you need to click on the crew member and select 'MOVE UP' option, as per screenshot. It is possible to move up a number of crew members, one at a time. The Crew members will then display by the selection order in which they were moved.
Crew search
In the filter > field 'Crew member' type crew name/surname or code and select him from the list. You can add more name to the searching list. You can also use quick search option by clicking on a key 'F' on your keyboard, type in the Crew member in the 'Crew member search' pop-up window and press enter. Leon will only display this particular Crew member.

To bring back view for all the crew you need to either remove the Crew from the 'Crewm Member search' in the filter or simply 'Reset' the filter.
Virtual Aircraft

It is now possible to see and service 'Virtual Aircraft' in the Crew Timeline.
'Virtual Aircraft' will be displayed at the bottom of the list in the 'Flights' section of Crew Timeline. It will also be available in the 'AIRCRAFT' filter.
Crewing options available to the 'Virtual Aircraft' are exactly the same as for standard fleet and include assigning crew, deleting crew, copying crew, etc.
Flights assigned to 'Virtual Aircraft' are displayed in light grey (for ferry flights) and in dark grey (for flights with PAX). This is caused by the lack of indication of minimum crew required on such an aircraft.
Duty info
It is possible to view duty information in 2 ways:
- One click on the duty - this will display the duty information at the bottom of the Crew Timeline page.
- Right-click - this will open a pop-up window with the full duty information including the duty type and who created the duty and when (date & time).
Using keys
For quick using of some options in Crew Timeline you can use particular keys on the keyboard. Select the flight and use keys as follow:
- A - shows crew available for flight assignement.
- S - shows already assigned crew on top of the crew list.
- D - shows assigned crew details (position, code, name/surname, phone number & email address) along with the basic trip information.
- F - shows 'Crew member search' pop-up window where you can type crew name or a code and view only his/her duties.
FTL Details

To check FTL Details on a particular flight either double-click on the flight (in the Crew part of the screen), or right-click with the mouse and select FTL Details - Leon will show a pop-up window which is divided into 2 parts:
- Duty & FDP Sectors - showing reporting on, STD, ADEP, ADES, STA and reporting off plus rest before & after duty. For the flights with FDP extension, possibility to turn off/on the extension by clicking on the 'FDP+' checkbox
- FTL Calculation Summary - showing the same FTL details which you can find in a section OPS, tab CREW > FTL Calculations. Hover the mouse over Rest, FDP or Duty values to find explanations why these values have applied.
Click on 'View FTL Sheet' to get FTL Sheet report.
Crew Currency

Leon shows the dot next to crew code, which can be defined in a section Settings > Crew Currency and can be activated in the filter under the three-dot icon in the top right corner of the page.

The colour of the dot shows the current state of the crew currency by displaying the dot either in green, amber or red colour. If you hover the mouse over the dot a tooltip will appear with detailed information about the status of crew currency (see screenshot on the right).
Crew Fatigue
LEON is able to monitor Crew fatigue in the Crew Timeline panel, with the help of Safte-Fast integration. Before, it was possible to check crew fatigue analysis for a single crew (by right-clicking with the mouse over his/her code) - now it is also possible to check it for all crew, in a selected period of time.
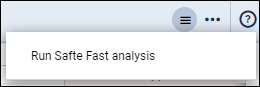
Once the integration with 'Safte-Fast' is enabled, in the top-right corner of the page an icon ![]() will show - click it, then click 'Run Safte-Fast analysis' link.
will show - click it, then click 'Run Safte-Fast analysis' link.
To show the level of Crew fatigue, Leon will highlight lines in either orange or red colour.
The orange colour of the line indicates:

Effectiveness ≤ 77
Reservoir ≤ 75
Percent below criterion › 10
The red colour of the line indicates:

Effectiveness ≤ 65
Reservoir ≤ 65
Percent below criterion › 20
Adding Positioning
To add positioning in the Crew Timeline - either before the planned sector or as a stand-alone positioning - you need to follow the below steps:

- Right-click on a flight in the Crew part of Crew Timeline to open the 'New Positioning' window. The window is divided into two tabs: BASIC and MISC.
- In the 'New Positioning' window, Leon will suggest the date of positioning, the departure of positioning (this is ADES from the sector you clicked on), and the Crew from the sector you clicked on. The Crewmember to which the positioning is added will be framed -
 . It is possible to change the default date, the departure airport of positioning as well as add extra crew by choosing them from the dropdown list. It is also possible to indicate if the positioning should be included in the FTL calculations by selecting either a specific AOC or setting the AOC to 'None'. It is also possible to numerous crew members as well as assign the ticket number and the PNT number
 - Click the 'ADD' button to save positioning. Once the positioning is saved it will display in the Crew part of Crew Timeline as
 (or will display as
  if added as an option). You can also select 'SAVE AND ADD NEW' option if more than one positioning needs to be added. Positioning will also display in the TABLE section of the OPS view.

Tab MISC contains additional options:
- Driver - option to indicate a driver. It also affects FDP calculations for the operators who include the positioning in FDP and the following rule is applicable within the OM7: A maximum driving period of 2 hours 30 minutes shall be allowed within an FDP and will constitute a sector when calculating the maximum FDP for any crewmember driving.
- Note - additional note for positioning crew
- Tags - option to insert tags
- Trip - allows connecting the positioning to a specific trip by inserting the Trip Number of an existing trip in the Trip field and selecting the one to be connected from the list in the dropdown
- To rebook - indication that the positioning is to be rebooked. Once the ‘To rebook’ checkbox is selected and saved, this Positioning will be excluded from the FTL calculations. Available only upon editing of an existing positioning
- Attachments - option to upload extra files
Hovering the mouse over the '?' icon located by the STD/STA inputs will display a tooltip with time values in UTC/LT/BT.
Once the positioning is added it is also possible to add further positionings, edit existing positioning and deleted the positioning. You simply need to click on the existing positioning and choose the relevant option.
It is also possible to check Changes history by going to Edit Positioning and clicking on the clock icon in the upper right corner of the window.
Adding Simulators

To add a new Simulator duty from the Crew Timeline - once it is already performed - select date range, crew member, right-click the mouse and select 'ADD SIMULATOR' option.

Once a pop-up window shows, you can initially fill it in with the following details: Aircraft type, Date, ADEP, ADES, BLOFF, BLON, Crew (CPT and FO), and optionally the Notes.
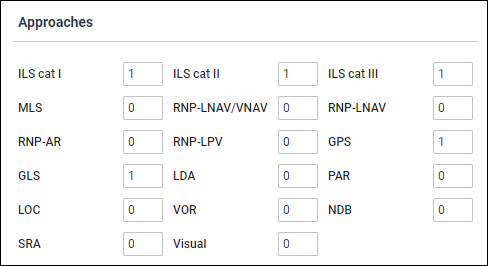
Additionally, when adding a SIM session to Leon - whether from 'OPS' section or 'CREW TIMELINE'/'CREW CALENDAR' - it is possible to select multiple Approaches:
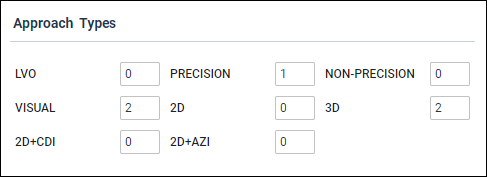
as well as multiple Approach types:
After the SIM is performed, you can fill in the rest of the details that applied during the SIM session.
Added SIM duty will appear with the black line of minimum rest required after the duty. It will also appear in the OPS panel with the already filled in Journey Log.

Added SIM duty can always be edited and its details can be changed. It is also possible to delete a particular crew from SIM and/or delete the SIM duty completely.
Once the simulator is added, the details as well as the tags and the notes will appear in the bottom bar.

Line Training

Option to record flights as line training and line check is also available in the Crew Timeline section.
If you select a particular flight, or several flights, with the right click of the mouse, from the drop-down context menu you can select the Add Training option.
Once selected a Create flight training pop-up window will open up. In the window under Type, from the drop-down menu, it is possible to mark the flight as training by selecting either Line Check or Line Training. In the same pop-up window, it is also possible to add Planner or Pilot notes. At this moment the notes show only in the bottom bar, showing them in Raport Wizard will get developed in later stages.
Line Training will mark the flight with a yellow symbol in the top left corner of the selected sector or series of sectors 
Line Check option will mark the flight with a purple symbol in the same place 
If the notes are added, both the Planner notes as well as the Pilot notes will appear at the bottom panel when clicking on the Line training/Check tile:

Once the training is added, an option to Edit Training is possible when right-clicking on the flight.
More information on including/excluding the crew on the Line Training from the total crew composition on the flight can be found here.
Hotel Bookings

A new feature to add hotel reservations for crew members has been implemented.
Under the 3-dot icon, it is now possible to switch an option to show Required hotel. Once this option is marked, Leon will show ![]() icon at the end of each day for which the hotel is booked, except the check-out day,
if a crew member ends his flight duty outside of his home base. The red H letter indicates that the hotel has not been reserved.
Once you click on the icon a Hotel booking pop-up window will open.
In the pop-up window it is possible to select:
icon at the end of each day for which the hotel is booked, except the check-out day,
if a crew member ends his flight duty outside of his home base. The red H letter indicates that the hotel has not been reserved.
Once you click on the icon a Hotel booking pop-up window will open.
In the pop-up window it is possible to select:
- Hotel from the drop-down menu - this is a list of hotels from Airport Directory database - additional hotels can be added there
- Check-in & Check out times in UTC or BT
- Status of the reservation
- Crew members for whom the reservation was made
- Notes (at the moment visible in Report Wizard only)
The Timeline view indicates the hotel booking in the following way:
 - Hotel required
 - Hotel requested
 - Hotel confirmed
 - Hotel untouched
The hotel options are presented based as follow:
- Hotel booking, regardless of the status, always presented at the end of the day
- If the hotel is booked across the number of days, the H icon will appear on each day for which the hotel is booked, excluding the check-out date
The below screenshot represents the hotel booking for two crew members with the check-in on 17 Feb and the check-out on 19 Feb. The H icon appears at the end of each day on 17 Feb and 18 Feb, except the 19 Feb which is the check-out day.

If manual publication of drafts is enabled a pink background will appear indicating the change requires publication.
If you right-click on the hotel icon from the context menu you can choose from 3 options:
- Edit Hotel reservation - once selected you can amend the existing reservation
- Delete From Hotel Reservation - selecting will delete selected crew members from the booking
- Delete Hotel Reservation - selecting removes the entire hotel booking
If the crew, in a given time range, performs a series of flights ending at the same airport out of the home base, adding one hotel reservation for the selected timeframe will mark all hotel icons as booked. This saves the crew planners from adding a hotel reservation after each flight separately.
In a situation where the destination airport is different from the airport at which the hotel was originally booked (e.g.in a case of flight diversion) the required hotel icon will display in red.
Additionally, a new scope has been added to the Report Wizard section called Hotel Booking where it is possible to generate a report with hotel reservations and filter out hotel bookings by selected Airport and Status (untouched, requested, and confirmed).
Deleting duties

Leon allows to delete multiple duties across different dates and different crew members. Just hold Ctrl key select duties to be deleted and right click the mouse and select Delete Duties. You can also use Shift key to delete multiple duties for one crew member.
The process of deleting duties is very similar to editing duties:
- Right-click the mouse on a particular duty. A pop-up menu will open
- In a pop-up menu click on 'Delete duty' option. The confirmation question will display
- Pressing 'YES' will remove the chosen duty, 'NO' will switch off the validation.
Airport/Crew Discontinuity
Leon will now mark the flight block with a red zigzag line if the last airport of landing does not correspond with the next airport of take off. This will indicate that aircraft repositioning needs to be added. Analogical situation will happen with the crew section if the airports between last and next duty do not correspond. This will indicate that crew positioning needs to be planned between the two duties.
