Table of Contents
Crew
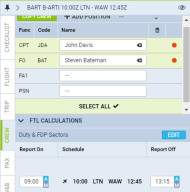
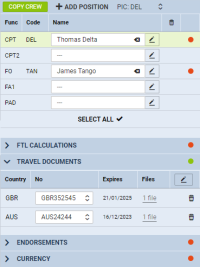
This panel allows you to add crew to the flight, add missing crew positions, check FTL calculations and verify crew passport's data.
The tab CREW is divided into 3 parts:
- Positions
- FTL Calculations
- Passports
Each part has a status dot on the right hand side. If the dot is red in either part, it means that the passport can be invalid or missing (Passport part), or there is FTL violation (FTL part). The dot by the Crew name is a representative of the two other dots. If either of them is red, the dot by the Crew name will turn red as well.
Adding new crew to Leon
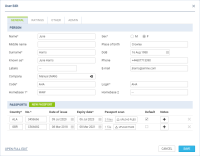
Adding new crew to Leon can be done from a tab CREW by clicking the icon ![]() placed right next to crew names.
placed right next to crew names.
In an User Edit screen you need to insert a few mandatory details, such as: Name, Surname, Code, Permission group, Login and Sex. All other details are optional.
You can also add passport details from this screen (1 or more) and attach a scan or number of scans.
Separate tab Ratings allows to add appropriate aircraft positions to each new crew.
The alternative ways of adding new crew to Leon are explained in Users chapter.
CREW TAGS
You can add Tags to your crew by editing their profile in the right-hand filter, tab CREW (click icon ![]() ).
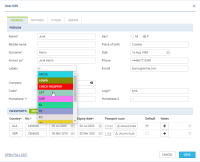
Here, when clicking on the field Labels you can select one - as long as labels have been defined in a section Phonebook.
).
Here, when clicking on the field Labels you can select one - as long as labels have been defined in a section Phonebook.
It is possible to add multiple labels and they can also be removed. Tags appear in a section OPS, in a column 'Tags', next to the right-hand filter.
Assigning crew to flights
If you click on any crew member's code in the Flights List Leon will open a tab CREW in the right-hand filter.
The tab shows all assigned crew along with not assigned positions (they can be defined in section Admin > Functions). It is possible to add missing crew positions by clicking + ADD POSITION.
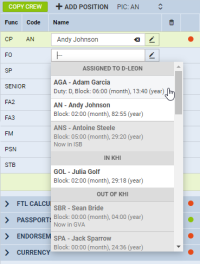
The crew part of the tab shows the position (CPT, FO, FA1, etc…), crew code (added in crew profile), the name.
To add a crew member simply click on the field and Leon will open a drop-down box with the available crew. On top, there are crew members assigned to an aircraft in the 'CREW' tab in the Settings > Fleet. Below, the crew at homebase, and below that (on a darker background) you can find crew out of homebase.
The information on the crew-belt contains (apart from crew code & name) current duty that the crew is assigned to in Crew Duties, monthly and yearly block time done so far by the crew.
In this section, you can also choose Pilot in Command (PIC). To do it simply click on PIC information. Leon will display other available assigned cockpit crew. Choose one of the pilots and click 'SAVE' to apply changes. Once PIC is selected, one will also be displayed in the COM column in the TABLE section of OPS.
When you remove a pilot flying as a PIC from the cockpit crew, Leon will switch the PIC code to the next highest rating, as per below:
- If CPT is assigned to a flight - CPT = PIC
- If only FO is assigne to a flight - FO = PIC
- If CPT is assigned to a flight on which FO was a PIC - - CPT replaces FO as a PIC
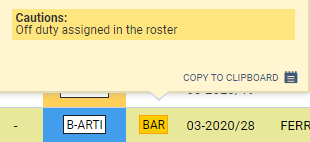
If a crew member has assigned an OFF duty in the roster (day off, holiday, sickness), Leon shows duty in name in red (tab CREW, when selecting crew member).

But even if the crew planner has assigned a crew member to the flight, who had already OFF duty added to the roster, Leon will highlight the crew code in yellow - as long as the Caution 'Planned crew on Off duty' is switched on in the 3-dots filter (top-right corner of the application).
Copying crew
When you add a multiple-leg trip to Leon from a section OPS > TABLE you don't have to add the same crew members by clicking one leg by one and selecting crew in a right-hand filter (tab CREW).
Right now Leon will automatically copy crew inserted to the 1st leg to the other legs, as long as the trip is on the same aircraft type.
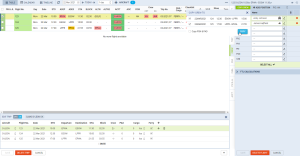
On the attached screenshot you can see that all crew members were added only to the first leg. The the other 3 legs were added and once the trip was saved Leon displayed the same crew for all 3 legs.
This option also works if you add a single leg with crew, save it and then after some time add more legs to that trip - Leon would also copy crew from the 1st leg to the other ones.
It is also possible to copy crew to the number of legs within one trip manually by using a button Copy crew (tab CREW, right next to 'Add position').
In order for this function to work properly certain conditions have to be met:
- EDIT TRIP in bottom panel - firstly you have to edit the trip. If the trip is not edited, upon clicking on 'Copy Crew' button you will receive the following message: “Only active in trip mode. Please click 'Edit Trip' in the bottom panel”.
- Aircraft type - at least one other leg has to have the same aircraft type as the edited leg. Leon will not allow you to copy crew to a leg with a different type assigned. It is possible to assign different aircraft type to one leg, however, they will not be suggested when copying crew.
You can still check FTL calculations before saving as Leon will recalculate FDP and duty times during the process.
'Do not fly with' list
A tab Other allows to select crew members with whom the edited crew member should not fly with (for whatever reasons). Click on the field and select person/persons from the list.
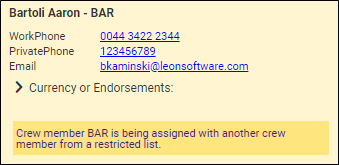
Once it is saved, when a crew planner has assigned crew with someone from a restricted list, Leon will show a caution (crew code highlighted in yellow) - as long as in the 3-dot filter (section 'Cautions') a checkbox 'Do not fly with' is marked.
FTL CALCULATIONS
The section FTL CALCULATIONS shows actual FTL data for assigned crew members, as well as their limits. The section is divided into 2 parts:
- Duty & FDP sectors, where you can see Report On, Schedule and Report Off values. This part can be edited to manually adjust reporting times, to apply a break (if possible) or to use FDP Extension.
- FTL Calculation Summary, where Leon shows details such as: Rest before duty, FDP, Duty, Rest after duty, Next EOBT plus cumulative duty, cumulative days off, number of FDP extensions used, etc…
Any FTL violation results in crew details turning red. A red 'X' also shows right next to the exceeded value.
Changing reporting times to a single crew
To change reporting times - Reporting On and Reporting Off - for a particular crew member:, click on the crew code and the tab CREW will open in the right-hand filter. Right below the crew code there is FTL CALCULATIONS panel - click on it to open FTL details section.
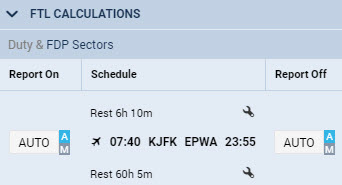
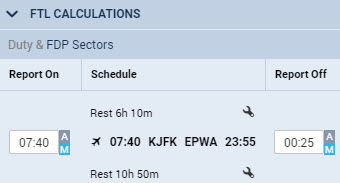
Leon shows Report On right below AUTO. To manually change it click on M icon and adjust it. If necessary do the same with Report Off time.
Changing reporting times for all crew
To change reporting times (Report On/Report Off) to all crew from default values to the manual value, go to the right-hand filter, tab CREW and click a link SELECT ALL. Here open a section FTL CALCULATIONS and click a button ![]() , then add new reporting times, which will apply to all crew.
, then add new reporting times, which will apply to all crew.
Once new reporting times have applied, if you add a new crew member to the trip, he will have those new reporting times assigned.
Using an option of manual split/merge defining by clicking the icon ![]() is not possible in a 'SELECT ALL' panel - it is possible ONLY when editing a single crew reporting times.
is not possible in a 'SELECT ALL' panel - it is possible ONLY when editing a single crew reporting times.
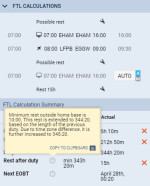
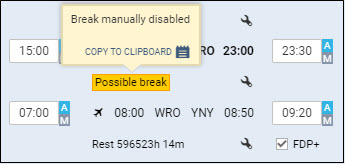
Any manual change in FTL Calculations section is highlighted in yellow (see example below). If you hover the mouse over highlighted part, Leon will show an information what has been changed.
Connecting and disconnecting sectors in FDP
It is possible now to connect and disconnect FDP sectors.
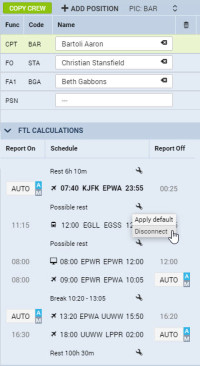
This functionality is located in FTL Calculations section in tab CREW.
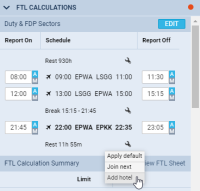
Here, you can see ![]() icon. When you click on this icon following options will appear, depending on the location of the icon:
icon. When you click on this icon following options will appear, depending on the location of the icon:
- Join previous - previous FDP is connected to the current one regardless of the break between the sectors.
- Join next - next FDP is connected to the current one regardless of the break between the sectors.
- Disconnect - this option applies only when there is Break scheduled or option for Possible rest
- Apply default - reverses changes to initial situation. You have to click on the same
 icon.
icon.
In order to divide Split Duty or Possible rest into 2 separate duties you need to use 'Disconnect' function. This function is only available if the difference between STA of the sector before break and STD of the sector after the break is 06:01h or more. If JL is entered, Leon calculates from BLON of the prior sector to BLOFF of the following sector after the break.
Manual switch for FDP extension
We have added a possibility of manually switching off and on the FDP extension.
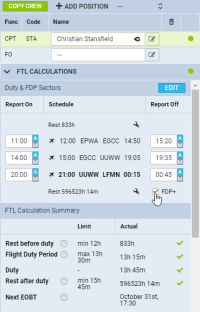
This option is located in the tab CREW in the 'Duty & FDP Sectors' of 'FTL Calculations'.
The FDP+ checkbox is displayed when FDP extension rules apply. If extension requires planning, 'FDP+' will only display when extension has been planned.
To activate the checkbox simply click on 'EDIT' button in the 'FTL Calculations' section.
The way the 'FDP+' checkbox works is very simple:
- FDP+ ticked - extension applies and is included in the FDP extension limits.
- FDP+ unticked - extension is disabled.
Hovering the mouse over the 'FDP+' will inform you of the current status of the FDP extension.
Using 'FDP+' automatically recalculates Max FDP Limit and does not require saving.
Manual Rest reduction
There are 2 modes of rest reduction currently available in Leon:
- Auto - rest reduction applied automatically depending on the FTL settings and calculations
- Manual - new mode allowing to decide whether the reduction should be applied or not. In this mode, the rest reduction is not applied by default
Manual Rest reduction can be enabled in Settings > Flight editing by ticking 'Require manual enabling of rest reduction' checkbox.
Once the checkbox is ticked, rest reduction does not apply automatically to the newly added flights. Instead, the Operator is switched from the 'auto mode' to the 'manual mode' and rest reduction is disabled by default.
In order to apply the rest reduction, you need to edit crew Duty&FDP sectors' subsection in the tab CREW > FTL CALCULATIONS (OPS view). Click on the ![]() icon depending on the place you'd like to apply the reduction to and choose one of the following:
icon depending on the place you'd like to apply the reduction to and choose one of the following:
- Force rest reduction - available in manual mode and clicking on it applies rest reduction
- Disable rest reduction - available both in manual mode as well as the auto mode. Available only if the rest reduction has been applied
- Restore rest reduction - available only in auto mode and only after the rest reduction has been previously disabled
'Add hotel' option in 'FTL Calculations'
This functionality applies to the Operators which have below regulation included in OM-7 regarding Rest at Home Base:
Minimum rest period away from home base during a rotation which includes a rest period at a crew member’s home base may be applied only if the crew member does not rest at his/her residence, or temporary accommodation, because the Airline provides suitable accommodation. This type of roster is known as “back-to-back operation”.
It is now possible to mark if the hotel (read: suitable accommodation) was used during the crew rest at Home Base. This will then equal rest period at Home Base to the one outside Home Base.
Applying it is quite easy:
- In a tab CREW > FTL Calculations section click on

- Click on
 icon after the last sector of the FDP.
 - Choose 'Add hotel' option from the dropdown menu.
'Add hotel' will recalculate the rest at Home Base and equal the minimum required to the value of min rest required outside Home Base, subject to preceding duty being shorter than min rest at Home Base.
After it is applied, the Rest figure in 'Duty & FDP Sectors' will be highlighted yellow and 'Hotel provided' information will display upon hovering the mouse.

Below are 2 examples of calculations including 'Add hotel' function:
Example 1.
- Minimum rest at Home Base is 12h or as long as the previous duty.
- Crew Duty ending at Home Base equals to 14h30min.
- Considering above, the required length of the rest after this duty is 14h30min.
- Adding hotel will not reduce minimum rest required at Home Base because it is longer than 12h.
Example 2.
- Minimum rest at Home Base is 12h or as long as the previous duty.
- Minimum rest outside Home Base is 10h or as long as the previous duty.
- Crew Duty ending at Home Base equals to 11h30min and rest after this duty equals to 11h55min
- Considering above, the required length of the rest after this duty is shorter than minimum rest required at Home Base (12h) and causes Rest violation.
- Adding hotel will reduce minimum rest required at Home Base to 10h (to equal min outside Home Base) but then it will extend it to 11h30min based on the length of the previous duty.
PASSPORTS
By editing the crew profile you can add passports to his/her profile. In a column 'Default' you can mark which passport should be used as default.
In a tab CREW, section 'Passports', it is possible to select a different passport for departure & different for arrival. Selected passports will appear on the Crew Tripsheet document (as long as in Documents Manager it is properly set up) and on the Handling Requests sheet.
Default passport is displayed automatically. By clicking the + icon you can select another passport, which should be used for arrival, or you can use the ![]() icon to remove the default passport for departure and change the order.
icon to remove the default passport for departure and change the order.
If the passport is expired the expiry date, as well as the status dot, will both turn red. You can add a new passport, edit and amend passport details by clicking on the ![]() icon. Here you can also add scans to the relevant passport as well as edit some of the person's information such as Favourite, dislikes, and Important information. You can also add and remove Labels.
icon. Here you can also add scans to the relevant passport as well as edit some of the person's information such as Favourite, dislikes, and Important information. You can also add and remove Labels.
If the passport is set as unavailable, the status dot will be red, and the expiry date will be N/A. The tooltip of the status dot will show you the explanation, that the selected passport is currently unavailable.
It is possible to upload multiple scans/files to the passenger's passport section. If the scans are uploaded, the link to the scan will appear in the Files column in the 'TRAVEL DOCUMENT' details.
VISAS
To add a visa for the crew, edit crew profile, click a button  and add visa's details:
- Passport - select a passport to which a new visa should be added
- Country - select a country which concerns the visa
- No. - insert visa's number
- Number of entries
- Max number of entries
- Date of issue - insert visa's date of issue
- Expiry date - add visa's expiry date
- Visa scan - option to upload files
- Notes - possibility to insert additional notes

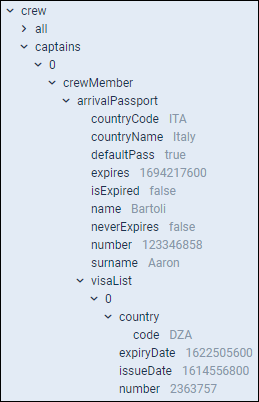
Adding details of visas to OPS documents (Trip Sheet and Gendec), can be obtained from Documents Manager panel, by using items under visaList.
CERTIFICATES
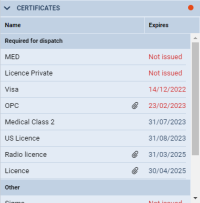
This section shows all certificates of the selected crew member with certificates names and expiry dates. The panel is divided into 2 sections:
- Required for dispatch - all certificates with marked checkbox 'Warn if expired when adding a flight' in a section Settings > Crew Endorsements. The dot color shows the state of the validity of these endorsements.
- Other - all certificates without a checkbox 'Warn if expired when adding a flight' marked - their expiration does not affect the color of the dot.
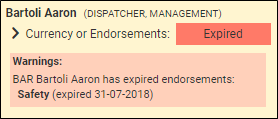
Leon will highlight a crew code in red in OPS if there are any expired certificates required for dispatch - hover the mouse over a crew code to see details.
The staple icon shows if a certificate has a file attached. For more information regarding Crew Endorsements check THIS CHAPTER.
AIRPORT RECENCY AND FAMILIARIZATION
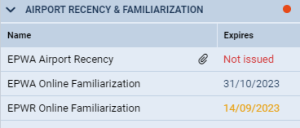
This section shows the validity of the 'Airport recency' and 'Online familiarization' requirements for the airports included in the Schedule.
The section is divided into 2 columns:
- Name - Name of the training required including the airport code
- Expires - validity date and status
The status is indicated by the color in the 'Expires' column:
- Red - indicates expired training or training that was never issued (missing the expiry date)
- Orange - indicates the training that is due to expire within 30 days
- Black - indicates valid training with an expiry date of over 30 days
The dot indicates the status of the validity of the training and is included in the dot indicating the Crew's overall status in the tab 'CREW'
ACKNOWLEDGEMENTS
The 'ACKNOWLEDGMENTS' subsection indicates whether the crew member has familiarized himself/herself with the changes to flight duties.
The changes are indicated on the mobile device by displaying a push notification. More information about mobile push notifications functionality can be found here.
The 'ACKNOWLEDGEMENT' displays 3 statuses:
 - notification sent
 - push notification received by crew but not familiarized with
 - familiarization confirmed
CURRENCY
Crew currency section shows information about the number of take-offs & landings performed by a particular pilot within a pre-defined period of time.
Leon shows the name of the currency (previously turned on in a section Settings > Crew Currency) along with the expiry date.
For more information regarding Crew Currency click on THIS LINK.
IMPORTANT!
Vaccinations
Vaccinations section lists the diseases against which the Crew have been vaccinated.
These are the details inserted in the crew profiles > 'Vaccinations' subsection.
It contains the following details:
- Name of the disease
- Indication of attached file (
 icon)
icon)
Clicking on ![]() icon will display the link to the file attached in the crew profile. It is possible to click on the file and preview it.
icon will display the link to the file attached in the crew profile. It is possible to click on the file and preview it.
