Checklist Configuration section allows activating an option to connect and send checklist item emails.
This section can be accessed in the ‘Admin’ panel by clicking on the ‘Checklist Configuration’ icon:
Checklist Configuration view
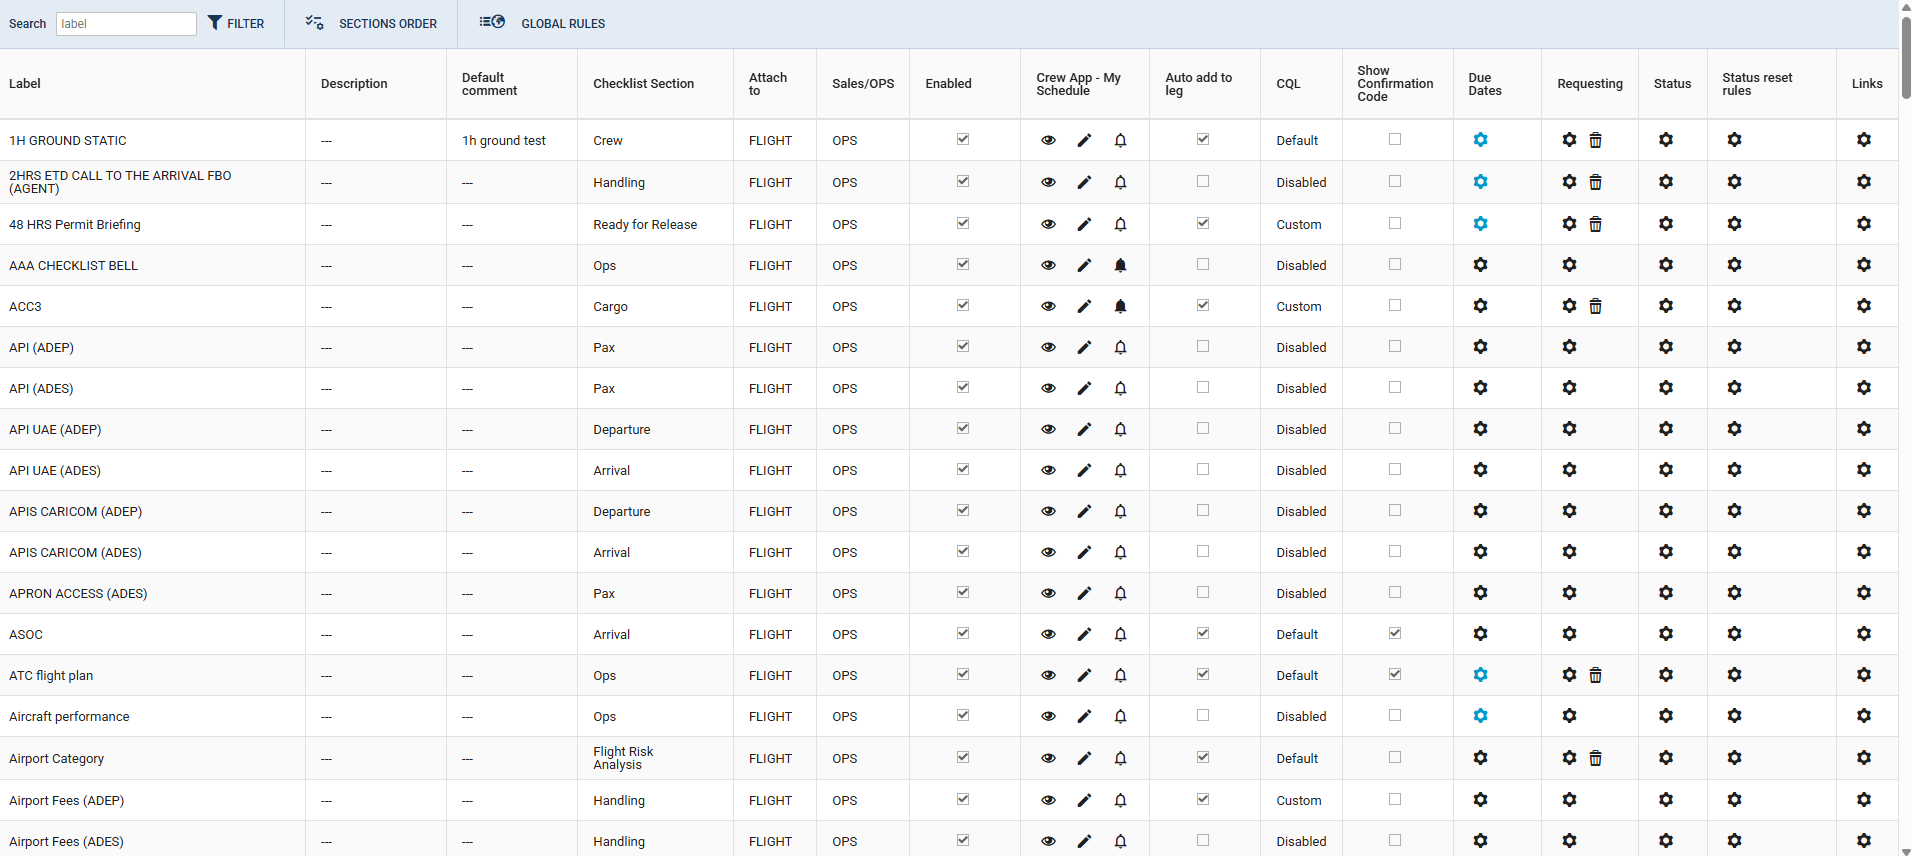
The ‘Checklist Configurations’ page contains the following options:
-
Search - option to quickly search for the specific checklist item
-
FILTER - option to filter checklist items list by:
-
Enabled only - allows displaying only the enabled elements of the Checklist
-
Type - filtering by group of the Checklist: OPS, Sales, or All (default value)
-
Attach to - filtering by type of the element of the checklist: assigned to a flight or a trip, or displaying All the elements (default value)
-
-
SECTIONS ORDER - option that allows selecting the order of subsections in the OPS Checklist. More information below
-
Checklist items table divided into following columns:
-
Label - checklist item name. The default checklist item name can be changed to the custom name. To change the name a User needs to click on the

-
Description - option to insert a full description of the item. Once inserted, it will be available in the checklist when hovering over the ? next to the item name
-
Default comment - this applies to the ‘Note’ under the checklist item. The default comment inserted will appear under this item when the flight is created and the checklist item added automatically or manually (ADD ITEM) to the flight
-
Checklist Section - a subsection of the checklist where an item is placed
-
Attach to - indicates whether it is an item assigned to a single flight or the whole trip
-
OPS/Sales/Flight Care - indicates whether it is an OPS,Sales or Flight Care Checklist item
-
Enabled - allows marking an item as used. If this checkbox is unmarked, the item is not available in the ‘ADD ITEM’ section of the Checklist and it is moved to the bottom part of the list within the ‘Checklist configuration’ section
-
Crew App - contains following settings options:
-

-

-

-

-

-

-
-
Auto add to leg - option to mark the default checklist items. This option has been moved across from the ‘Flight Editing’ section. If it‘s ticked, the item will be automatically added if the condition set in CQL is met.
-
CQL - Checklist Query Language - it allows to define a condition for adding the item automatically to the checklist.
-
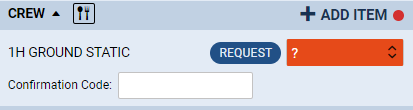
Show Confirmation Code - a field to add the confirmation code to checklist items.
-
Due Dates - possibility to configure the ’Request Due Date’ and the ‘Completion Due Date’ for selected checklist items at selected airports.
-
Requesting - activating/deactivating the checklist email configuration:
-

-

-
Empty – checklist item email configured by default
-
-
Status - section that allows editing and changing the statuses of the Checklist item
-
Status reset rules - possibility to select the items of the schedule that trigger the change of the checklist item status
-
Links - an option to add URL links to selected items
-
SECTIONS ORDER
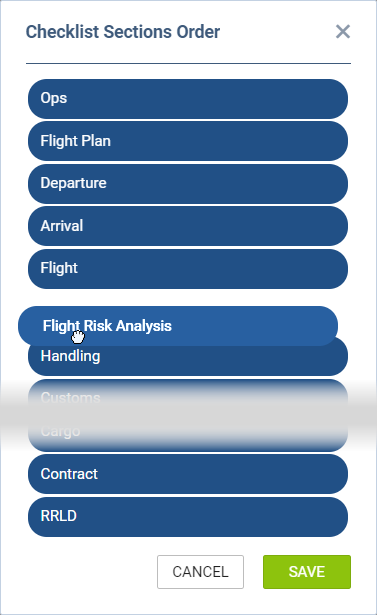
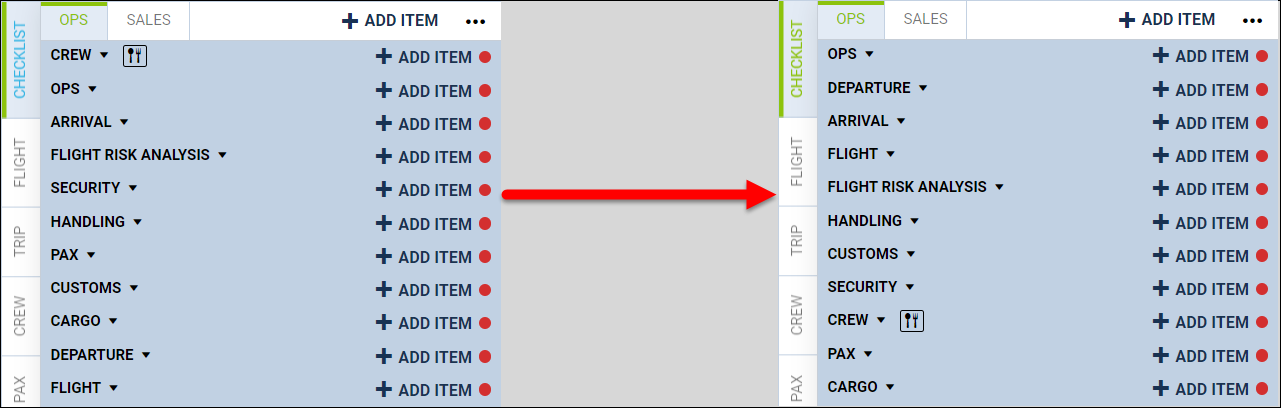
It is possible to change the OPS Checklist sections order from the default to custom.
This can be done using the following steps:
-
Click on the

-
Use drag-drop to select the order of the checklist
-
Save changes
Once the changes are saved, the order of the checklist will switch to the custom, selected order, as per the below example:
Checklist item description
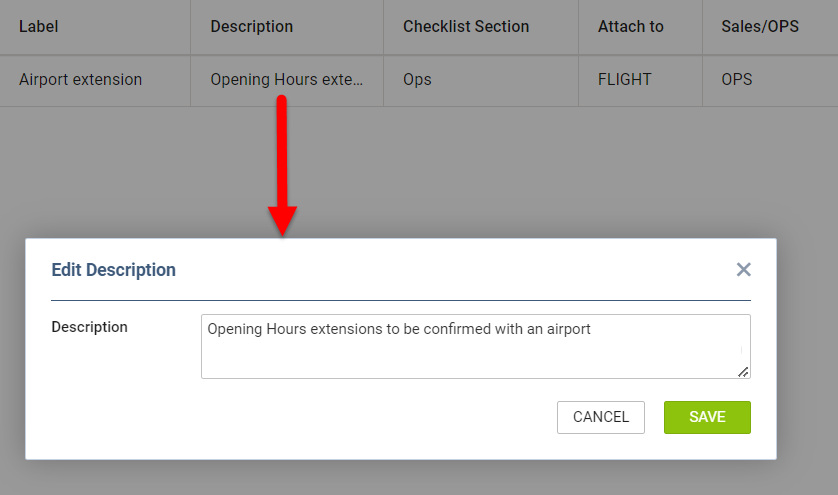
It is possible to add a Checklist item description that appears by the item in the Checklist.
In order to add the description you need to:
-
Click in the ‘Description’ column next to the checklist item
-
Add the description
-
Save changes
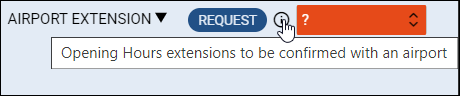
Once the description is added, the 
Hovering the mouse over the icon displays the tooltip with the description
Checklist Section
When clicking on a section defined for a particular Checklist Item in the ‘Checklist Section’ column there is a possibility to change it.
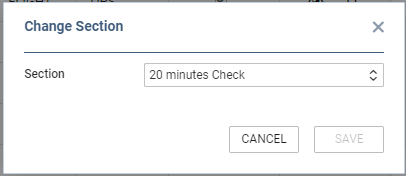
For this purpose, the new section needs to be selected from the dropdown list in the ‘Change Section’ window.
After saving the change will affect all flights.
Hiding Checklist items
This feature allows hiding the OPS and Sales Checklist items that shouldn‘t be used in operations. After unmarking the checkbox in the ’Enabled’ column the item will not be available to be added automatically or manually to the Checklist.
Disabled items will be visible at the bottom part of the Checklist Configuration.
CQL (Checklist Query Language)
CQL is a simple but very expressive language for defining conditions that determine when particular checklist items are to be applied. It allows the translation of the operator‘s internal knowledge and operational needs into simple rules by specifying all actions (checklist items) needed to be done before a flight with certain attributes.
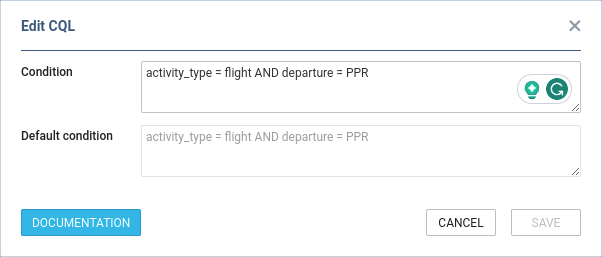
The ’CQL’ column will show the current status of the conditions for adding the items to the checklist automatically. There are three possibilities:
-
Disabled - the item is disabled and will not be automatically added to the checklist in any case
-
Default - the item is enabled and the default condition for adding the item to the checklist automatically is set
-
Custom - the item is enabled and the custom condition for adding the item to the checklist automatically is set
By clicking the field in the column, you will get an ‘Edit CQL’ window, in which you can:
-
Edit the condition - if the condition is met and the item is enabled (‘Auto add to leg’ is ticked), the item will be added to the checklist automatically. Otherwise, it will not be added automatically but can be added manually
-
See the default condition - to compare with the custom one, or restore it
-
Get access to CQL documentation, which describes the operators, fields and values which can be used to define the condition
Show Confirmation Code
The ‘Show Confirmation Code’ checkbox enables adding a free-text (digit) field under any chosen checklist item. If marked, a ‘Confirmation code’ field will be available and editable in OPS view under selected item.
Due Dates
The ‘Due Dates’ option gives a possibility to configure the ‘Request Due Date’ and the ‘Completion Due Date’ for selected checklist items for selected countries or at selected airports.
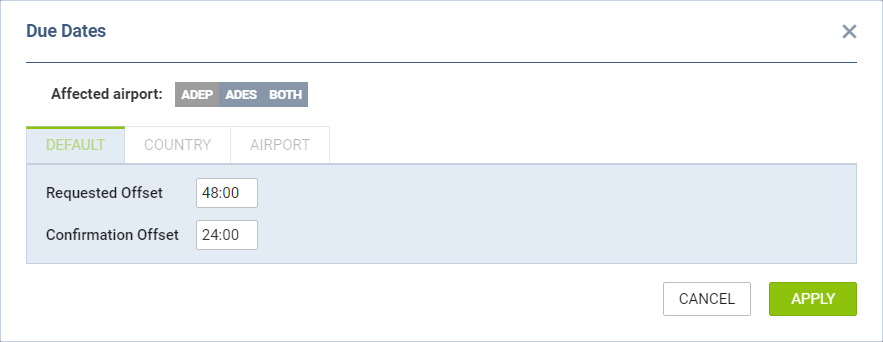
The ‘Due Dates’ section is divided to 3 tabs:
-
Default - default threshold
-
Country - threshold based on the country
-
Airport - threshold based on the airport
Configuration
Below, is an example of the configuration based on the specific Airports.
In order to configure ‘Due Dates’ you need to follow the below process:
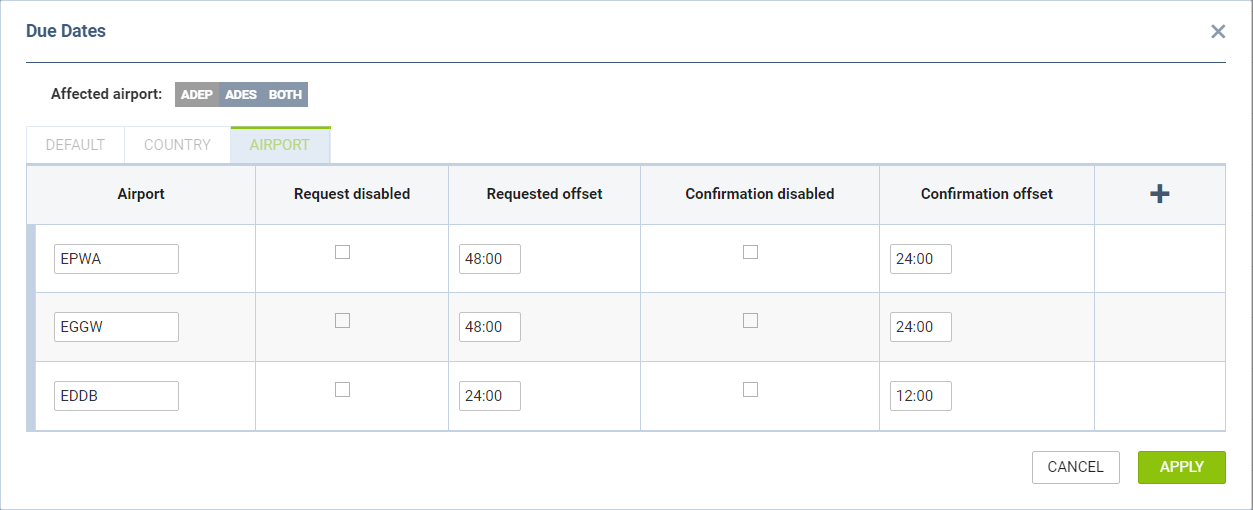
Click on
-
Affected airport: ADEP/ADES/Both - indication of whether the configuration should apply to ADEP only, ADES only or both airports on the flight
-
Airport - airport code of the affected airport
-
Request disabled - option to disable 'Requested offset'
-
Requested offset - option to indicate how many hours before the flight, in HH:mm, the item status should be requested
-
Confirmation disabled - option to disable ''Confirmation offset'
-
Confirmation offset - option to indicate how many hours before the flight, in HH:mm, the item status should be confirmed * + - clicking on + will add a row on the list of airports * Press 'APPLY' to save the settings * The icon in the 'Due Dates' column will turn blue once the settings are saved - {{:leon:settings:checklist-conf:due_date_-_setup_condirmed.png?nolink|}}
Clicking on the 
How it works
Once the ‘Due Dates’ are configured, the clock icon becomes available in the OPS sections. It is located in the top bar of the OPS section, next to the ‘Message Center’ icon:

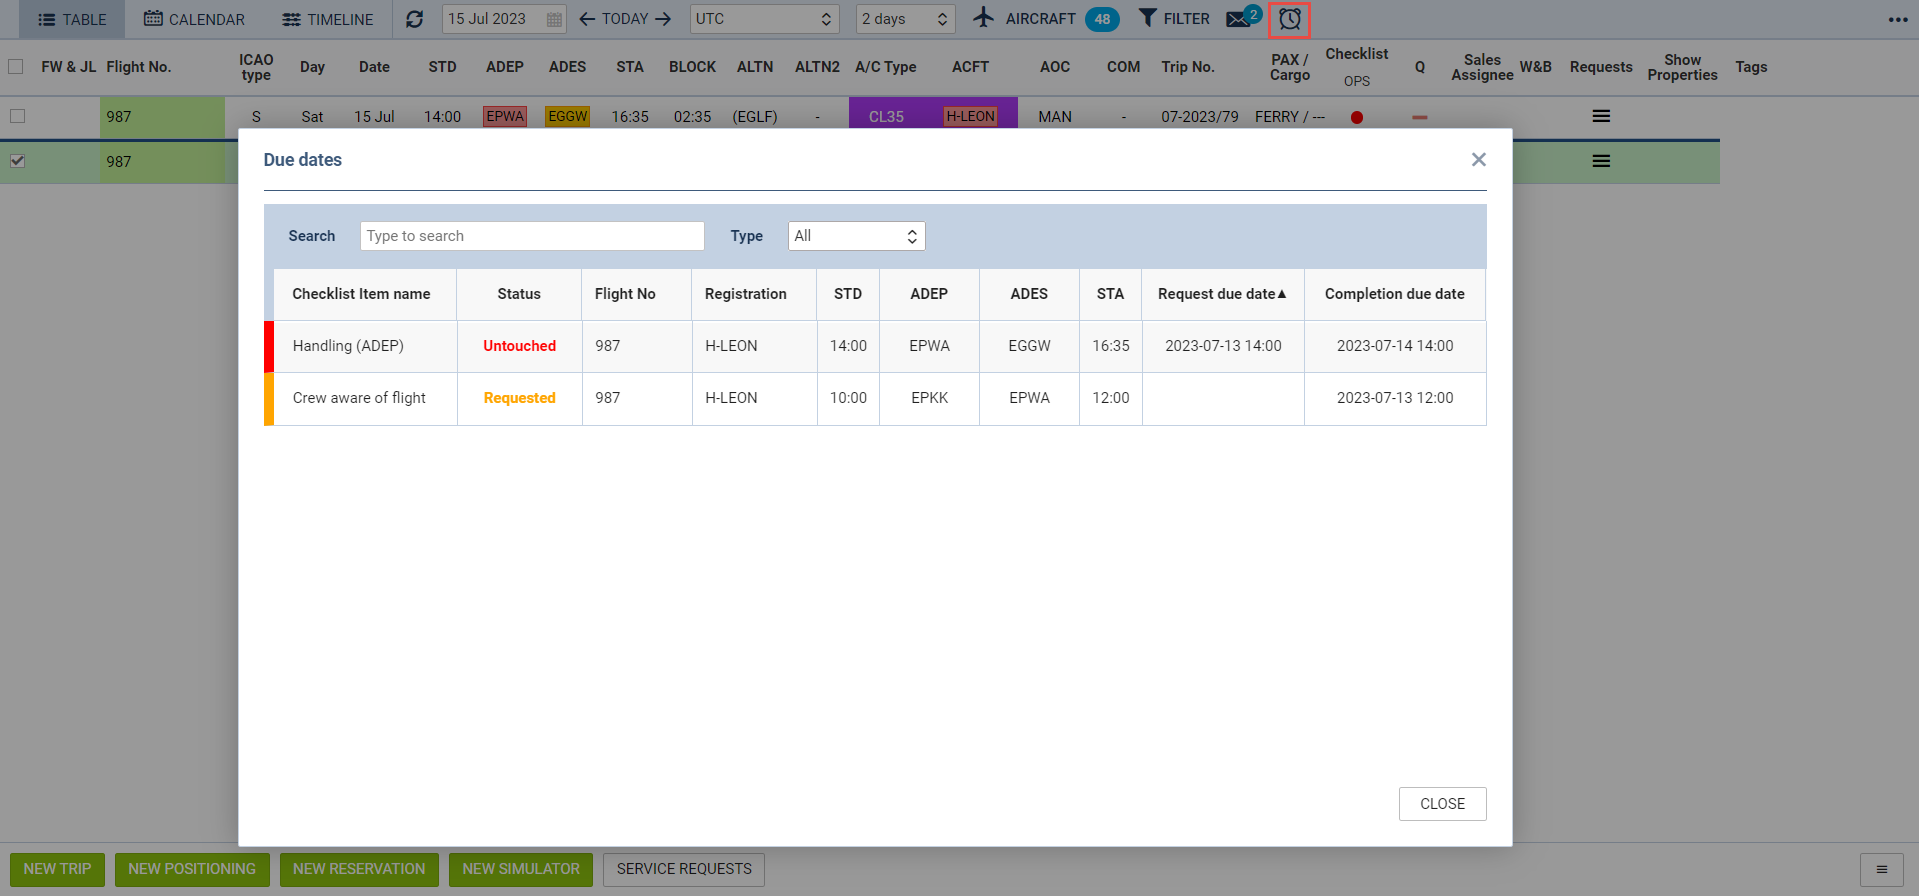
Clicking on this icon opens the ‘Due Dates’ pop-up window that contains:
-
Search - option to search for the specific checklist item
-
Type - option to select the type of the checklist item between OPS and Sales
-
List of items - any items that require action are listed along with the checklist item status, flight details and the Request/Confirmation due dates. The bar color on the right of the item indicates the checklist item status
The items are included in the list based on the ‘Due Dates’ configuration and the status in the checklist.
EXAMPLE
Below there are 2 examples presented:
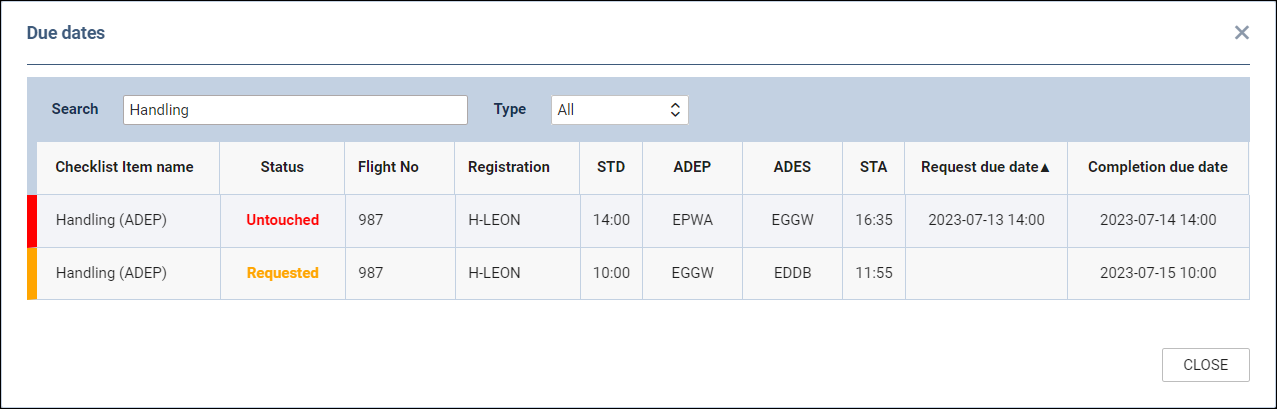
Item requested
Once the checklist item is requested, the status in the ‘Due date’ pop-up window changes to the relevant status for this item. In case of the ‘Handling (ADEP)’ item the status is ‘Requested’.
Additionally, the ‘Request due date’ is removed.
Item confirmed
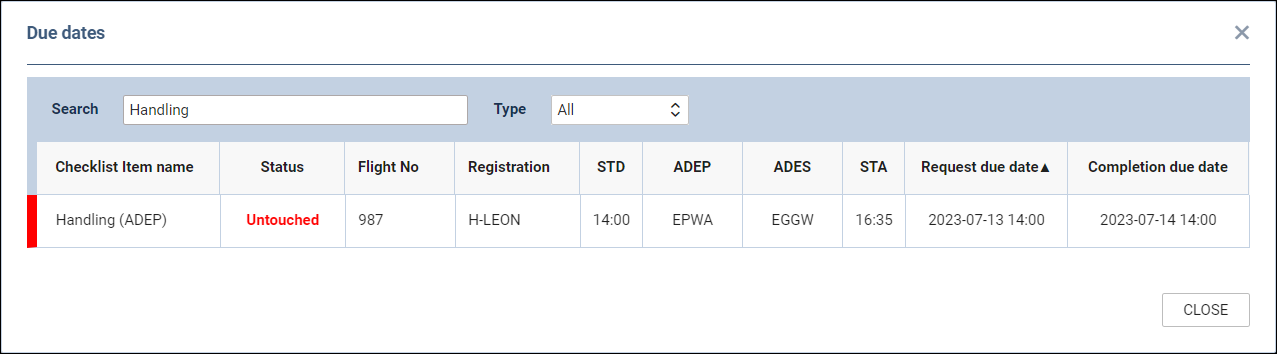
Once the checklist item is confirmed, the item is removed from the ‘Due Dates’ pop-up window.
Configuring emails
The checklist item emailing option can be configured by accessing the ‘Edit Email Configuration’ window via
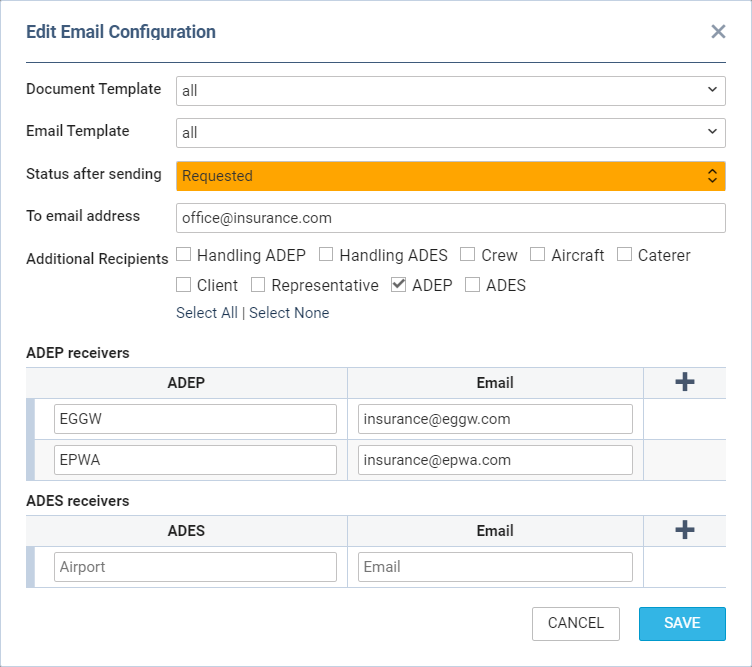
The ‘Email Edit Configuration’ window contains the following:
-
Document Template - an optional setting that contains the selection of the documents set up in the Documents Manager and based on the ‘Checklist Leg Item Document’ template or the ‘Checklist Trip Item Document’, depending on the Checklist item being applicable per leg or per the whole trip. If no documents are set up, the selection is set to ‘none’
-
Email Template - an optional setting that contains the selection of the emails set up in the EMAIL TEMPLATES and based on either the ‘Checklist Leg Item Email’ template or the ‘Checklist Trip Item Email’, depending on the Checklist item being applicable per leg or per the whole trip. If no emails are set up, the selection is set to ‘none’
-
Status after sending - required field. Allows selecting the default status after sending an email in the Checklist
-
To email address - fixed email address that appears in the ‘Request’ email pop-up window in the Checklist
-
Additional Recipients - an optional group of recipients of the Checklist emails
-
ADEP/ADES receivers - additional email for specified airports triggered by the ADEP/ADES checkboxes selection in the ‘Additional Recipients’ subsection. These emails are sent as a hidden copy
The SAVE button allows saving the ‘Checklist Configuration’ settings.
Once it is saved, the REQUEST button will appear in the Checklist, next to the item status. The status of the item will change to the selected one in the configuration:
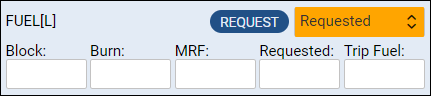
Status
This option allows to update the Checklist item statuses on the existing Checklist Items.
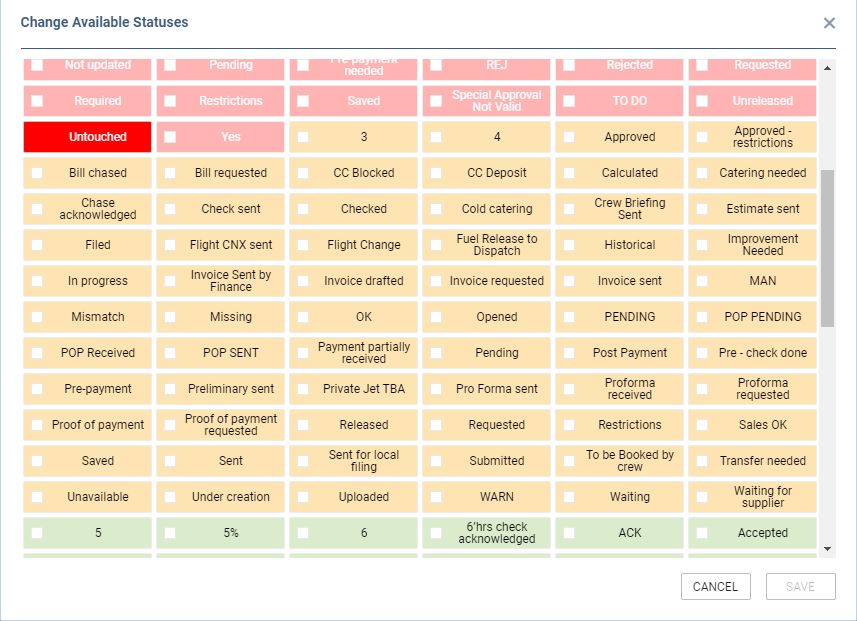
Clicking on the toggle icon in the ‘Status’ column will open a ‘Change Available Statuses’ window.
Here admins can select which statuses should be available for a particular Checklist item. Stuses are separated by colours that affect the Checklist dot:
-
Green
-
Orange
-
Red
-
Grey
The following rules apply:
-
Statuses applied to the item are displayed in full colours
-
Statuses that are not active are displayed in dimmed colours
-
Required statuses do not have the checkbox and will be available on the items at all times
Status reset rules
Click on the gear icon to set up which changes should trigger selected checklist item‘s status will turn to red ’?’
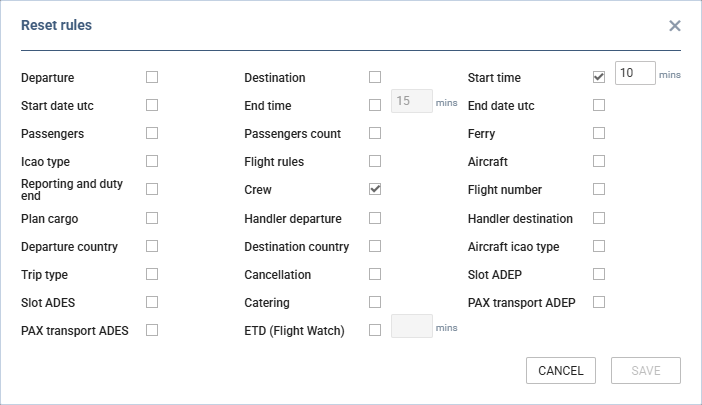
Items ‘Start time’ & ‘End time’ are editable (when checkbox is marked) - it is possible to define number of minutes where Leon should not change item’s status.
For example, if 00:30 is inserted into ‘Start time’ item, if STD of the flight is changed by less than 00:30 - Leon will not change item’s status.
URL LINKS
A new functionality LINKS has been implemented in the section Checklist Configuration section.
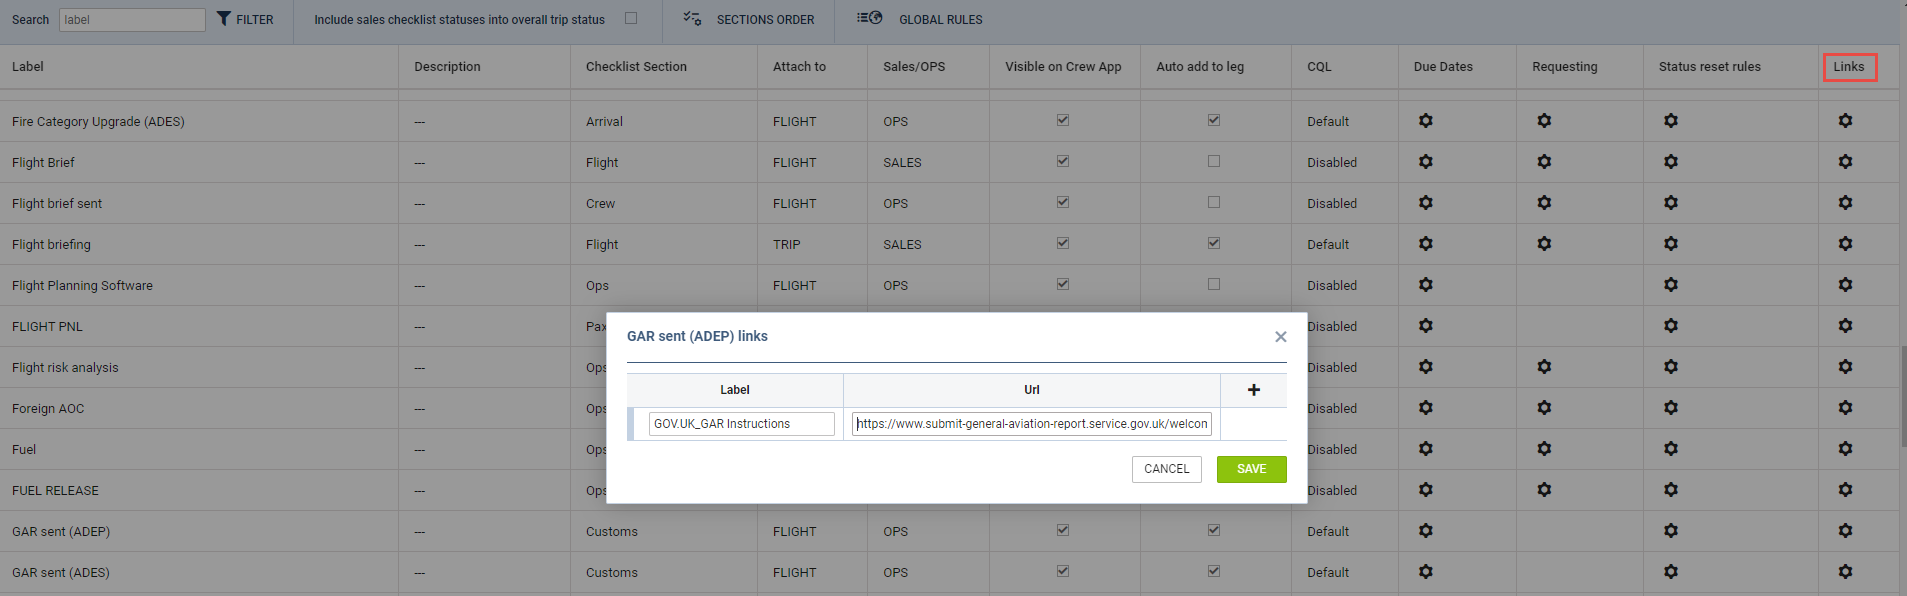
To activate it, go to the ADMIN panel section ‘Checklist Configuration’ section, and choose a checklist item where you would like to add a URL link.
In the pop-up window, insert the name of the link in the label field and paste the URL link in the designated field. You can add multiple links several using the + icon.
After saving, the link will be visible in the OPS module within the checklist section. The link will be active.