

JOURNEY LOG
This panel allows to set up Journey Log list of items, which will show in the OPS section.
The Journey Log configuration panel contains the following options:
-
FILTER - allows filtering and searching for specific Journey Log items in the list
-
Additional settings - list of additional settings that contains the following options:
-
Allow not completed JL to be entered - this option allows to add partial Journey Log. Partial Journey Log is a Journey Log that only includes the timeframes, ie BLOFF, T/O, LDG, BLON, without having to fill in other required Journey Log fields
-
Automatically update visa entries - this setting allows indicating the usage of Visa and, if the Visa matches the country of arrival of the crew, it will recalculate the number of Visa entries in the crew profile. Journey log has to be inserted on the flight
-
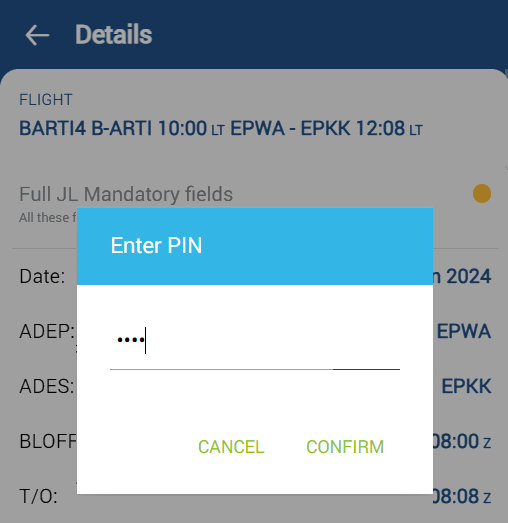
Confirm JL entry using PIN - this setting will allow setting up a PIN in the User Profile. This PIN can be used to confirm the JL entry in the Crew App.
-
Fuel density (JET A-1) - default fuel density for Jet A-1 fuel
-
Fuel density (AVGAS) - default fuel density for AVGAS fuel
-
Keep JL files - option to select the number of days after which the files uploaded to the Journey Log should be deleted. If the field is left empty, the uploaded files won't be deleted. The setting is effective at most for flights up to 3 days older than the value entered
-
Close JL automatically after - option to set an automatic closure time of Journey Log. If it's set to for example 2 hours, the Journey Log (provided all required fields are completed) will be automatically closed 2 hours after the last data modification. If a user with the necessary permission reopens the Journey Log, they will be able to make changes within a 2-hour time window, after which the system will automatically close the Journey Log again. Once the JL is closed, it will be impossible to edit both JL and the Flight Watch.
-
-
Changes history - opens a pop-up window with history of changes made to the Journey Log fields configuration.
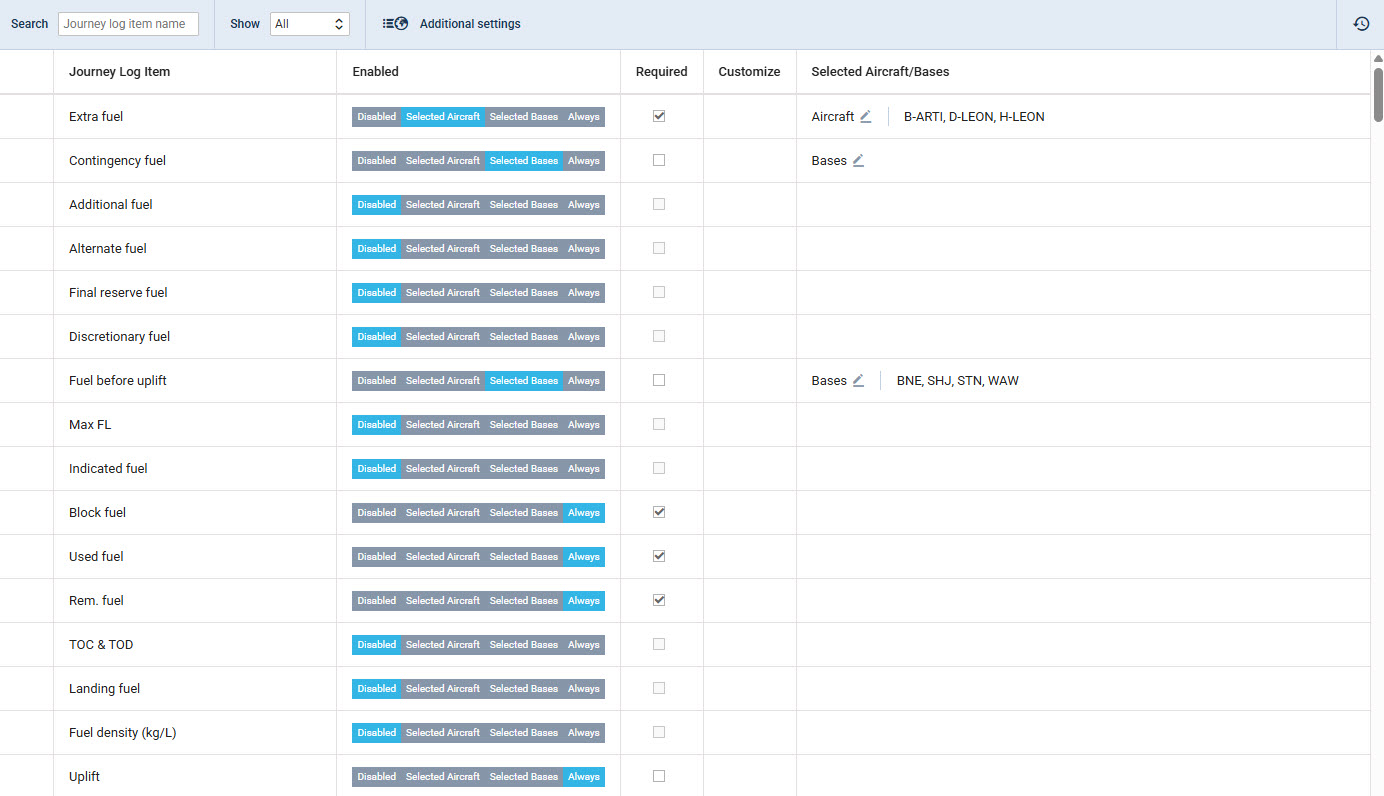
The main view contains the following columns:
-
Journey Log Item - list of available Journey Log items. For a complete list of all fields and their descriptions, refer to the Journey Log - available fields page.
-
Enabled - contains the following 3 options:
-
Disabled - the item does not apply to the Journey log
-
Selected Aircraft - allows selecting the aircraft registration in the 'Selected Aircraft' column to which the selected item should apply.
-
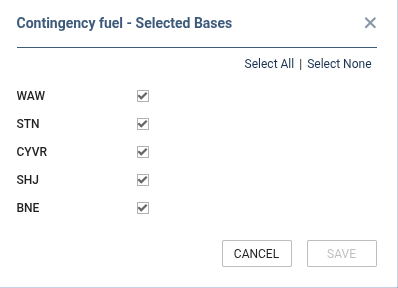
Selected Bases - applicable to the Operators with multiple bases set up in the Admin Panel > General settings
-
All Aircraft - the selected item will apply to the JL on all Aircraft
-
-
Required - selecting the items that will be required for the Journey Log to be considered as a Full Journey Log (green dot in the OPS TABLE view). If an item is selected as required it will be moved from the 'Optional Items' section to the 'Mandatory items' section in the Journey Log
-
Customize - some items, such as Night Time or Instrument Time, can be configured to select a calculation method. It is possible to select manual input as well.
-
Selected Aircraft/Bases - applies only if either ‘Selected Aircraft' or the 'Selected Bases’ option is activated in the 'Enabled' column. Clicking on the icon allows choosing the aircraft registration or the base, depending on the selection, to which the Journey Log item should apply.
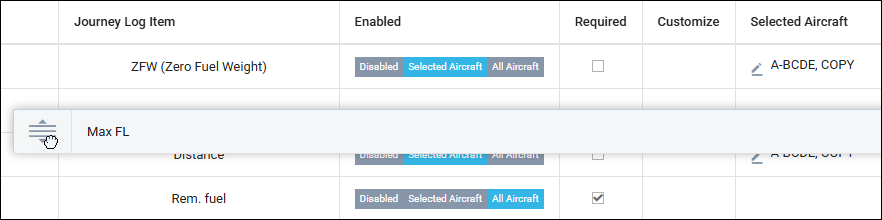
It is also possible to change the order of the items by dragging and dropping them on the list.
Changes history
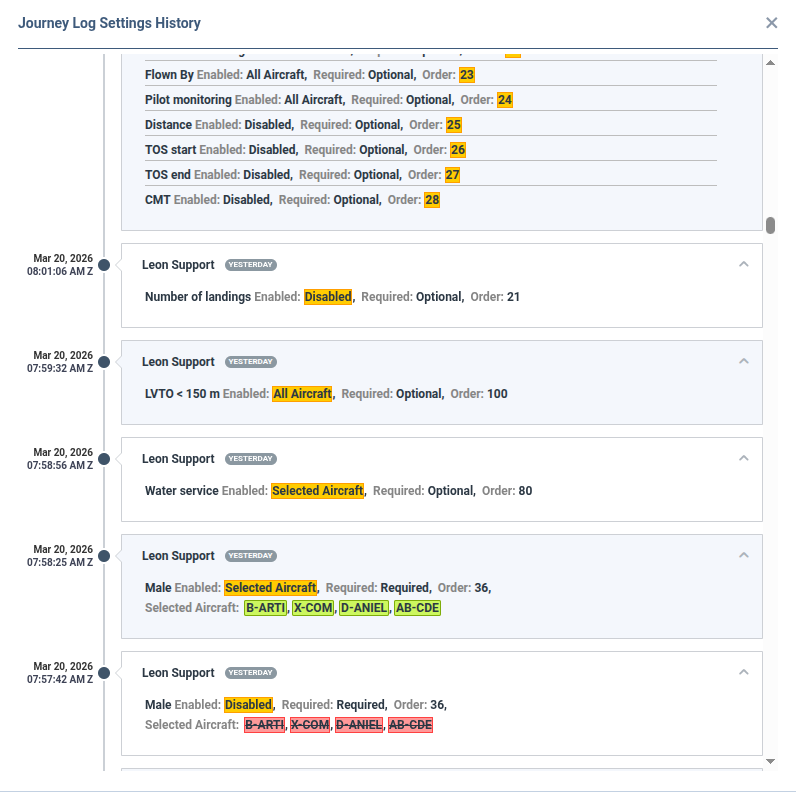
This panel allows you to review all past changes made to the Journey Log configuration. To open it, click the Clock icon located in the top-right corner of the Journey Log configuration view:

What the history shows
Each entry in the history panel includes:
-
Date and time of the change
-
User who made the change
-
List of modified items — only items that were actually changed are shown. For each item, the entry displays:
-
The field name
-
The enabled status at the time of the change: Disabled, Selected Aircraft, or All Aircraft
-
The aircraft registrations assigned to the item (only shown if the status was Selected Aircraft)
-
The required status - either optional or required.
-
Item order
-
Confirm JL entry using PIN
The Confirm JL entry using PIN allows restricting the Journey log entries in the Crew App to these Users who have the PIN set up in the profile.
Configuration
To configure this functionality the following steps are required:
-
Go to the 'Admin Panel' > 'Journey Log' and open 'Additional settings'
-
In the 'Additional settings' check the Confirm JL entry using PIN option
-
Go to the logged-in User profile where the Crew app auth field will be available. This is the field where that authorization PIN can be set up. The PIN should consist of 4 digits.

The PIN can be easily changed by going to your own profile and setting up a new PIN.
How it works
Once the functionality is configured, the PIN will be required in the Crew App at any time whenever a User is trying to save the Journey Log in the Crew App.
This functionality only applies to the Journey Logs inserted via Crew App.
Overview
Journey Log elements can now be configured to appear only for flights operated from specific bases (offices). This adds a new layer of targeting — complementing the existing per-aircraft setting — so operators with multi-base operations can define precisely which elements are relevant at each location.
What's New
Per-Base Assignment for JL Elements
Each Journey Log element in Admin Panel > Journey Log can now be assigned to one or more operational bases. When a base is selected, the element will appear in the Journey Log only for flights departing from (or assigned to) that base.
This setting is independent of the per-aircraft configuration — both filters can be used on the same element at the same time.
How the base is determined
Leon uses the following priority when evaluating which base applies to a given flight:
-
Base set on the flight — if a specific base is assigned directly to the flight, that base is used.
-
Base set on the aircraft — if no base is set on the flight, Leon falls back to the base configured for the aircraft.
If neither is set, the element is evaluated using the standard per-aircraft logic only.
Configuration
-
Go to Admin Panel > Journey Log.
-
Find the element you want to configure, then click it to open its settings.
-
In the element's configuration panel, locate the Bases field.
-
Select one or more bases (offices) for which this element should be active.
-
Save the changes.

Note on deleted bases: If a base is removed from the operator's configuration after being assigned to a JL element, it will still appear in the element's settings marked as *** (Deleted). The assignment remains in place but does not affect flight visibility. You can remove it manually by editing the element's base list.
When bases are configured for a JL element, changes are recorded in the Journey Log Settings History, including the list of selected bases.

Why It Matters
-
Multi-base operations: Different bases may have different operational requirements or local regulatory needs. Per-base filtering ensures that crews see only elements relevant to their location.
-
Cleaner JL forms: Reducing irrelevant fields improves data quality and speeds up Journey Log completion.
-
Flexible targeting: The combination of per-aircraft and per-base conditions covers complex fleet/base setups without needing duplicate element definitions.
Late booking, Shared flight and transport notes
Four items let you record commercial and ground-handling details directly on the flight:
-
Late booking — a checkbox marking flights sold at short notice.
-
Shared flight — records which client the flight was shared with. The list is taken from your Phonebook and contains online clients only. In the mobile app this field is skipped in offline mode.
-
PAX transport note — a free-text note with the details of passenger ground transport. It complements the existing PAX transport checkbox, which records only whether transport was arranged.
-
Fuel payment note — a free-text note describing how the fuel uplift was paid for, for example a fuel release, a credit card or a fuel card.
Enable them in Admin Panel > Journey Log like any other Journey Log item. All four are available in Report Wizard in the Flight scope; for Shared flight, both the client name and the client's known as value can be reported on.
For notes on crew accommodation and crew catering, use the existing Crew HOTAC notes and Crew food notes items.